In the process of finishing work, putty is very often used. This material allows you to align the walls, with their subsequent painting or gluing wallpaper. An important role in the process of putty is the proper preparation of the mixture. It is important to consider the proportions that are most often indicated on the labels from the manufacturer. And if you do not take into account some of the details, then as a result it may affect the quality of work. From this article, you can learn the details of how to properly dilute the putty.
Types

Although the kneading process may seem simple and is most often trusted by ancillary workers, there are many subtleties that need to be taken into account. For example, today there are several types of putty that are used for certain finishing works.
All types of putty, this is a fine mixture, characterized by its consistency. It can be based on polymers, gypsum, cement. Accordingly, this affects the way they are prepared and the scope of use.
Cement

This type of putty is an excellent tool for removing wall irregularities, drops and cracks. It can be applied both in wet and in dry rooms. For example, a cement-based mixture is used for the walls of building facades. In general, it is divided into the following types:
- decorative;
- base;
- front;
- heat insulating.
Its scope:
- Unheated rooms, for example, summer cottage, garage.
- Pools and showers.
- Bathrooms.
- For finishing concrete, brick and stone surfaces.
It is produced in two types: liquid and dry. For example, dry requires mixing to achieve the desired consistency. After drying, it does not crack, and also has good adhesion. But this is achieved only through proper preparation and application. As for the liquid, it is sold in plastic containers. Its use is associated with some risks. So, after drying, it decreases in its volume. When applied to the wall of a thick layer will appear cracks. Preferably, the cement based putty is gray.
Gypsum

This type is more often used for interior decoration. It is applied to the wall for wallpaper and painting. Gypsum plaster has a pleasant snow-white color. If the room is high humidity, then unlike cement it can not be applied. Therefore, its use is possible in dry rooms where there is heating. Usually it is a bedroom, hall, hallway, sometimes it is applied in the kitchen.
Polymer

As regards polymer putty, it can be applied only for interior decoration. She is highly elastic. Due to the contained polymers in its composition, it is characterized by durability and high strength.
Among other things, putties are dry (starting and finishing) and liquid. If we talk about the finish, it consists of small grains. Due to this, the surface of the wall, after its application and grinding, becomes smooth and perfectly even. If we talk about the starting mixture, then it can be applied in a thicker layer. Therefore, it is used to align the walls and seal cracks. It consists of large grains, which reduces the likelihood of its shrinkage after drying. Also on sale can be found leveling compounds, often used for the initial puttying (starting). Such mixtures have high strength.
Universal have properties of starting and finishing mixes. They are used for walls that do not have obvious defects that require alignment.
Considering these features, we suggest that you familiarize yourself with the methods of preparing these compounds.
Preparation of starting putty
 Kneading process
2 cooking methods are known: manually and mechanically. Consider each process in stages.
Manually

If you do not have a mixer for kneading, then it’s possible to prepare the starting mixture. This will require a mixing container, water, a mixture, and hand tools, such as a spatula.
An important rule when manually kneading is that water is added to the mixture, and not vice versa. Otherwise, the mixture will catch into lumps, which will be difficult to break without electric tools and a mixer.
The breeding process is as follows:
- Take a clean container, preferably plastic.
- Add a few dry putty trowels to it.
- After that, pour the water in the appropriate proportion indicated on the label. Here it is important not to rush to fill the mixture with water. This should be done in stages.
- Now mix thoroughly with a spatula or other improvised tool, which must be clean.
- The result should be a homogeneous mixture without lumps.
Immediately it should be noted that it is quite difficult to perform such a manual kneading. Moreover, if you are faced with the task of filling a large area, you will have to do such batches very often. This is explained by the fact that it is possible to dilute the putty manually only in small portions. Moreover, it is rather difficult to prepare a mixture with this method of the desired consistency.
Mechanically

In this case, the process of preparing the finished mixture is greatly simplified and even accelerated. To perform the work, you must have a screwdriver or a drill with a mixer attachment. Also often used punch. But here it is important to think not about the cooking speed, but about the quality. The speed of the mixer should be about 800 per minute. Therefore, you should not get carried away, including a drill or punch to the maximum.
So, first pour water into the plastic container, and then add the putty. After that, put the mixer on the power tool and mix the mixture to the desired consistency. This process can form lumps. Therefore, after mixing, make sure that they are missing.
Using an electric tool and a mixer allows you to prepare the mixture in large portions. The quality of the batch will be high.
When you have prepared both mixes - starting and finishing, they must be left for a few minutes to swell. After that, re-mix it. This will prevent lumps. Also, this will give the mass elasticity.
Finishing putty

As already mentioned, the finishing mixture is used for final finishing. As for the method of preparation, it is practically no different from the technology of preparing the starting mixture. However, here you should take into account some subtleties:
- The finishing putty should be completely free of lumps, since the layer of its application to the wall can reach up to 1 mm. Therefore, any lumps will immediately appear, and the process of re-mixing should be given special attention.
- Repeated cooking is allowed only in a clean container. Even if before that you did the batch finishing putty, the capacity is best thoroughly cleaned. To do this, it is best to use warm water. It is also necessary to rinse the mixer itself.
- During work, residues may form on the spatula. They are not recommended to return to the main mass of the prepared mixture. For example, they can be removed to another container. This will prevent the formation of lumps. If this is not possible, then the mixture must be mixed again with a mixer.
In order not to accumulate lumps on the mixer, which can get off in the process of mixing, immerse it in a container with water. Pre-mixer in the water scrolls at low speeds.
Tips and recommendations

When working with putty, be sure to consider the following nuances:
- It is unacceptable to dilute the thickened mixture water This can greatly reduce its quality. To prevent this, prepare the amount that you can work out until it solidifies.
- All surpluses that are formed during spackling should not be placed in a container with a total mass. This will lead to the inevitable formation of lumps. Residues can be used to seal cracks and gouges. Therefore, have another container on hand.
- It is unacceptable that when kneaded in the tank dirt gets into or lumps remain. This contributes to its rapid hardening.
- After mixing, allow the mixture to stand. 3-5 minutes is enough. During this period, it does not have time to harden. After this, repeat mixing.
If after the completion of work, the putty will crack, then this is a sign that the technology of dilution of the mixture has been violated. Also the cause may be drawing too thick. Moreover, the wall surface may not be adequately processed before application.
 Putty
Putty
As you can see, the quality of the final result depends largely on a set of measures, ranging from cooking mixture and ending with its application. But at the core of all of this, adherence to mixing technology remains. Therefore, be sure to follow the proportions indicated on the label. As a result, after finishing the walls, for example, after painting, they will be perfectly smooth and please your look.
Video
You will learn about how to dilute the putty from the video you provided:
Search
Related Articles
The structure of the wooden floor: features of floors
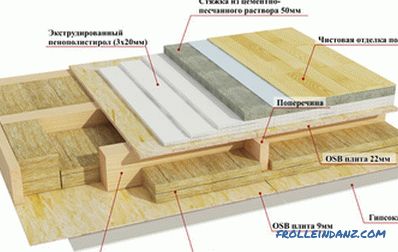
Wooden floor beams can be used as the basis of construction for interfloor and floor ceilings in wooden houses. Such structures must meet certain requirements in order to be sufficiently reliable a...
How to bend a pipe without a pipe bender for a canopy
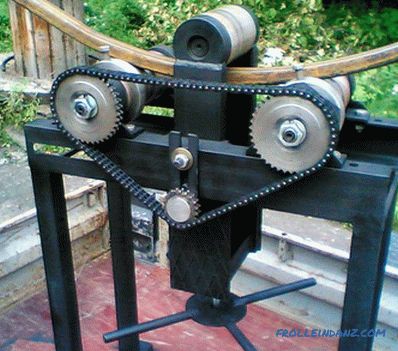
Nowadays pipes are used in many professional fields. They are used in construction, manufacturing, mechanical engineering and even in agriculture. In the process of performing various tasks on the a...
How to determine the bearing wall - in a brick, panel and monolithic house
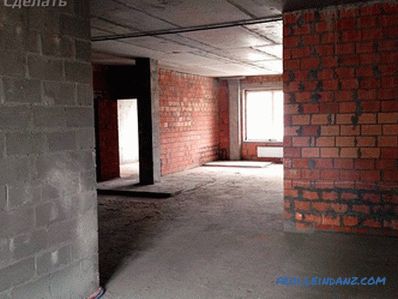
When performing repairs, there is often a desire to make fundamental changes in the redevelopment of living space. In this case, the question arises: how to determine the bearing wall, which can not...
Wiring in the garage with their own hands
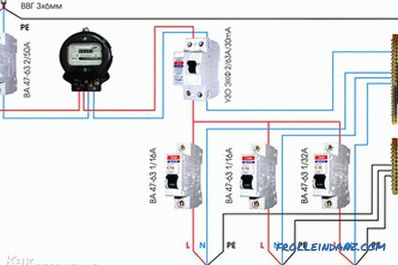
A garage is a great way to protect your car from theft or damage, from precipitation and burning paint. Also this room can serve as a place where it is possible to arrange a repair pit, so that with...
The ceiling of plasterboard do it yourself + photo
Carrying out repairs in your apartment, major or cosmetic, sooner or later there is a question about the ceiling. In the article we will explain how to make a ceiling of plasterboard, give step by s...