Paneled sides and comfortable drawers give this bed an elegant modern look. And thanks to the boxes under the bed, its owner receives a huge amount of usable storage space ... In this article, we will discuss how to make a bed with a podium with your own hands.
I built this bed for my teenage daughter. It all started with the fact that I bought her a new mattress with shape memory effect, which requires a solid foundation. I decided to make as many as six drawers for two reasons. First, to make rational use of the space under the bed for storing bedding and other things. Secondly, to disaccustom her daughter to push trash under her bed when she "cleans up" in the room.
I didn’t have any plans or sketches for work. I acted on the principle of "be what will happen" (which, in general, is characteristic of me). I am sure that there are more effective ways to implement such a project using fewer lumber. I just tend to reinsure myself: I don’t really want each time that my creation once fell apart due to a weak construction ... Muscles are sometimes better than the brain:)

Step 1 : Beginning of work. Construction of the support frame
In this article I will talk about building a podium bed with my own hands literally step by step. I hope that my instructions will be a good help for those who have decided on their own to update the furniture in the house. I will talk about what methods I used to create it and what tools I needed for this. I intentionally did not give here the exact dimensions of the individual elements. All sizes can and should be adjusted to suit your individual needs - bed height, width, mattress size and number of drawers, etc.
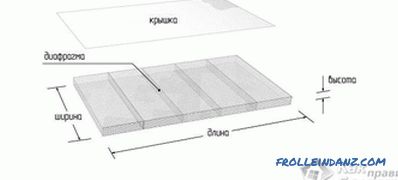
I designed this bed, trying to have it with its flat surfaces and straight lines lines looked quite modern. I wanted the bulk of the bed to rest on a relatively small base, and the side walls seemed to hang over it. My bed was designed for a Queen-sized mattress - 150 cm wide and 200 cm long. The distance from the floor to the overhanging walls was decided to be equal to 12. 5 cm.
To achieve these goals, I built a frame with a length of 187. 5 cm and a width of 125 cm, using for this purpose bars with a section of 5x10 cm. When the frame was ready I placed it on my workbench for the convenience of further work. I leveled the frame using wooden inserts where it was needed, and fixed it to the surface of the desktop so that it did not move during operation. No, I did not fasten it with screws to the workbench, I simply glued it ...


Step 2: Making the bed frame
I made a frame, divided into two halves. This allows you to disassemble the bed for easy transportation. For the manufacture of the frame, I used 5x10 cm bars and 18 mm plywood, which means the finished furniture should be very durable and rather heavy. I decided to place the drawers trampled down: two large ones at the foot of the bed and two smaller boxes on each side of it.
I started by preparing the top guides. The fragment facing the inside of the bed is made slightly shorter, and its end is thinned (half thickness is cut) to make an overlapping joint with plywood that will continue the remaining bed length. To reduce the thickness of the bar, I set the cutting depth of my circular saw to 18 mm, made a series of transverse cuts at a distance of about 3 mm from each other, and then with a hammer and chisel I removed the remnants of wood and smoothed the surface at the place of the future joint. Of course, it would be easier to use one solid piece of plywood for the entire length of the bed, but I did not want to buy lumber on top of what I already had (left from previous projects).
Then I sawed the plywood panels of the right size. I cut out one fragment 75 cm wide (half the total width of the bed) and 62. 5 cm long (which corresponds to the depth of the drawers), as well as three 35x71 cm fragments for vertical side partitions and one 35x62. 5 cm for the back wall.
First, I glued and screwed the back wall to the bottom panel. Then he made cuts in the side walls for 5x10 cm bars (upper guides), attached the side walls (partitions between drawers) to the bottom panel. I placed the floor fragment on the base frame and temporarily secured with two screws. From the inside of the top rail, I placed an overlap, glued and fastened the corresponding plywood panel. I lifted the opposite end of the upper guide rail with a piece of 5x10 cm bar. Then I installed a 5x10 cm crossmember in place adjacent to the plywood side wall. With screws, I attached the crossmember to the side wall, as well as to the upper guides.Then I positioned the outer top rail and attached it to the crossmember. I connected the crossmember to the rail at the head of the bed. Instead of a solid plywood panel at the head, I used a 5x10 cm frame, on which I fixed the trimming plywood. To prevent the wood from splitting, I drilled the guide holes at the ends of the upper rails at the fixing points of the crossbars. In addition, I also attached a 6. 25 cm strip of plywood to the side edge of the bottom plywood panel. You will need it to fasten the facing panels.
The next action I took was to install a 30 cm strip of plywood for the remaining length of the bed frame. I just needed plywood along the outer edges of the bed to support the low edges of the partitions between the drawers. I attached plywood fragments to the bottom of the bottom plywood panel. Then set the remaining 5x10 cm cross member between the upper rails. I placed them next to the drawer dividers panels. Then I installed the dividers themselves, in which you also need to make cuts for the upper guides. I screwed the separating panels to the crossbars, as well as to the bottom floor panel. I arranged the dividers so that between them there is space for two drawers 50 cm wide. Approximately 32 cm of space is left at the head of the bed for the bedside table. In the future, I plan to make the back of the headboard 15-20 cm thick, as a result, the bedside table will increase to ~ 50 cm.
It remains to repeat the whole process, resulting in the second symmetrical half of the bed frame.

The result of this step should be in such a frame, below you can see a photo of the stages of work.


 Assembled two halves.
Step 3: Making drawers for storage
For this project, I made very strong solid drawers using butt joints instead of dovetail. The width of each box should be 2. 5 cm less than the width of the compartment designed for it to accommodate guides for its extension. As you remember, the width of the compartments for the drawers was 50 cm, so I made the drawers themselves 47. 5 cm wide and 60 cm deep. I cut 12 mm plywood strips 20 cm wide and then cut them into pieces of the desired length. On my workbench, I secured a small wooden bar for timely stopping the sawing process. Thanks to this, all the fragments cut out turned out to be ideally the same length. To make such a locking bar is a matter of a few seconds, but at the same time a lot of time is saved on endless measurements.
The side walls of the drawers in my design overlap the ends of the front and rear. On the inner side of each drawer, I made a groove with a depth of 4. 5 mm in 1. 5 cm from the bottom edge. The width of the grooves is made with the expectation that they can be inserted into the bottom of the box, made of 6 mm plywood. When making the bottoms you need to carefully monitor that the corners were perfectly straight. Their size, of course, should be slightly larger than the distance between the walls of the drawers (9 mm wide (toward the side walls) and 15 mm long).
Before assembling the boxes, I polished all their fragments (when the boxes are assembled, it will be much more difficult to do). Then proceeded directly to the assembly. For this, I needed glue and a pneumatic nailer, which clogs up 30 mm finishing nails. I connected the side and front walls of the box, put a small amount of glue into the grooves and inserted the bottom into place, then attached the back wall. Using a carpenter's square, I leveled the frame of the box and in the final I nailed the bottom of the box to the lower edge of the back wall.


Step 4: Installing Drawers
I bought some inexpensive guides for drawers 55 cm long. Such guides allow you to pull out the drawer only 3/4 (in our ~ 40 cm case). Each rail consists of two parts - one for installation on the box and one for mounting on the frame / partition wall. First, I installed the "runners" on the side walls of the drawers using the supplied screws, then the "rails" on the dividing walls. When doing this, it is necessary to ensure that the displacement of the guides relative to the front edge of the structure is the same everywhere. So that all the boxes were fixed on the same level, I used a piece of 6 mm plywood as a gasket. After installing the guides, I numbered each box and its place.


Step 5: Assembling and installing drawers and finishing surfaces
To finish the surfaces of the bed, I decided Use 18 mm plywood lined with maple veneer. The ends of the plywood I pasted plastic edge. It's pretty easy to use.A layer of thermoactivated glue is applied on its lower side. To heat it, I use an old iron: I heat about 25 cm of veneer for ~ 3 seconds, and then with a small wooden block I firmly press the heated area to the base. If you need to make adjustments, simply heat the area again. The edge is slightly wider than 18 mm, the excess can be carefully cut with a knife, but I think it is easier to remove it with a grinding machine.
With the help of a circular saw, I cut strips of plywood 36 cm wide and divided them into fragments of the desired length. So that the angles do not deviate from 90 degrees, I used a carpenter's square. First, I prepared the panel for mounting at the foot of the bed as described above (I made it long enough to cover the side edge of the drawer). Then I fixed the veneer on the edges. I temporarily fixed the panel on the bed frame, while doing so that the upper edge of the panel rose above the upper surface of the bed frame by 4 cm - this will hide the lower part of the mattress. After making sure that everything satisfies me, I finally secured the panel, screwing it to the frame from the inside.
The next panel I made was for two side drawers. I cut out a 100 cm fragment (this is the length of two boxes combined), and already from it I drank a 10 cm strip, which I fixed along the upper edge of the bed frame. As before, I had previously fixed the panel with clamps, and having made sure of its correct location, I secured it with screws. The remaining piece of plywood 100 cm long was sawed in half, resulting in two front panels for the boxes. After inserting the runners and placing the boxes into the compartments intended for them, I fixed the panels to them. Their upper ends should be in close contact with the decorative strip of plywood fixed above, and the lower ones should go down 1. 5 cm below the bottom surface of the frame of the frame. I used 3 mm spacers on the top and sides of the front panels for the drawers, so that the gap that allows the drawer to move easily is the same everywhere. By drilling holes in the frame beforehand, I significantly reduced the probability of the panels moving when the screws were screwed in. Similarly, I did the finishing on the other side of the bed.


Step 6: Final Adjustment and Finishing
After installing all the finishing panels, it turned out that some adjustment of the guides is required for pull-out drawers. A pair of front panels covering the boxes turned out to be not in the same plane as the adjacent finishing panels, but protruded almost 3 mm. To remedy the situation, I had to adjust the position of the guide runners on the bed frame.
Despite the fact that at the previous stages I tried very hard, a few minor surface defects were found. To hide the flaws, I used putty on DAP wood. After drying, the entire outer surface of the bed was polished with fine-grained (220) sandpaper to prepare it for finishing.
I covered the outer surface of the bed with Ebony stain. She gave the tree a nice deep color. With a foam brush, I applied one layer of stain, waited 24 hours and covered the surfaces with three layers of water-based polyurethane varnish. After applying each layer, I waited for at least 2 hours, and then polished the surface with 300 grit sandpaper.
I missed two steps in my instructions because I forgot to photograph these stages of work. First, I cut out two strips of 6 mm oak plywood 9 cm wide, painted black and covered the sides of the support frame with them. Secondly, I cut two fragments of 9 mm plywood and attached them to the upper surface of the bed frame to support the mattress.


Step 7: Result
I am pleased with the results of the work done. I had a lot of materials left over from previous projects, and as a result I spent relatively little money, buying only guides for drawers and a couple of sheets of plywood.
My daughter was delighted with her new bed. She really liked her modern look and the presence of built-in storage. Now we will see how much nonsense she can squeeze into these boxes when it is time to clean up the room. I have to prepare for the next project - the creation of a headboard for this bed, again with built-in storage space.

Step 8: My mistakes
As in most projects, even well-thought out ones, there were some errors. I think it makes sense to talk about the problems that have arisen in the course of work, because we all learn from our mistakes and those of others.
The first problem arose when I tried to install drawers after attaching the runners.The boxes turned out to be too high, and it was not easy to tilt them to insert the runners into the guides. To fix this, we had to reduce the height of the boxes, cutting 1 cm from the top edge.
The next problem arose when I realized that I could have made the bed frame too narrow. I made it exactly 150 cm wide (like the mattress). When the work was in full swing, I suddenly realized that it was necessary to make not 150 cm, but 152-153 cm - I simply did not take into account the thickness of the bed linen. It’s good that this thought occurred to me before I started cutting out the trim panels. To solve this problem, I added 5x10 cm blocks between the two halves of the bed, thereby increasing its width. When it came to getting the new mattress out of the package and putting it on the bed, I was in for a new disappointment. It turned out that the mattress is actually smaller than the one on the package; its actual width was only 145 cm.
Having grumbled a little, I still came up with a solution that the truth has not yet been implemented in practice. I'm going to remove the 5x10 cm spacers installed between the halves of the bed. Simple enough, right? Wrong! I will have to reduce the width of the two drawers and the upper parts of the finish. However, there should be no new problems if everything is done carefully and carefully. Since all the finishing panels are attached from the inside, they can be easily removed to cut the length (I, however, will have to re-paste the veneer on the freshly cut ends).
And, finally, with the last difficulty, which I would like to mention, I ran into during the finishing of the finish. I was pleased to see that the combination of wood filler and wood stain helps well in concealing defects, and the latter are unlikely to be noticeable after completion of work (in the past I had to deal with fillers that could not be painted, although the manufacturers were convinced of the opposite). But still not everything turned out so smoothly. When applying the stain, it turned out that those areas that were subjected to more intensive grinding absorb the stain much worse, resulting in a non-uniform color.
At first, I decided that this was not the biggest of the problems and it is quite possible to put up with it, so I continued the finishing process. After applying the first layer of polyurethane varnish, I changed my mind and decided to try to still cope with this problem. I polished the surface and re-applied a layer of stain. I am very glad that I have taken additional efforts to correct the situation. The result of my work was an excellent self-made bed podium - high-quality, reliable furniture that will serve us for many years ...


Source of translation: www. instructables. com
Search
Related Articles
How to make a gabion yourself
Recently, when creating a landscape design for the construction of walls of houses, fences and other purposes, gabions are installed, which are a metal frame in the form of a grid filled with stones...
How to block the roof slate - installation
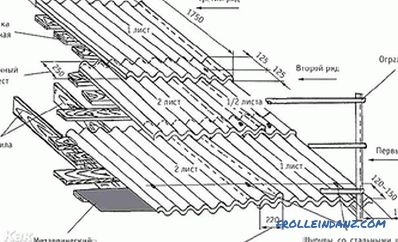
Although for the roof overlap today predominantly preferred modern building materials, slate is still in demand. From this article, you will learn some of the subtleties of how to cover the roof wit...
How to choose a submersible pump - models of submersible pumps

If you live far from a centralized water supply system, then most likely the main source of water is a well or well. To raise water from the bowels of the earth, you need special equipment. The pump...
exterior finish and basic facing options (photos and videos)
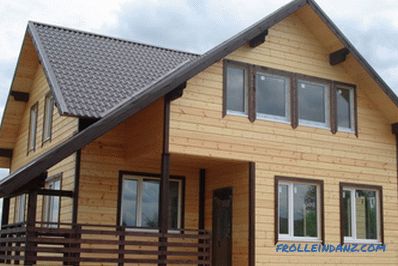
Timber is one of the most popular building materials. From it build houses, baths and other buildings for domestic use. Houses from a bar possess a special microclimate thanks to a natural origin o...
Children's playground with their own hands (+ photos)
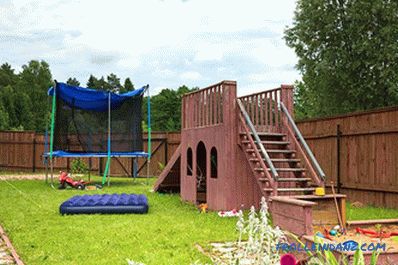
A prerequisite for the arrangement of a recreation area, which is divided into the territory of a suburban area, is the presence of a children's playground on it (which, of course, is true only for...