We seldom remember such an element of water drainage as a siphon, usually only in cases when we look under a sink or when a sewer is blocked. They can be seen under the sink in the bath or under the sink in the kitchen. Its task is simple - it prevents the penetration of an unpleasant smell to you in the house due to water, which serves as a barrier. If your siphon is out of order, or you just need to install it, do not rush to contact the experts who will take a decent amount for this simple work. You can install yourself. Moreover, modern designs are made so that to install them you only need a regular screwdriver and a flashlight to highlight the place of connection. It is only necessary to figure out how to install the siphon . You will learn about this from the material below. Such work can be performed not only by a specialist, but also by a housewife.
Features and types of siphons
If you have a need to install a siphon, first of all you need to purchase it. Since the range of goods is large, you can see different models in the store. What siphon to choose, and why are they different? Let's look at all the features of designs and types of this equipment.
 Pipe siphon
- Pipe siphon . This is a curved pipe in the form of a letter U or S. It connects between the sewer pipe and the sink. At the bottom is always water that does not allow the smell of sewage to pass through. The disadvantage of this design is a small odor trap. If you have left somewhere and did not use the sink, it can dry, and your home will be filled with "scents" from the sewer.
 Corrugated
- Corrugated siphon . In appearance is no different from the pipe. But it is made of flexible plastic pipe (corrugations), which has a connecting node. The advantage of this siphon is that the pipe is very plastic and can be easily connected to any sink. But, it should be noted that boiling water and aggressive chemical agents should not accumulate in the tube. The service life in this case is significantly reduced. Install corrugation in an unheated room can not.
 Bottle
- The bottle siphon . It is a cylindrical or cone-shaped vessel, made of brass, cast iron, plastic or steel. From above and on the side, such a vessel has openings for connection. The cylindrical vessel (or flask) itself is collapsible, since the cover is removed from the bottom and is easy to clean. Such a model is most common and in demand. They are suitable for sinks , as well as for washing and highly positioned bathtubs. They are easy to install. Complete with such a siphon can go corrugated pipe, which is joined to the outlet of the sewer pipe.
 Branched
- Branched siphon . Outwardly, it looks like a bottle siphon, but has a more complex structure. The flask has not one hole for the nozzle, but several. This design allows you to connect the drain not only from the sink, but also from the washing machine and dishwasher, as well as to ensure the drain of two sinks.
 For flush mounting
- Flush mounting siphon . This is the most expensive option of all. It is suitable for sinks that are mounted on an open shelf or fixed to a wall. The siphon will not be visible, as it is installed in a special niche behind a decorative screen.
 Siphons with overflow
- Siphon with overflow . This is mainly a pipe or bottle type siphon. It is equipped with a corrugated hose to connect overflow (upper drain hole in the sink or bathtub).
So, having chosen the siphon you need, you will encounter the following problem: it is in a disassembled state. Therefore, the next step is to build it. To find out how to connect everything correctly, let's consider what details it consists of.
The complete set of siphon
 The complete set
For example, take the most common type of siphon - bottle. It consists of the following elements:
- The protective grid is made of stainless metal. It prevents clogging of sewer pipes, without missing large waste of food and other garbage. It is inserted directly into the sink.
- Drain.
- Siphon housing.
- A nozzle that will come out of the siphon.
- A mounting screw that will connect the grille and siphon. It must be made of stainless material. If it is made of black steel, the structure will rust and eventually break.
- Corrugation, which will be connected from the siphon to the sewer pipe. Water will flow through it.
- Cone gaskets.
- Gaskets for tightness of connections above and below the sink.
- Connecting nuts (couplings), due to which the siphon will be connected to a drain pipe, a corrugated hose and a drain.
We proceed to the assembly of the structure.
 In the disassembled state
- First you need to put on the largest gasket in the form of a ring on siphon, at the junction with its cover.
- Screw the siphon cap all the way. You do not need to resort to brute force, strongly tightening the connection.
- After that, put a nut and then a conical gasket on the drain tube (pipe). Insert it into the siphon hole located at the top and tighten the nut. Again, do not make much effort.
- Go to the corrugated hose. Put the nut on it, install the conical gasket and insert the corrugation into the hole on the side of the siphon. It remains to tighten the nut.
- From above, install another nut on the drain pipe (pipe) and put the right gasket there. After that, screw the drain.
All gaskets are of different sizes, so you can easily determine which one fits.
This completes the assembly of the device; you can proceed to the next step.
Dismantling the old siphon

If you do not have an old siphon, you can skip this step. Those who want to replace the old equipment with new ones can follow the instructions:
- First, prepare a bucket or basin, rag or plastic bag.
- After that, it is necessary to shut off the water supply to the water supply system.
- Place the bucket or basin under the siphon. Any remaining liquid will flow there.
- Using a screwdriver, unscrew the fastening screw that is in the sink. He screwed into the lattice. Twist to counterclockwise.
- Unscrew all siphon parts. This can be done by hand. If the connections are tightly tightened, use a pipe or wrench.
- Now remove the nozzle located between the drain hole and the siphon. He also needs to unscrew.
- It remains only to remove the lattice. Wipe the inner surface of the sink with a rag.
This is the end of all the preparatory work, you can proceed with the installation. Now we will consider two connection options: in the sink in the kitchen and in the bathroom to the bathroom.
Installing a siphon in the kitchen
 Installing in the kitchen
Now we take a closer look at , how to install the siphon under the kitchen sink.
- Check to see if the safety grille fits into the sink hole. If the lattice diameter is much larger than the hole diameter, you need to buy another one that will fit perfectly.
- Place the gasket and attach the grate to the hole.
- Insert the mounting bolt into the protective grid. Bring the siphon to the hole and attach the connecting pipe, after having attached the gasket. It remains to fasten it to the drain hole with a bolt.
It is important that there should be gaskets under the sink and above the sink.
- In the sewer connection, put a cuff that has been pre-lubricated with a sealant. Keep the nozzle dry.
- It remains only to insert the corrugation into the cuff, where the water will go.
Your siphon is installed. It remains only to check the tightness of all connections. To do this, turn on the water and wait until the siphon is full. If there are no leaks, everything is fine and works as it should. If a leak has formed at the junction, then it should be slightly tightened.
Installing the siphon to the bathroom
 Installing in the bathroom
If you need to install the siphon in the bath , it also does not cause big problems. The only difference is that the bath uses a siphon with overflow.
- First of all, you need to fully collect overflow. Use tapered gaskets, mounting nuts. The bottom end is not needed yet. Fasten it into the desired hole in the bath.
- Then fully collect the drain, release and bottle. The technology is the same as in the usual siphon, which is placed under the sink. The difference is that, instead of the sink, you connect everything to the bathroom.
- After this, connect the overflow to the siphon. Please note that the gasket must be worn with a narrow end towards the union nut.
- Do not use the bath for a day. The next day, take a full bath of hot water and check the overflow operation for leaks.
- For low-rise bathtubs, siphons are produced, specially designed for this purpose, and their installation may differ slightly from our usual siphons.
To summarize the

As you have seen, the installation process of the siphon is quite simple and quick. But the installation of such equipment will save you from the appearance of an unpleasant smell in the house. After all, siphon can be called one of the most important elements of plumbing.
Although you need to install a siphon, whether in the kitchen or in the bathroom, you can do this without help. Now you do not need to call in specialists and pay them money. Thanks to the Internet and your abilities, you save money and learn new skills.
Video
This video shows the process of assembling and installing a bath siphon:
See how the installation, replacement of the siphon on the sink or washbasin is performed:
Search
Related Articles
How to choose a laminate for an apartment

When making repairs in the apartment, the owners tend to choose high-quality flooring, and increasingly prefer laminate. What is the advantage of this flooring over the other, and how to make a choi...
what, from what and how to weave?

Fashion walks in a circle. And now the wicker home furnishings, once forced out by soft furniture, are returning to the houses again. Wicker furniture and rattan products can not only replace any s...
Calculation of wooden beams: the cross section of the timber
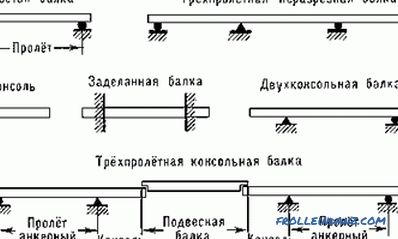
Calculation of wooden floor beams is in demand both for residential attic floors, second floors, and for unexploited attics. Low fire safety, resistance to fungus infestation of wooden structures i...
How to choose an oil cooler - choice of oil heater

The beginning of cold weather makes you think about the issue of heating a home. In the case when central heating does not warm the rooms enough or the heating season has not come yet, it becomes ne...
What should be the slope of the sewer
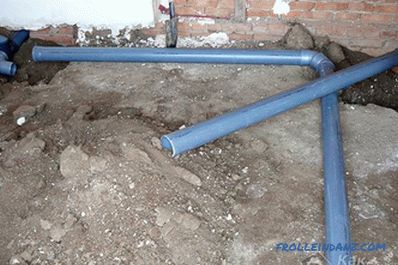
For those who have not encountered the laying of sewer pipes, it may seem that everything is elementary and simple, but it is worth noting - it only seems that way. The question of what should be th...