Lining is an environmentally friendly and versatile finishing material, which is often used to decorate various rooms in country houses, including saunas and baths. It is worth noting that the eurolining differs from conventional lining only in that it is made according to the European standard, which makes it more durable and moisture-resistant. When planning the use of this finishing material, first of all you need to figure out how to fix eurolining.

Lining is a high-quality, natural material for decoration of houses outside and inside.
Lining has an attractive appearance that can give a highlight to the planned interior, allows you to visually expand the room if mounted in a small room, and is able to hide all the irregularities of the walls and corners. Despite the fact that this facing material has a lot of advantages, yet so that the result is pleasing to the eye over the years, it is necessary to pay attention to the subtleties of fastening eurolining.
Preparatory stage of installation of eurolining

For installation of clapboard, it is necessary to make a batten.
It is possible to fix eurolining to the ceiling or walls only if they are smooth, otherwise it is necessary to make a batten. The preparatory stage is quite complicated, but it is very important to do everything correctly in order to facilitate the installation of the facing material. It is worth noting right away that it is much easier to mount eurolining to the ceiling on a pre-made wooden frame. Before starting work, all the necessary tools and materials should be prepared for both the preparatory phase of the work and the mounting of the eurolining.
- Bearing slats - 20x45 mm.
- Alcohol level.
- Jigsaw.
- Dowel.
- Screws for wood.
- Screwdriver.
- Lining.
- Klyaymera

Types of fixing lining
Before you start shaping the batten, you first need to think about how will be installed lining. There are 4 directions for fixing the wall paneling: horizontal, vertical, combined and diagonal. This is a very important point, since the direction of formation of the batten depends on it. In addition, when planning installation of eurolining on the ceiling, it is worth considering that when fastening this material perpendicular to the sun falling from the window, the lines on the floor will visually reduce the room, and if you fix the wallboard along the room, you will experience the effect of its visual increase.
For the batten you need to take wooden slats, which have undergone artificial drying. First of all, it is necessary to note the places of fastening of wooden slats to the walls and drive in dowels. Next, using special screws, you can begin to mount the rails to the wall. The correctness of the attachment must be constantly checked using a spirit level. The distance from one rail to the other should be in the range from 40 to 80 cm. It should be borne in mind that with horizontal installation of the euro-rail, the crate is fastened with strips in the direction from the floor to the ceiling. With the vertical mounting of the eurolining, the lathing is mounted horizontally from one end of the wall to the other. The last crate is formed on the ceiling.
Installation of eurolining using klyimer

Mounting of eurolining can be done using klyimery.
Despite the fact that many craftsmen "invented" ways of attaching eurolining with screws and even nails, yet such methods are not the best solutions to this problem. The fact is that the eurolining is made from solid wood, so when using screws and nails for its attachment, the risk of defects and chipping on it is too high. With this method of attachment, in most cases, the marks remain, which significantly spoils the appearance of the entire coating. The best solution in terms of mounting the eurolining both on the walls and on the ceiling is to use clamps - special clamps for secretly fixing the board.
For each individual type of eurolining there are different types of klyaymer, so it is best to purchase them immediately when you buy eurolining, in order not to be trapped with the thickness of the plate.
It is quite simple to assemble the wall panel using cleats, and the fixings will not be visible from the outside.
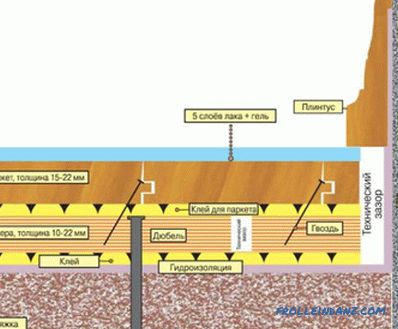
Before attaching the lining to the ceiling and walls, the factory package should be completely removed from the boards and left for 24-72 hours so that it is saturated with moisture from the air and acclimatized in relation to the microclimate of the room, which will be the installation.

Finishing scheme for ceiling and wall clapboard.
It is better to start mounting the eurolining from the ceiling. Special attention should be paid to fastening the first board with the help of clamps clamping the lower part of the groove.For reliability, it is best to use at least 4 clips. Kleimer fixing the board, attached to the crate with screws. The next board is inserted into the already fixed groove with the side having a special spike, while the clamps are put on the lower part of the groove of the 2nd board. In order for the spike of the 2nd board to fit tightly into the groove of the first one, you can slightly hammer it using a wooden hammer. The entire ceiling is sheathed in a similar way, after which you can proceed to the walls.
Wall cladding with eurolining is performed using the same technology. In some cases, the last board has to be cut to close the corners or to fit it to the ceiling as much as possible. Places of a joint of the plane of a ceiling and walls can be covered with decorative plinths.
Didn't find the answer in the article? More information on the topic:
-

How to level the floor in an apartment?
How to level the floor in an apartment: collecting information, working with the level and marking, the necessary building materials and tools. Self-leveling floor: step by step instructions.
Search
Related Articles
How to put a floorboard: tools, stages
Few will argue with the fact that the floors in the house should be different not only beauty, but also environmental friendliness, and for this you need to be able to properly lay the floorboard....
How to make a garage ventilation

Every car owner wants his “iron horse” to retain all his great qualities and excellent appearance for as long as possible. Almost all motorists rightly believe that storing the car in the garage wil...
Baby bed do it yourself - how to make a baby bed

Do it yourself? - Is quite real! To do this, it is not necessary to be a master furniture maker. Although the ability to hold a tool in hand, of course, is useful. The ability to clearly visualize t...
Interior doors in the interior - the rules of selection and photo design ideas
Interior doors in the interior perform a functional and decorative role at the same time. They delimit the space of rooms, provide noise insulation, emphasize the beauty of the interior. Today, manu...
technology, materials, methods (video and photo)

Log building construction is gaining more and more popularity. Such houses have a special comfort and create a sense of naturalness and closeness to nature. However, when constructing a wooden buil...