What happens to a brick if it is thrown into the water? This question may seem silly enough. But if you still try to convince him that he will float? In fact, a cement construction material has been developed that can boast such characteristics. In order to fully experience the good quality of this product, it is important to know how to build a house from polystyrene concrete with your own hands.
New word in construction
 Polystyrene concrete
Initially, this building material was conceived as the ability to eliminate the need for wall insulation from the outside and to eliminate the use of highly flammable foam. Ingredients include Portland cement, polystyrene foam granules, water and resin-based plasticizers. Developing the entire half century, but despite this, she has already managed to win her fans. There are no restrictions on temperature conditions, as well as environmental humidity. The final product can withstand up to 300 cycles of complete freezing and thawing.
Are there any minuses
 Structure of polystyrene concrete
These are just some of the reasons for the high popularity polystyrene concrete:
- low weight;
- ability to impart any form;
- easy construction of the structure;
- ability to create a monolithic house;
- resistance to high temperature and fire;
- sufficient density for comfortable hanging of furniture and other products;
- excellent thermal insulation;
- sound-proofing characteristics allow cutting off waves up to 72 dB;
- no need to use heavy d technology in the construction of the structure and delivery of materials;
- significant cost savings compared with other blocks, lined with brick;
- ease of fitting blocks, even with ordinary hacksaw.
Of the minuses, there is a poor vapor permeability, which can lead to moisture accumulation, as well as the fact that it is not known how foamed polystyrene behaves over time. The level of styrene that is released into the air remains unexplored. Also, after a strong fire, the walls will have to be completely demolished, although the unit does not burn, it loses its strength and also releases toxic gases. But even in such an emergency you should not doubt the reliability of the building.
In the study, polystyrene concrete was exposed to a temperature of 1000 ° for more than an hour, but this did not lead to its destruction.
More information about the advantages and disadvantages of the material described in the video:
Construction types
 Formwork for monolithic construction
As in the case of expanded clay concrete, the possibility of block and monolithic construction of the building is available. For the second option, it will be necessary to take care of the correct installation of the formwork with observance of a certain profile of components, which will make it possible not only to provide better interlacing, but also to eliminate cold bridges. Blocks can be made at home. It does not need a lot of strength and great skills. However, they can be of different configurations, tailored to a specific project.
 Filling of polystyrene concrete
Independent production of blocks
In order for the final product to turn out the highest quality, it is necessary to observe the ratio of the components. Bearing walls carry a large load, so the composition, in addition to the main components listed above, also adds sand.
 Equipment
The process will be as follows:
- The concrete mixer is poured a little less than 1 bucket of water. If necessary, make the composition more fluid, it can additionally be added to the process. Additives are poured into the water, they need 2% of the total planned volume. This composition is well mixed. To simplify the process, you can use not a regular concrete mixer, but a stationary mixer. It looks like a barrel in a horizontal position, inside which the blades rotate.
-
 Composition of polystyrene concrete Next, 3 buckets of polystyrene foam granules are filled up. This is half the required amount. This part is filled up now to reduce the amount of cement that can stick to the walls.
 - 1 pail of cement is poured inside. Everything is mixed to a homogeneous mass.
- The last component will be sand, it will need 3 buckets.
- After the sand, the remainder of the required volume of PVG is immersed.
- The inclination of the container must be kept so that the foam granules do not fly out.
-
 Mixture of polystyrene concrete The solution should get dry enough, then it will be easier to work with the forms.
 - A level surface is selected on which it will be possible to store finished products for 24 hours. This may be a room or a courtyard.It is important that the ambient temperature is above + 15 ° C. Only in this case it will be possible to guarantee the high quality of all the processes.
- Void creators are installed inside the tool. The space around them is filled with the finished mixture. It is not necessary to ram too much; it is enough to evenly distribute it over the entire area of the machine.
- Next, the top of the structure is covered with a special bar and is pressed a little.
- Hollows are removed and the form is removed.
- Finished material should preferably be covered with plastic wrap to protect it from getting wet. In this form, it is left for 24 hours, after which it can be folded for further drying. After 4 weeks, the blocks are ready to be laid.
 Manufacturing of blocks from polystyrene concrete
The machine for manufacturing is a usual metal box. You can make it yourself for the size of the planned blocks. To do this, you need a sheet metal with a thickness of 3 mm. Hollow cores are made of the calculation so that the wall thickness of the block is about 5 cm (or you can use ordinary sleeves from a pipe with a diameter of 50-60 mm). For the clamping bar will need a square with a size of 50 * 20 mm. To make it easier to lift the form, the handles are welded to the sides, and the side is welded to the top face for more convenience when laying the raw materials. The compaction process can be accelerated by attaching an engine and making an offset center of gravity on the shaft, which will cause vibrations. It is necessary to turn on the vibrator only for a few seconds, with a longer operation time, the integrity of the blocks may be disrupted.
We save on the foundation
 Pile foundation for the house from polystyrene concrete
Total weight the structure is relatively small, so the foundation can be made of this design, which will be the minimum cost. For example, a good option would be pile supports, a columnar foundation or a tapeless base. We will consider screw pile, since it can be applied practically on all types of soil. Components for it are purchased in a specialty store or made independently. The essence of the method lies in the fact that metal pipes are immersed in the ground, which will serve as reference points for the entire building. One element is able to withstand a load of 20 tons.
- Usually, a pipe with a diameter of 80 to 130 mm is used for manufacturing. What exactly the size of each element will need in a particular case will depend on the quality and density of the soil.
-
 Making screw piles at home The length should be such that the blades can be immersed 50 cm below the ground freezing, and the upper part is another 30 cm protruded above the surface. This will allow the supports to maintain stability even in cases where the layers may move due to expansion.
 - It is desirable that the sleeves are intact without any parts, otherwise it may simply break down or turn away along the seam during the tightening process.
- A butt that will sink into the ground must be sharpened. To do this, vertical cuts are made to a depth of 15 cm, after which the individual parts are bent in the middle and boiled using a welding machine, the seams need to be cleaned and polished well.
-
 Drawing of a screw pile The diameter of the screw is also an individual component. Its size will depend on the depth to which the dive is planned, as well as determining the composition of the soil. The greater the length of the pile, the smaller the screw will be. The fact is that the thicker the layers, the harder it will be to twist. For its production can be purchased blank. If you want to do it yourself, then you will need a sheet metal of 5 mm. It is possible to use disks from a tractor hinge plate. Patterns cut elements. They are semicircles with a part selected in the middle that is equal to the diameter of the pipe. They need to bend in such a way as to make a 5 cm step. They are welded to the stand.
 - At the top of the pile, it is necessary to make a transverse hole designed for a lever that will allow turning.
Installation of the whole structure does not require a lot of effort, but it will take at least a few helpers.
- The territory is marked by the parameters of the future building.
- Corner anchor points are drawn.
- Notes are made every meter.
-
 Tightening of the pile Piles are screwed along the marked points. It is important to ensure that the elements are strictly vertical. This can be achieved by several bubble construction levels. If they have a magnetic base, then they are simply mounted vertically on the pipe, otherwise they can be wound with adhesive tape or tape.
 - In advance, on each column you can put a label to which you want to dive.
- After the required level has been reached, the height of all elements must be leveled.
- The one that is below all is selected. The marking is applied on it and it is cut if necessary.
- Water level size is transferred to all other elements.
- In order to be able to place a concrete grillage on top, square pads with a size of 25 * 25 cm are welded.
- Roofing sheets with an overlap of 10 cm are placed on the inside area. well rammed. This is done in order to prevent the growth of weeds under the house.
- Piles will not perform their function unless combined into a common structure. This can be done by welding on top of the channel.
The foundation of screw piles is not recommended to be concreted. If you decide to use concrete, then there are 2 ways: concrete is poured in the form of a grillage or in the form of a socle.
- If the first option is chosen, then you need to take care of high-quality formwork. It should be made of durable boards, since it will need to hold the weight of the concrete to a certain degree of setting. It is important to remember that the width of the foundation should be 15 cm greater than the width of the wall, only because of this it will be possible to make a quality floor. Its height is 30 cm or more. The metal base of the reinforcement is placed inside the formwork, then everything is poured with concrete and is well rammed to fill the voids.
- In the case where a basement strip foundation is planned, then a certain degree of land works will be required. It is necessary to dig a trench to a depth of 50 cm. Its width is the same as the width of the foundation from the previous paragraph. Sand is poured in a layer of 15 cm. It must be well compacted by tamping. Another 15 cm is filled with rubble and is also well rammed.
- The next step is to install the formwork. This must be done in such a way that the piles are in the middle and are subsequently submerged in concrete from all sides.
- The height of the future fill above the surface should be 70 cm. For this level several reinforcing structures may be needed. Apply fittings with a diameter of not less than 12 mm. Additionally, you can tie it with piles.
- Prepared concrete is poured into the middle. To be sure that it is distributed over the entire planned area, it is necessary to use a vibrator.
- In order for the concrete to be "alive" for a longer period of time, plasticizers must be used. This will also eliminate the formation of layers when the gap between the fillings is not observed.
 The grillage for screw piles
When laying the foundation, care must be taken to leave the sleeves for communications. So it will be possible to greatly facilitate further work on the laying. In addition, for the basement floor it is necessary to make vents that will prevent the accumulation of moisture inside.
 Concrete grillage on screw piles
The first few days in hot weather need to be watered ready concrete. This is necessary so that it does not crack. Also, to preserve moisture inside it is better to cover it with roofing felt or plastic wrap. There are no prohibitions to use the classic version of the recessed foundation. The advantage of polystyrene concrete is also the fact that when cracks appear at the base of the wall, they remain without damage.
Walling is fast
 Walling
Walls can be driven out in three ways:
- masonry;
- removable formwork;
- fixed formwork.
 Characteristics of polystyrene concrete walls
In the case when ready-made blocks were purchased or they were cast by themselves then the solution will be obvious. After a month, when the concrete of the foundation has gained sufficient strength, you can proceed to the following actions.
 Polystyrene concrete laying
- The place to start the laying is selected. This will be the highest angle. You can define it in several ways. If you have a laser level, then it turns on in the direction of the foundation, a parallel line is projected. Using a tape measure from the line to the base. Where the distance is the shortest, you need to start from there. A more affordable way can be the water level. One of the containers is fixed at an arbitrary angle. The second is necessary to bring to each of the remaining and, having waited, when the water is balanced, to fix the differences.
- Before you begin laying, you need to take care of waterproofing. To do this, bikrost or roofing felt is laid on the concrete surface in two layers.In this case, it is desirable to roll them in whole stripes. If this is not possible, then it is necessary to overlap and missed the joints with bitumen mastic.
- The first block is set using a bubble or laser level in all planes. The layer of mortar for this series can be up to 3 cm.
- Taking the first stone as the basis, according to its position, an element is drawn from the opposite side, towards which the masonry will go.
- Corners with protruding blocks for ligation are displayed in several rows.
- A fishing line is pulled between them. It should be exactly the level. Thanks to it, it will be easier to navigate when building a wall. With each new row, it is moved to a higher level. It must correspond exactly to the outer line of the rearrangements.
- In order for the walls to be vertical, you must constantly monitor the line with a plumb line or level. Additional metal guides that dig in two at each corner can also be a good reference.
- If blocks with through voids are stacked, then vertical reinforcement must be performed. For this, two elements of the metal frame are installed in the corners. It is extended in the course of advancement and will correspond to the full height. Throughout the length of the wall rods are inserted metal reinforcement.
- When placing factory monolithic blocks, it is necessary to insert a sealing cord into the grooves. Every few rows need horizontal reinforcement. To do this, the metal mesh is placed in the seam. The thickness of the seam is better not to do more than 8 mm. Otherwise, this will lead to the appearance of cold bridges, which will worsen the characteristics of the building.
 A wall of hollow blocks is reinforced with
Special glue is used as a solution . It has better adhesion characteristics compared to a conventional sand-cement mix.
 Special glue is used
If it was decided to build a monolithic wall, then first of all take care of suitable formwork materials. You can use plywood with a thickness of 15 mm. In order for it to be less exposed to moisture, it is wrapped in plastic wrap. Additionally, you will need clamps. They should open to the width of the future wall plus the thickness of the formwork. To make it easier to independently expose the sheets you can make a simple device. To do this, you need a profile tube with a size of 40 * 30 mm. Its size should be 5 cm larger than the wall thickness. Every 20 mm welded lengths of reinforcement are 10 cm long. It should be a comb.
 Construction of a monolithic wall
- Filling as well as masonry starts at the corners . In this case, there is no need to look for the highest point.
- The start profile is mounted. It needs to be selected for plywood thickness. It is attached to the concrete base with dowels and screws. To do this, you need a punch, because the finished plate has high strength.
- Two sheets are perpendicularly inserted into the profile. They are fixed between a metal corner.
- After the outer corner elements are exposed, the inner ones are mounted. This is where the comb is needed. It is inserted between the sheets and holds one of them while the other is being mounted. For the internal elements also screw the metal corner.
- The ends are closed with slats. But it is important that they are specialized. There must be a protrusion that is shaped like a spike. After pouring and solidification, a notch is formed, it is necessary so that the next layer lays down well and does not form cold bridges.
-
 Formwork for polystyrene concrete To prevent formwork from sprawling, you can make an additional fixture of a square pipe with a size of 50 * 30 mm. It should resemble the letter P. The length of the upper plank is equal to the width of the wall plus the thickness of the formwork. Height - so as to close the sheet almost to the bottom. Before filling, the bracket is put on and holds two sheets together.
 - The end plate is pressed using clamps.
- The ratio for the preparation of the mixture will be the same as in the manufacture of blocks.
- After unloading the mortar into the formwork, it must be well compacted so that the walls are made without voids.
- The formwork can be dismantled after a few days.
- The top layer can be poured without waiting for the previous solidification. At the same time, shields are not removed from the lower level. The next row is simply mounted on top. In this case, it is important to calculate the load.
 Fixed brick formwork
If there is a desire to immediately finish, you can formwork make non-removable. Its essence is to fill the space between the two brick walls.At the same time, the external one is laid out of a facing stone under the jointing.
- The highest angle is selected, as described above.
- The laying of the outer and inner wall begins.
- During erection, when the ligation will be carried out, it is necessary to lay the brick brick through a row, which turns inward - it will perform a reinforcing function.
- Fill is made as the laying progresses.
 Fixed formwork for polystyrene concrete
For this option you have to spend a little time at the beginning, but subsequently, this will result in significant savings.
Even before the forcing of the walls, it is necessary to note the locations of the doors and windows. In the course of construction, you can use improvised frames of knocked-down boards to make it easier to keep dimensions. Subsequently, they can be removed. You can insert the finished frame immediately after the roof is covered. The house does not undergo shrinkage, like many other materials, so there will be no problems with the fact that the plug-in structures will crack or break the glass from the load.
Some manufacturers make blocks of polystyrene concrete with a raised face in the form of a certain ornament. If such a stone is used, then the facade is automatically revetted. If desired, you can buy already painted elements or open them with the composition of the concrete after all the work is completed.
Floor of polystyrene concrete

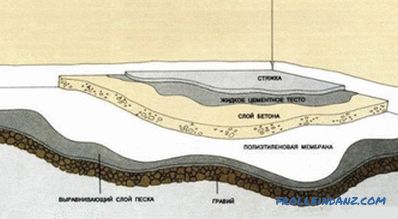
Under the draft floor, it is necessary to make a sand bedding to the height of the base. She is well rammed. For this, it is better to use special vibration machines. The next step will be placing beacons. In their role can play the most ordinary wooden pegs. They must be on the same level. To achieve this, the laser level will be a great helper. A line is projected onto the height of the planned subfloor (usually 20 cm). The wooden components are recessed until the mark is at the extreme point of the upper edge. The solution is prepared the same as when pouring the walls. He poured out on the surface, leveled and tightened with the help of the rule. At the same time you need to rely on lighthouses. This floor does not require additional heat, steam and waterproofing. The next day you can walk on it, continuing the construction. Finishing finishing screed is done during interior decorating.
Before filling it is necessary to lay all sewer and water pipes. Otherwise, you have to destroy the finished plane.
Roof
 The roof can be any
Polystyrene concrete house does not limit the customer in how the roof will be mounted. As a truss system, you can choose, single or dual slope. Attic space can be left under the attic. When calculating the roof, it is necessary to take into account the weather conditions and the maximum gusts of wind that may be in a particular area. This will give the opportunity to choose the optimal angle of inclination. The roof slope must protrude so far that the flowing rainwater does not undermine the foundation. To do this, also provide a blind area. The frame can be assembled both from wood and from a lightweight metal profile. If you properly warm the ceiling and flooring, then in the case of using the second option, the air will not freeze so much that it will lead to large heat losses. By the way, from the attic part of the ceiling, you can also make a screed using polystyrene concrete. It is lightweight, so it will not carry a large load.
Do you need a finish
 Facing brick
Every home needs a finish. To a certain extent, it not only allows you to give a pleasant appearance to the walls, but also protects against various influences. Above it was already mentioned that the planes outside can be finished either with a decorative brick in the process of laying, or with a special block. You can always go the other way. Polystyrene concrete perfectly interacts with ordinary plaster, so you can apply a classic fur coat, which requires almost no maintenance and can last for a long time.
 Facade plaster
Another option would be siding, wooden lining, block house, or other material of a similar type . The process is facilitated by the fact that there is no need to fix the insulation. Everything happens quite quickly: the crate is installed and the area is sutured. There is no urgent need for waterproofing, because concrete with polystyrene perfectly repels water.
 Siding
You can also use plaster for interior decoration. Next, the walls are plastered and painted or covered with wallpaper. Nobody forbade to sew up all the planes with drywall and apply finishing layers on it.
Installation of a high-quality ventilation system will be a mandatory step. It is better if it is forced-air and exhaust.The urgent need is explained by the fact that polystyrene concrete has almost zero vapor permeability. This means that all the steam released by people, which rises when bathing or cooking, will accumulate. If it is not removed in a timely manner, it will lead to the development of fungus and mold. As a result, the entire interior will be damaged. In order to remove the infection, it will take a serious work, and it is not always possible to complete it. This step must be taken into account at the design stage, so that technological holes can be left during construction
For more comfort, you can make and fix a visor above the entrance doors. The porch, which is tiled, will also give a special charm. Rainwater gutters can be connected to a collection system. Subsequently, it will be very useful when watering plants.
In the course of reading the article, you most likely noticed that the project of such a house can be easily implemented with one assistant. In this case, you can not be afraid for ripped backs, because this building material is so practical and easy that it does not cause much trouble.
Video
In this video you can see how easily a polystyrene concrete house is built:
Search
Related Articles
How to collect houses from CIP panels
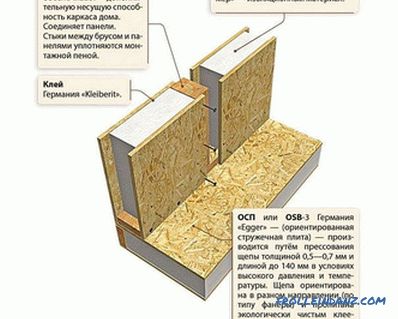
CIP panel is a building material inside which there is a layer of insulation, and the outer part is a layer of OSB. Insulators Inside the panel there can be different types of insulators, each o...
Plasterboard and Profile Tools
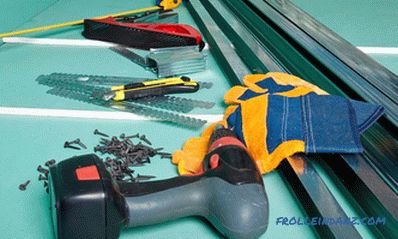
The practical application of any building material presupposes the existence of a certain set of special devices. In particular, without a tool for drywall and profiles, it is impossible to imagine...
Which timber is better for building a house
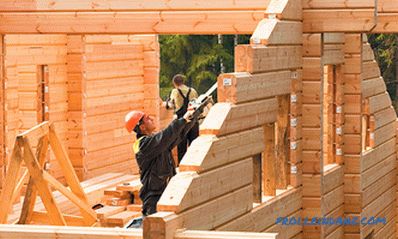
After a break, wood again begins to gradually gain a leading position in the market of materials for low-rise construction. The tree is eco-friendly and aesthetically attractive, but at the same tim...
What is included in the cost of the project house
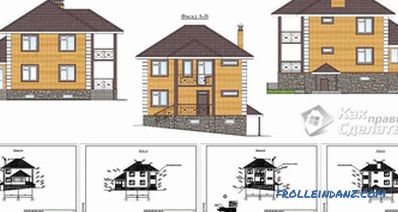
If you are interested in the question of what is included in the cost of the project at home, it is worthwhile to begin to figure out exactly which project you have in mind. Does the project need?...
How to align the floor in the apartment with your own hands?
It is very difficult to imagine any modern apartment or house without a beautiful flat floor. In creating a well-appointed room, he performs one of the most important roles. Modern technology allow...