Many people believe that the garage should be a kind of fortress, built from the usual, but expensive building materials. Nowadays there is an opportunity to choose a less expensive method of erecting structures - this is the frame construction technology. If you adhere to all regulations, the garage will turn out not only warm, but also durable. Despite the apparent fragility of the structure, it has several advantages:
- Due to the low weight of the structure, there is no need to build a strong foundation that can be made on any type of soil.
- With a small thickness of the walls they keep warm inside the garage, so you do not have to spend a lot of money on heating.
- No need to plaster. In addition, for both exterior and interior decoration there are many relatively inexpensive materials for sale.
- The dirtiest job is mounting the foundation. All other work does not lead to contamination of the site.
- From the beginning of construction until its completion, a maximum of 2 months will pass, and half of this period is set aside for the solidification of the concrete foundation.
Is it possible to build a strong frame garage with your own hands? Of course, even alone, which is not always convenient, but quite realizable. Let's consider together all the stages of the work.
From what to make a skeleton?
Since this is a frame construction, it is quite clear that it is necessary to carefully consider what material to make it. Wood or metal can be used for this. In each case, the work on making the skeleton will be different, so we will focus on the choice of material in more detail.
Bar
Consider the advantages and disadvantages of a wooden frame.
Pros
- The skeletons will cost a little less.
- If there is no electricity, then all the work can be performed with ordinary carpentry tools. This option is extremely time-consuming, and it will take more time.
Minuses
The disadvantages include:
- A high level of fire danger compared to other materials (the only exception is a log building).
- Wood likes to eat various insects and bugs.
- The material does not tolerate prolonged exposure to moisture.
Many of the listed drawbacks are not so significant with appropriate material processing. With regard to fire hazard, then, as a rule, in the garage there are many other objects and liquids that are easily ignited, so that the design features of the room do not play a big role.
Metal
In this case, when manufacturing a skeleton, the following can be used:
- Metal profile or LSTC.
- Profile pipe.
- Metal Corner.
It is also worth looking at the features in more detail.
- The material itself is not combustible, but after a fire it becomes unsuitable for further use.
- Any design can be made collapsible, but when working with thick metal parts it is better to use electric welding.
- The frame is susceptible to corrosion.
At this stage you must make a clear choice - you have to choose the appropriate project.
How to deal with the project?
Many people believe that during the construction of simple structures you can do without paperwork, but in our case it will be not a small temporary structure, but a garage that has to withstand a large a lot of snow on the roof, and do not warp under the weight of the gate. Therefore, it is better not to risk it, but to use a ready-made project or make your own. In this case, you will see how much and what material you need to purchase.
We bring to your attention the draft of the garage, but if for some reason it does not fit, then it can be redone by making your own corrections.
Scheme
 Sheet 1
 Sheet 2
 Sheet 3
 Sheet 4
 Sheet 5
 Sheet 6
 Sheet 8
 Sheet 9
 Sheet 10
 Sheet 11
 Sheet 12
 Sheet 13
 Sheet 14
 Sheet 15
 Sheet 16
 Sheet 17
Preparatory work
So, we have dealt with the project, purchased the materials, now we proceed to the preparatory work.
The construction site
Most often, the place where the garage will be built is determined in advance, but upon detailed examination it may be inconvenient, since it is located on a slope. In some cases, it is easier to start construction in another place than to export tons of land, using various equipment for this.
Having finally decided on the plot, mark the garage dimensions with pegs. Check again for a convenient entry.
What will be the foundation?
Depending on the chosen type of foundation, the site is being prepared.
- When pouring a shallow strip foundation, part of the soil is removed in the places where it will pass.
- Under the monolithic slab, excavation is carried out along the entire perimeter to a depth of at least 50 cm.
- In the case of manufacturing a columnar foundation, pits 50 * 50 cm in size are pulled out to a solid base.
- If the decision is made to make a pile-screw foundation, then we don’t touch the ground at all.
Let's start building the foundation
We will look at the process of making the most expensive, but the most practical kind of foundation - this is a fill of a monolithic slab. Such a basis does not sell the wheels of the car, and in the manufacture of the inspection pit will not have problems. You can choose the most suitable or less expensive type of foundation, using the recommendations from the video collections on the relevant topic.
Foundation type:
- columnar;
- pile;
- solid;
- screw;
- tape
When building a slab foundation, the procedure will be as follows:
 Using a tractor, we will dig a ditch Using a tractor, we will dig a ditch | The soil is sampled to a depth of 50 cm. |
 At the lowest point, its depth must be at least 50 cm At the lowest point, its depth must be at least 50 cm | The bottom is thoroughly rammed. |
 A thick layer of sand will prevent deformation of the plate A thick layer of sand will prevent deformation of the plate | It is filled with sand so that it does not reach the top of the pit 20 cm. |
 Vibrating rammers will greatly facilitate the work of Vibrating rammers will greatly facilitate the work of | Sand also needs to be tamped well. |
 Geotextiles will not allow sand to mix with rubble Geotextiles will not allow sand to mix with rubble | Over the top fit geotextiles. |
 The rubble layer also needs to be compacted The rubble layer also needs to be compacted | The next layer of the pie will be the crushed stone of the middle fraction, which is filled to the brim. He, too, must be well tamped. |
 It is best to make a formwork based on the height of the It is best to make a formwork based on the height of the | slabs Now it's up to formwork. It is best of all if it will be set flush with the level of the slab fill - so less likely to allow drops. As for the thickness of the concrete layer, then 20 cm will be enough for a car. For a truck, it is better to increase the thickness to 30 cm. |
 The design should be rigid The design should be rigid | By exposing the formwork it is necessary to ensure the rigidity of the structure, securing supports from all sides. It is best if a thick plank is used for the formwork. If this is not the case, then the props will need more. |
 Take care of waterproofing Take care of waterproofing | Over the rubble with overlap on the formwork is placed waterproofing, which is used as a roll of materials on a bitumen base or thick plastic film. |
 Set the first reinforcement layer Set the first reinforcement layer | Now Install the first layer of reinforcement Ø10 мм14 mm. It should not touch the bottom, so it is necessary to provide the necessary clearance. For this purpose, do not need to use bricks and other objects, as they can pierce the waterproofing, and some are not suitable for laying in the screed. |
 Plastic retainers for valves Plastic retainers for valves | Use plastic retainers for fittings. |
 A second row of reinforcement A second row of reinforcement | Then fit another layer of reinforcement. |
 When pouring concrete, it must be compacted When pouring concrete, it must be compacted | Bay concrete, you need to vibrate it (the process is shown in the photo), while trying not to touch the frame and formwork. Stick stitching is tedious and ineffective. |

| The edges of the formwork served as a level for pouring and leveling the concrete pad. |
 At any time of the year the stove needs protection At any time of the year the stove needs protection | Now we have to wait almost a month until the concrete attains the necessary strength. During the summer period, the pillow must be periodically watered with water and covered with a material that prevents the rapid evaporation of moisture. The foundation also needs protection if it is made in the fall and left until spring. |
Construction of the frame
Since this is a wooden structure, all the details must be soaked in an antiseptic composition.We will need bars and boards of such sizes:
- For the lower part of the garage we use bars of 100 * 40 or 100 * 50 mm.
- The size of the corner boards and racks is 100 * 100 mm.
- Rafters and additional racks - 100 * 50 mm.
- Distance between racks - 110-120 mm.
- The optimum length of the boards is 3 m. You can purchase six-meter blanks and cut them in half.
- For the roof we will use boards of 100 * 25 mm.
- It is better to make the crate out of 30 * 30 or 40 * 40 mm bars.
 On the slab we will begin assembling the first wall On the slab we will begin assembling the first wall | So, the foundation is ready, you can proceed to the construction of the frame. We will begin its assembly on the plane, and then we will lift, we will establish and we will fix. Let's start with the back wall. To give the frame strength in the corners should be installed struts. |
 In the front wall will be installed the ports In the front wall will be installed the ports | The next part is mounted reinforced part of the frame in which the gate will be installed. |
 Installing the sidewall Installing the sidewall | Then fix the opposite wall from the door. |
 Assembling the last part Assembling the last part | Let’s proceed to front wall assembly. |
 Now you can securely fasten everything Now you can securely fasten everything | Now it can be installed and secured. From the metal corner (65 mm) we will make the outer and inner frames of the gate and fix them with each other with metal stripes. |
 Trying made rafters Trying made rafters | Let’s proceed to making rafters. Having made the first section, you can check how accurately it is made. |
 Installation of rafters Installation of rafters | Making sure that everything is done correctly, we will do the rest of the rafters and install them. |
 It is necessary to install a vapor barrier It is necessary to install a vapor barrier | Fasten the vapor barrier and beat the crate. |
 we use the RSD we use the RSD | to frame the casing We used ondulin as a roofing material. |

| The frame sheathed around the RSD. |
 Metal-plastic windows Metal-plastic windows | Inserted plastic windows. Door frames were welded from a 40 * 25 mm profile pipe and, observing fire safety techniques, were welded to the frame. |
 This completes the work This completes the work | Here this turned out to be a garage. |
 Types of gates Types of gates | Swing gates more easy to manufacture, but not very convenient. There were cases when a strong gust of wind broke the sash from the locking device, which resulted in damage to the car body. Therefore, now it is often possible to meet various devices that close the entrance. |
Garage device with attic
If the dimensions of the building allow it, the attic can be converted into an attic. Of course, it would be best to provide the attic at the design stage, but this is not always the case, because the need for additional usable space arises during the operation of the room.
Conversion process
One of the points that must be taken into account is the placement of the staircase and the cutting out of the part of the ceiling so as not to disturb its carrying capacity, which is not always possible. If this happens in your case, then you can make an extension to the existing structure, through which you will be raised into the living room.
In some cases, gases from a working engine enter the room on the second floor. Especially this can be felt when starting a cold engine (especially diesel). Therefore, ventilation must be provided in the garage itself. It is also necessary to install a door to the living room.
Everything is taken into account when planning
If the manufacture of an attic is planned in advance, the project already provides for where and how the staircase will be installed. In order to make the most of the available space, the roof is made broken.
How to insulate?
The living area should be warm, and if the garage is unheated, then you will need to do not only the walls of the attic, but also the floor. First, let's talk about the walls, discussing the basic rules of insulation.
 The stretched kapron thread resembles a spider The stretched kapron thread resembles a spider | Experts strongly recommend using a kapron thread, as it will save insulation from sagging and slipping. From the thread is a kind of web, which is stretched and securely fastened. It is important to remember that not the whole attic is being insulated, but only the living space. |
 The nylon thread securely holds the mineral wool The nylon thread securely holds the mineral wool | When working with attic walls, insulation is first laid down, and then the thread is pulled. The same is done with the ceiling, if later it will not be possible to put a heater on top. It is important to note that the minimum layer of insulation to be laid should not be less than 200 mm. In areas with severe winters, you need to increase the thickness of the insulation to 300 mm. |
 We will make sure that cold air We will make sure that cold air | does not pass through the insulation When laying insulation, it is important to ensure that there are no cold bridges left. As for the mineral wool, it can accumulate water in itself, therefore, opinions on the expediency of its use diverge. Many people prefer to use penoplex, since it is not hygroscopic. |
 For this, the next row of insulation should overlap the joints For this, the next row of insulation should overlap the joints | For this, the next row of insulation is laid so that it overlaps the seams of the laid material. |
 Vapor barrier is glued with silver reinforced adhesive tape Vapor barrier is glued with silver reinforced adhesive tape | At the joints be sure to glue the vapor barrier. For this, it is best to use silver reinforced tape. It is not only durable, but also well glued. |
 When sizing parisolation on the walls, the reverse overlap is not needed When sizing parisolation on the walls, the reverse overlap is not needed | In the attic, the vapor barrier is overlapped, so its installation is done from top to bottom. Reverse overlap means that the next sheet of vapor barrier will fall on the top sheet. Thus, couples rising from the bottom of the room will go not to the joints, but to the top of the roof and will be weathered due to ventilation. |
 The counter racks provide ventilation under the The counter racks provide ventilation under the | casing > After installing the insulation from the side of the room (as well as outside), the counter bars must be nailed. |
 Cladding boards as constructors Cladding boards as constructors | On the ceiling, the role of the counter-rail and the batten will be performed by 25 mm thick boards. This dual function board can perform only on a flat ceiling. |
 This is what a roofing cake looks like This is what a roofing cake looks like | Submit All in details will help scheme roofing pie roof attic. |
Video: nuances and technology of mansard roof insulation
As for the methods of floor insulation, then the only limitation in the choice of material can be its large weight.
Video: ways of attic floor insulation
Can I make a two-car garage?
If there are 2 cars in a family, then the frame can be made so that even 4 cars can fit in the garage. In this case, it is necessary to calculate the dimensions and carrying capacity of the material used, let it be wood or metal. The following video demonstrates the process of building such a structure.
Video: Building a frame garage for 2 cars
Building a skeleton car costs less, but such a structure cannot be called a budget option. With the observance of the technology of construction of such a structure, it will serve the owner and his car for more than a dozen years.
Search
Related Articles
What bimetallic radiators are better
Bimetallic radiators - they are installed without problems, they give plenty of heat, and they can boast of a beautiful design. The stores sell bimetallic radiators of different design and technical...
Tarkett linoleum - technical characteristics and properties of all collections

When going to the store to buy linoleum, many ask Tarkett products from sellers - after all, everyone has heard about its quality. However, seeing how diverse the range of these floor coverings is,...
Ecowool - disadvantages, advantages and properties of insulation + Video

Today in the construction of houses is widely used modern insulation material - ecowool. The disadvantages of eco-wool for many years considered the leading experts of this profile. Not all positive...
Rafters for a bath: categories, design, device
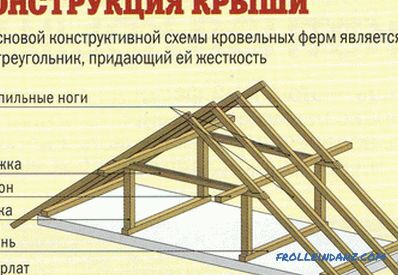
The roof of any structure is the supporting frame on which the roofing material is mounted. Its construction is impossible without such important components as rafters, power plate and lathing. Eve...
Do-it-yourself board table - preparatory work, drawings (photo and video)
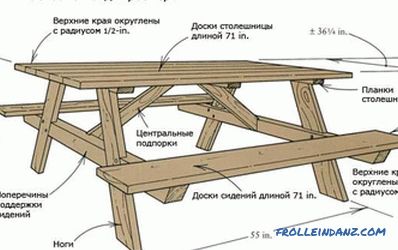
The board table can be made with your own hands. To do this, prepare a drawing and determine the size of the furniture. If a simple table is made, then its length (cm) should be equal to 120, heigh...