Mauerlat is a very important building block. It is installed over the walls and serves as a support for the roof rafters. It is very important to know the rules for mounting the wall cover. Everything must be done in such a way that this element evenly distributes and normally maintains the load on it. Unlike the truss system, the mounting of the power plate can be performed exclusively fixed. If you wish, you can do the handpieces. It is only necessary to strictly follow the instructions and take into account all the rules and recommendations given during installation.
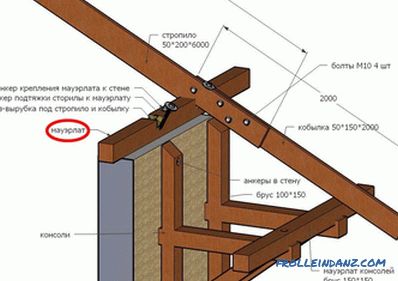
The mounting scheme of the power plate to the wall.
Preparation for fastening the power plate
Before installing this element, you need to perform a number of important preparatory work. Mauerlat is made of finished timber or a pair of boards of appropriate dimensions. Nails are used to join the boards. It is important to choose the right wood. The most preferred breed is pine. To create a mauerlat, you can use a material with a moisture content of up to 22%. There are several ways to mount structures on the walls.
When choosing a particular method, one must first of all take into account the material used for the construction of the building, the area of the building and a number of its design features. The most important thing is to secure the mounting plate on the walls as securely as possible. Such elements must be installed on an exceptionally flat surface and in a strictly horizontal position. Loose mounting is not allowed. In view of this, the creation of stop slots is allowed exclusively from the side of the rafters.
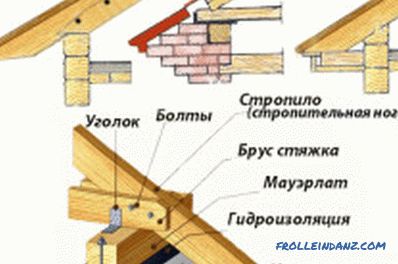
Ways of connecting the power plate with a truss foot.
In order for the system to be more stable, a protrusion must be made from the inside of the wall during its construction. During the fastening of the base under the rafters on the walls, this projection will prevent its accidental dropping even when uneven and too strong loads on the roof of the building appear.
To work you need:
- Bar. Choose a material with a section from 15x15 cm.
- Waterproofing material (roofing material is most often used).
- Construction level. With it, you will control the horizontal installation of elements.
- Drill.
- Adjustable wrench.
- Hammer, bolts, nails.
The set of materials for work may vary in accordance with the chosen fastening method. So, if you opt for tying timber with wire, you will need to buy a thick steel wire rod. In most cases, there is enough material with a diameter of 0.5 cm.
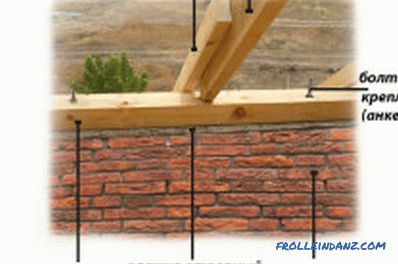
Elements attaching rafters to the power plate.
In the event that wooden plugs are used in the process, the following will additionally be needed:
- Wooden bars. Pick them up in a size that roughly matches the size of an ordinary brick.
- Metal brackets. In this case, you will need products with a length of 25 cm.
If construction studs are used for the connection, additionally prepare the following:
- L-shaped pins made of metal with a thread of about 12 -14 mm in diameter. Pick up such products so that the length of the short part is 12-14 cm, and the length of the threaded part is 5 cm.
- Metal washers.
- In the case of installing concrete pads, you will need concrete. Material grade 250 will suffice.
- Nuts for the thread of selected pins. In most cases, this thread M12.
Guidance on the choice of the method of fastening and the form of the structure
It is important to choose the form of the structure and decide on the appropriate mounting option. If you have a frame, panel house or a house built of lightweight concrete or lightweight brickwork, it is best to equip a continuous system around the perimeter of the building. If you are working with a more massive structure, the mauerlat should be installed flush with the inside of the wall. Outside, it will be fenced with a masonry ledge. For the device, you can use pieces of logs or lumber with a length of 50 cm or more. These segments should be placed under each leg of the truss system.
For houses with a small roof area, a structure in the form of a rigid frame is suitable. Bars are spliced with a direct lock and fastened to each other with nails and bolts. After this, the frame is attached to the plugs with brackets For the manufacture of caps used pre-treated with antiseptic composition of wood.
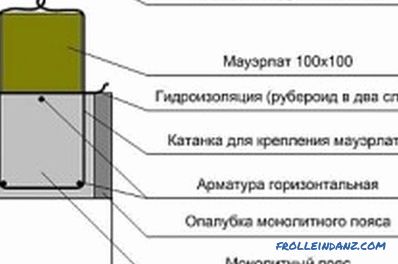
Fixing the power plate to the wall with a wire.
The corks themselves are embedded in the masonry. A waterproofing layer must be laid between the frame and the brickwork. A pair of layers of ruberoid will be enough.
If the roof of the house has an area of 200-250 m2 and more, then it is better not to use the considered method.Instead, another will suit, according to which a concrete pad is arranged on the wall where the power plate is mounted. In not fully frozen concrete, metal threaded rods must be embedded. They are installed in a vertical position. Choose rods that are 3-4 cm longer than the thickness of the mauerlat. Install them at a distance of up to 2 m from each other. The product is pre-drilled holes, it is put on the rods and is attracted by nuts and washers.
The rods can be made from fittings of suitable length. It is enough to weld the bolts to them with the threaded part up, after cutting off the heads from them.
Some owners simply bend sections of reinforcement that protrude over the beam. Do as you think is more correct. To prevent the rods from tearing out of concrete, metal plates should be welded to their bottom. This will not allow the rods to "go away" even with very strong gusts of wind.
When installing a power plate on roofs of up to 200 m2, concrete pouring is not necessary. It is only necessary to build in reinforcement in the 3-4 upper rows of the masonry. It is important that the bar spacing is different from the rafter spacing.
Step-by-step instructions for fastening the power plate with studs
Experts consider this method to be the most reliable. Therefore, it is recommended to make a choice in his favor. If the studs are embedded directly in the brickwork, they must be immersed 45 cm. In the wall they must be located in an upright position. The protrusion above the surface of the power plate should be from 3 cm.
If desired, a method based on the use of support pads can be used for fastening. The main difference from a similar operation with the arrangement of a monolithic reinforced belt is that with the device of the support cushion the length of the pillow should be no more than 40 cm, and the height should be up to 22 cm. 2> Fastening the power plate to the wall with anchor bolts.
Before performing the concrete casting, it is recommended to wrap the thread of the studs with adhesive tape. This will prevent its pollution and will relieve from difficulties with further tightening the nuts.
Before installing the mauerlat, drill holes in it. For this work you need to use a special feather drill. Markup is pre-created. To make it as accurate as possible, lay the mauerlat on the tip of the studs and hit the top with a rather massive hammer. After such a simple operation, the marks on the surface of the product will remain in the required places.
Make sure that the studs are always located at the edges of the mauerlat. The base for the future roof is laid along the centerline. It can also be slightly displaced outward or inward (this depends on the particular construction of a particular building). The most important thing is that there should be a distance of at least 50 mm between the power plate and the outer part of the wall.
Lay the waterproofing material on the wall, impaling it on the studs. Proceed to the main stage of installation. In the process of fitting the system, take into account the fact that the mauerlat in no case can not be cut. This can only be done with rafters, be sure to control that they reliably rest on the bar. Consider: it is based, not just concerned.
Fastening options for small roofs
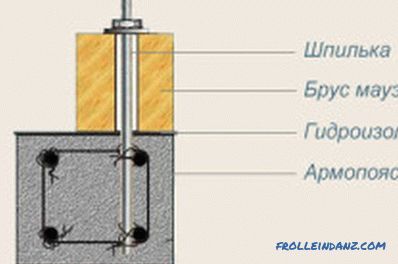
Fastening the power plate to the wall using studs.
It is considered that if the house has a small area, then the rafters can be mounted straight to the floor beams, without first attaching the power plate. It is important to take into account the fact that great tension is formed at the points of support. Mauerlat allows this tension to be distributed as evenly as possible over the surface. In addition, the roof has a fairly high sail. The device is the same Mauerlat and compliance with all other important requirements will allow you to avoid shifting the roof with a strong wind.
One of the simplest and most accessible is the method of fixing the structure using thick wire.
Sometimes in such situations rafters are used, which are connected to the reinforcement hammered into the masonry by means of wire twisting. Thanks to them, the direct pressing of the power plate to the wall is carried out. But such a solution is recommended to use only in those situations when it is impossible to apply any of the other existing methods.
Traditional wire fixing is performed as follows. First you need to place the middle pieces of wire in the masonry for 4 or 5 rows to its completion at a distance of 60-65 cm. Lift up the ends of the wire 25-30 cm long. Wait until the solution is strong enough, and twist the ends of the wire over the wooden beam, tightly pulling it to the wall.
In various small buildings, it is convenient to mount the system with the arrangement of wooden traffic jams.The most optimal use of cork the size of a brick. The material is pre-treated with an antiseptic agent and wrapped around with it. Traffic jams are placed at a distance of 50-70 cm from each other directly under the power plate or slightly lower. Elements are connected with metal brackets.
Didn't find the answer in the article? More information on the topic:
-
Wooden windows: DIY-making
Do-it-yourself wooden windows: the advantages of installing wooden structures. Varieties of windows from natural breeds. The stages of the manufacture of wooden windows, installation design.
