If a person likes tinkering at home, he will definitely need to arrange for himself a comfortable and safe place to work. High-quality imported workbenches are very expensive, and Chinese fakes raise many doubts. Therefore, it will be useful to learn how to make a workbench with your own hands at home.

The scheme of the joinery workbench.
A reliable and high-quality workbench can be made independently. Indeed, in reality, its design is a regular table, complete with fasteners, supports and a place where the tool kit is located.
Designing the Workbench
When designing the design of the future workbench, you need to consider several factors that affect the final configuration. First of all, you should pay attention to the height of the table: it should correspond to the height of the person who will work for him. The master should always feel comfortable and reach all the necessary areas of the workbench. In this case, the table should not be very low, since the work in a bent state causes a stoop. The average workbench has a height of about 75-85 cm.
Regardless of the operations that will be performed on the workbench, its configuration must include certain supports and several clamps or screw vices. At the same time, it is worth considering which hand the master prefers to work with, since this affects the location of certain accessories.

A drawing of a self-made workbench.
Table dimensions are determined based on the total area of the room where you plan to place it. Standard workbenches usually do not exceed 2.5 m in length and 90-120 cm in width. This size is considered optimal and suitable for most masters. Be sure to provide for the placement of several drawers or pedestals under the projected workbench, since you need space to store the necessary equipment and a set of tools.
During the design process, you need to decide whether the table will be removable (disassembled) or fixed and static. With a removable type of configuration, it is recommended to select lighter types of material for making a workbench. Understand the table, it is advisable to make in such a way that you can simply dismantle the tabletop or unscrew / fold the legs.
The most suitable place for the location of the workbench is the area close to the window opening. It must be installed so that in the process of working there is enough natural light. But in case of working at night, an additional light source will be required without fail. Therefore, you should make sure that there is a socket or a box with wires nearby so that you can connect a lamp and use electrical tools. Make sure that all electrical wiring is well insulated and not dangerous to the working person.
Selection of the necessary materials

Tools for making a workbench.
Before making a workbench, you need to select the required materials and accessories. The most suitable material for such a table is planed timber. From it will be made obreshettochnaya frame and legs. To create legs, you need a bar of 10 * 7 cm in size, and for jumpers there will be enough size of 10 * 5 cm.
The table top is made of straight, even boards 50 mm thick. In addition, this element can be created from an unnecessary solid wooden door or laminated chipboard with a high-strength surface. As a material for the manufacture of parts, it is recommended to select dense woods such as maple, larch or oak. Thick timber and boards will make the structure massive, which will give it additional stability. As you know, this factor is one of the main in the process of working behind the bench.
The fasteners that will be needed to create the table are selected based on whether it is stationary or removable.
However, it is necessary to determine the number of installed vice. The best option would be to place 2 tools, one of which will be located on the right side of the workbench, and the other on the front of the left. The first will be designed for fixing elongated materials, such as boards. The second will be useful for fastening short elements. Standard diameter of vice jaws - 175 mm.

The scheme of the joinery workbench with sockets for fastening.
In addition to the above materials, you will need the following accessories and tools:
- self-tapping screws, nails, screws, bolts;
- hammer;
- screwdriver set;
- construction level;
- wood glue;
- drill and saw;
- grinding machine or sandpaper.
Production of the main part of the workbench
The assembly of such a table is carried out in 2 stages. The first stage involves the manufacture of the main part, and the second - the placement of the table top. Any stage of the process implies an exact selection of the size of the elements; they must correspond to the overall size of the structure. Measurement needs to be carried out using a building level
The main part is a lathing frame made of a bar, which is connected so that the whole base of the workbench turns out to be high-strength and tough. To achieve such a result, it is necessary to place a cross-link between the table legs, and in the center you will need to provide a rye. The listed elements are placed 0.5 m from the floor. In the future, you can arrange special shelves for storing various accessories.
The main part of the timber must be joined into the spike and into the groove, simultaneously supporting the structure with a reliable glue. In some places you can use self-tapping screws, if the design allows this type of reinforcement. In the case of manufacturing a disassembling type of workbench, several parts of the crate can be fastened with metal corners.

The scheme of fastening clamps and stops for the workbench.
Before starting work, you need to prepare the spikes and grooves, after which you can proceed to the construction of the structure. Joining places must be securely glued with wood glue for wood, and then secured with clamps.
In the manufacture of a fixed type of workbench, it is recommended to provide for fixing some parts of the crate directly on the wall of the room. Thus, you get the most reliable design that can withstand high loads. Strength can be increased by means of cross bridges or wooden inserts in the form of a wedge, which are located between the legs and the top of the batten. In this case, the fastening is done with self-tapping screws. The tapered ends at the top of the batten will also need to be joined with a cross web.
Production of tabletops
If you use straight boards for the production of tabletops, you must make sure that they fit well together. Otherwise, garbage will penetrate the chasm, which will be difficult to eliminate. When building this element, its value is calculated so that the edges protrude 10-15 cm to the outside. This will provide the master with more comfortable work at the workbench, in addition, it will be easy to clean and maintain.
When starting to manufacture the worktop, the boards should be nailed or fastened to 3 bars, which are transversely placed from another part of this element. In the main part it is necessary to make attachment points for these bars. Such a table top must necessarily be ground at least 2-3 times, after which a protective mixture (preferably drying oil or oil) should be applied to it. This will prevent the formation of small chips, which may cause injury to the master in the future. After that, the table top is fixed on the main part with the help of metal corners.
Fastening of other construction elements
A required number of vice is attached to the prepared structure, under which the openings in the necessary parts of the table top are pre-prepared. Under these openings you need to fasten small gaskets of dense plywood. When installing it is necessary to take into account that the vice jaws should be placed at the same level with the workbench surface.

Workbench assembly scheme.
Trying on the vice for the openings, you need to mark the attachment points, and then securely fasten the tools with the help of hardware on the M12. Holes for hardware pre-milled, which allows the bolts to plunge to the end and equal to the surface of the tabletop. It is not recommended to place the vise too close to the corners of the workbench, otherwise there is a risk that the tool will fall off the table at high loads.
After the mounting of the vise is completed on the workbench, you need to create support elements. This can be done by fixing the finished stops, drilling openings of the desired size on the table, or you can create them yourself. Bolts or pins are not recommended as stops, since the former ones can cause damage to the parts being machined, and the latter do not provide reliable fastening of the installed elements.
Making the stops in the form of a rectangle is the best solution. They will ensure reliable fastening of parts and placing them at the required height during processing. In order to reliably position the stops, it will be necessary to make openings on the surface of the workbench or to increase the tabletop by fixing the bars of the desired size in its end part.
The openings are spaced apart half a turn from the grip. This will fix elements of any size.Pegs can be made of dense wood either in a rectangular shape or with the presence of a spring at the place of attachment. In the case of the manufacture of rectangular support elements, it is recommended to slightly expand their upper part. So pegs can be fixed in the openings much safer.
Assembling a self-made workbench for carpentry work is a laborious process, but it can be done by every novice master. This design is an integral part of any workshop, since it includes a lot of useful equipment assembled in one place.
Didn't find the answer in the article? More information on the topic:
-

Tool selection: which circular saw is better?
Which circular saw is best: the choice of saw depending on the area in which it will be used. The main parameters characterizing the model. Cutting depth and adjustable angle.
-

Which house fretsaw is better to choose
Which jigsaw is better for home use? Attention should be paid to the functions of the tool. Estimated power equipment, the ability to adjust the course.
Search
Related Articles
Sizes of sawn timber: GOST standards

Lumber is a group of building wood materials produced by the method of sawing roundwood. Different sawing schemes are aimed at maximum waste-free production. The timber obtained on sawing is dist...
French style in the interior - the rules of design and photo design ideas

What is the French style in the interior and what are the main characteristic features of it? To answer these questions, you can carefully consider the interiors of modern French apartments. Despite...
Calculation of the truss system, constant and snow loads (video)
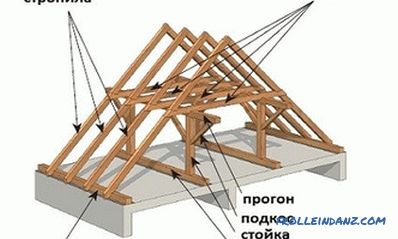
The calculation of the truss system acts as the main design process of the building, this allows you to determine the parameters of the carrier system. The structure of the gable roof of the...
Plaster walls without beacons with their own hands

If you started a repair, then, most likely, you already know what you want to see in the final result. However, have you ever thought that by making repairs, you can save money at some construction...
Do-it-yourself stool repair: options
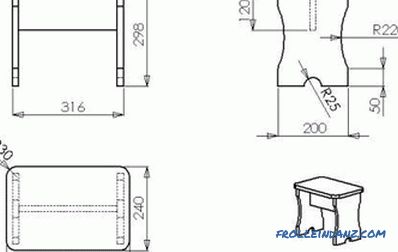
Stools in the interior are the most important functional part of it. And if recently in the bedrooms and living rooms stools have become not such a common attribute, then in the kitchen you cannot...