If something in the old furniture is broken or it has lost its appearance, this does not mean that it is necessary to change it. Furniture can be restored, and any furniture, including kitchen. To begin with, it is important to determine what exactly broke, whether it is possible to repair, whether the repair will be temporary, or the furniture can still last for a long time. In the event that the set is made of good-quality material, or only the correction of cosmetic defects is required, the repair of kitchen furniture with its own hands justifies itself. This is especially true of wooden furniture, it can be repaired repeatedly. But the more affordable furniture from MDF and particleboard is also amenable to repair, when, for example, you need to refine the appearance of the facades.
Renovation of kitchen furniture
Usually, the fastest kitchen loses appearance, and most of all it is noticeable on the facades. If these are MDF fronts, then in some places the film is lagging behind (the ends of the facades are vulnerable), scratches appear, spots from various contaminants, such as fat, appear, the coating changes color and becomes uneven in tone.
Restoration of minor damage
Minor damage should include chipping, scratching, scuffing.
- Chips are removed with wax. The chip is pre-leveled along the edges of the chip, melted with wax, polished, and then painted over with special felt-tip pens, selecting colors. Then fix the finish layer of varnish.
- The scuffs are rubbed with a soft microfiber cloth with a dye from a felt-tip pen.
- Scratches are polished with furniture wax.
- If some parts are separated, the edges are coated with PVA glue and pressed together with clamps.
 Minor defects can be painted over
It happens that the edge of a kitchen or kitchen top is peeled off. the table. It can be replaced with a new, suitable in color. This will require the very edge, scissors, construction knife, iron.
- The hem is cut into pieces, according to the size of the tabletop, with small allowances. First make blanks for the long sides, then for the short ones.
- Then the iron is adjusted so that the edge does not overheat and swell.
- The edge is evenly applied to the end. For convenience, you can put the table top end up.
- Uniform slow motions lead along the edge with an iron, as a result of which the glue melts, and the edge is glued to the end.
- While the glue is cold, it is necessary to press the edge to the table top, ironing with pressure along the edge with a piece of felt or a rag.
- The excess edge at the corners is trimmed with scissors, trimmed with a knife.
- The excess edge at the top and bottom, if it does not fit in width, is cut with a knife, gradually, towards the table top. And then pass one more time in one motion, putting the blade at an angle of about 45 degrees to the tabletop.
- The corner joints are lightly sanded with a fine sandpaper.
Video: restoration of a burned tabletop
Blown, peel off film
Peel off film can be stuck back, if this defect is minor. For these purposes, the usual PVA glue will do. The main thing is to get to all hard-to-reach places.
Video: gluing a shrink film with PVA glue
When the problem becomes global, the film will have to be removed. This is done as follows.
And after that two options are possible: either paint the facades or glue a new film.
Facade Coloring
If it is decided to paint, then the facades will need to be sanded in order to clean off any glue residue and level the surface. This applies to both MDF, particleboard, and the whole tree. In places where the cutter passed, the material may be rough. To prepare for painting, professionals recommend taking:
- P220-280 sandpaper on foam rubber. It takes better shape, and it can sand complex bends;
- Scotch Bright P220-280 is a non-woven abrasive, somewhat resembling felt. They are hard-to-reach places;
- anti-silicone - acts as a degreaser;
- plastic primer (suitable for wood);
- epoxy primer - needed for good adhesion;
- acrylic primer - foaming, for leveling the plane;
- solvents.
If there is gloss on the facade, it is necessary to knock it all over the plane, to achieve haze. Then carefully remove dust from the surface, degrease it and apply a primer for plastic. Then they primer it with epoxy primer, let it dry for 3-4 hours (if there is no paintwork on the facades, this step can be skipped) and primer with primer-filling primer, grind, preparing the facades for painting.
 Putting paint on the facade
Paint in cans is often used as a dye.Painting the facades, first pass the ends, then apply the paint with a smooth movement from side to side, moving upwards or downwards, with overlapping layers.
Decoupage
A popular way to update furniture is decoupage. It is characteristic of rustic interior styles, especially Provence.

| First of all, unscrew the handles from the facades. |

| If there are any defects, they are eliminated. |

| You can use the remover to remove the paintwork. After applying a brush should cover the facade with a film. |

| Then, having endured the time, according to the instructions, the varnish is peeled off with a spatula, removing the film as it is being cleaned. The reuse of a wash is allowed. |

| The surface is well sanded, dust is removed with a damp cloth. |

| To achieve the transparency of the paint, mix white acrylic lacquer and white acrylic paint. Color in the direction of the fibers of the tree. |

| The drawing should be carefully cut out with a stationery knife along the contour to fit the size of the plane. To arrange the elements symmetrically, they control the distance with the help of a measuring tool. |

| Apply a napkin and apply PVA glue on top of it. |

| Then, after the glue dries, the surface passes through a fine sandpaper. |

| Apply a thin layer of acrylic varnish. Again sand and varnish. |

| Additionally, facades can be decorated with putty. The composition is prepared as follows: mix the oil putty with white glue to achieve the consistency of sour cream. Attach the stencil in the right place and putty over the stencil. |

| The resulting ornament is polished with fine sandpaper. If desired, you can tint the putty. Then this area is covered with acrylic white varnish. |

| Then a matt yacht varnish is applied to the surface. |
Gluing self-adhesive film
If you want to give a certain texture to MDF facades, use a self-adhesive film. Before gluing the film, the facade is prepared as before painting. It is important to stick the film carefully, avoiding the appearance of bubbles.
- First, cut a suitable-sized piece of film with allowances of 2 cm on each side. Then a film is applied evenly to the edge of the facade, after removing the 5-10 cm of protective strip.
- Glue the material in small sections, smoothing and gradually removing the protective film.
- If, after all, bubbles have formed and cannot be expelled, it is necessary to pierce them and release air.
 Self-adhesive film can transform the interior
Replacing the tabletop
Tabletop Chipboard sometimes becomes unusable completely, if, for example, it is swollen from water. In this case, it is not necessary to order a new one. You can make your own tile countertop. Such countertops, firstly, are durable, and secondly, you can pick up almost any design. It is fashionable to spread the countertop from the mosaic.
Broken mounting holes
Chipboard has a tendency not only to swell from water, but also to crumble under load. From the often inaccurate opening of the doors of the cabinets, screws cut open the holes and break out what is called "with the root." It is simply impossible to fasten the screw to the same place again. But there is one long-known way to repair broken holes, which are still successfully used.
If more serious damage occurs when a laminated coating peels off around the attachment point, use another method. Mix PVA glue and wooden chips. This composition is filled with damage. Allow to dry and then screw the screw as if it were a new surface.
Second life chairs
When analyzing the ways to repair kitchen furniture, it must be said about the repair of chairs. The easiest way to update is a case that will hide all scuffs, scratches or patches on the seat. If a chair with a hard seat, it is enough to paint it, you can decorate with decoupage. The work is carried out in the same way as in the case of facade restoration. Old chair with a soft seat must be overtightened. Let us consider in more detail how to do this. From materials and tools you will need: sandpaper of medium grain, primer, brushes of different sizes, gloves, paint, wadding, upholstery fabric, furniture stapler.

| First, remove the seat and remove the upholstery and filler. |

| Then the wooden seat is covered with a primer, it has antiseptic properties. Primed, leave to dry completely. |

| The chair itself should be sanded, then primed and repeated these two steps again. If you want to achieve the effect of a perfectly smooth surface, then you need to do an additional sanding and priming, with a leveling primer. |

| Then you can start painting. It is recommended to start staining from the inside, bottom. |

| Then the chair is turned over and put paint on its upper part. After drying for 24 hours, the chair is painted with a second coat of paint. |

| Leaving the allowances of 4-5 cm, cut out a piece of fabric according to the size of the seat, two sides at once. Moreover, the fold of the fabric must coincide with the outer edge of the seat, i.e. the parts will be joined together. |

| Then the batting is cut out. It is enough to lay the fabric in 4 layers. |

| The entire batting is fixed around the perimeter with the help of a furniture stapler. |

| Then lay upholstery with the wrong side up, lay the seat down with a batting. |

| Pass with a stapler on the sides, then bend the upholstery at the corners separately, fix with brackets. Lay on top the remaining piece of upholstery, bend inward excess. And pass with a stapler or hot glue. |

| Install the seat into place. |
And it also happens that the wood is cracking and the chair starts to stagger. This problem is also corrected by itself.
Video: how to fix a loose chair
This is how you can repair kitchen furniture. These are not all options. You can find many more ways to repair, original options for the restoration and renovation of the kitchen set, table, chairs. But even using only these recommendations, it is possible to completely restore kitchen furniture, while spending only on consumables.
Search
Related Articles
How to install siphon - do-it-yourself siphon installation

We seldom remember such an element of water drainage as a siphon, usually only in cases when we look under a sink or when a sewer is blocked. They can be seen under the sink in the bath or under the...
Replacing the heating battery in the apartment with their own hands
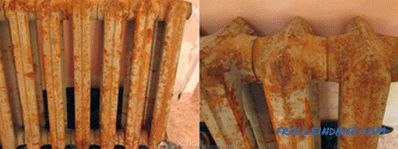
After moving to the purchased apartment, located in a house built in 1968 ("Khrushchev"), the question arose of replacing the old cast iron radiator with a new one. After long and painful doubts, we...
How to level uneven wooden floors do it yourself: technology (video)
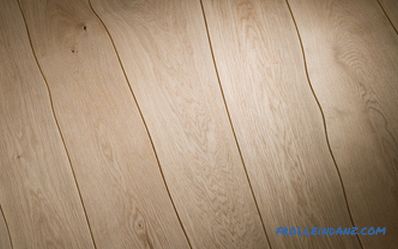
The quality of floors and the comfort of staying in a house or apartment are always closely interconnected. A lot of inconvenience and trouble deliver uneven wooden floors. They creak, make unpleas...
Screed flooring on wooden lags: the subtleties of installation
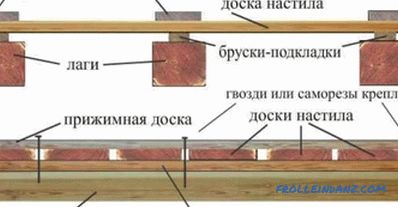
In the process of laying a floor covering a mandatory step is the installation of a sand-cement screed. With its help, the surface is leveled, on which this or that floor covering will be laid late...
Laying the substrate under the laminate with their own hands
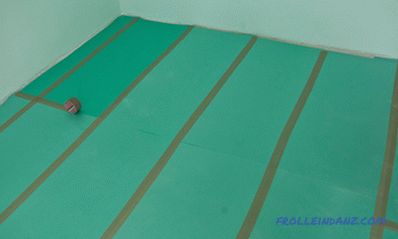
This material is about laying the substrate under the laminate. This stage precedes the installation of laminate flooring and is mandatory, since it depends on it how long a new flooring will last f...