Red brick has been used for construction for quite a long time, however, despite the fact that many other building materials have been produced, it is successfully used for the construction of load-bearing walls of houses, as well as for the foundation, although this is done less often now than before. If you chose this material and decided to make a brick foundation with your own hands, then it is important to know in what conditions it can be used, and what types of foundation do with it.
What you need to know about the soil
 Types of soil
Different areas, even in one locality, the type of soil may differ significantly. Let's call several species:
- Loose.
- Average heaving.
- Non-lumpy.
In order to understand what kind of soil in the area, you need to know how it differs. A soil is called puffy, which freezes increases in volume. This phenomenon occurs because ice crystals appear in it. This is facilitated by both the composition and level of groundwater, as well as the composition of the soil consisting of pebbles, sand, clay and gravel. The heaving level of the soil depends on the size of the particles of which it consists. Values are mutually proportional - the highest heaveiness of the soil with smaller particles that are included in its composition, but accurate data on the quality and composition of the soil can be obtained only in the laboratory.
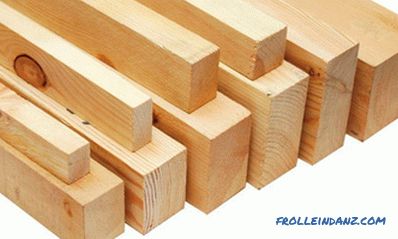
Choice of brick
 Red solid brick
Most often used for this purpose used brick, remaining after the dismantling of a building. This is, in general, not bad, as he passed the test of time, but it must be borne in mind that now he has to be in a wet environment. Therefore, a perforated or slit red brick cannot be used for these purposes. The ideal option would be to use corpulent baked red brick (ceramic). It is resistant to moisture, durable, but requires additional waterproofing, which will significantly extend its life.
How does a red clay brick differ from a silicate brick? The basis for the manufacture of silicate bricks is taken a special breed, which is pressed and baked under high pressure steam. This makes the silicate brick able to withstand very large loads, but on the condition that there is no moisture. Such a brick in water limp, losing strength and shape. Red clay brick is burned in special furnaces, becoming an artificial stone that is not afraid of moisture. This technology is similar to the technology of obtaining ceramics. Essentially, they are related, therefore, in order to make a brick foundation, facing brick is also suitable, if, of course, the plant guarantees that it is resistant to moisture.
Device depending on the type of soil
 Columnar brick foundation
After determining the type of soil, you can choose a suitable foundation for it and start preparatory work.
The best conditions for building a brick foundation with your own hands are possible only on non-dull and dry soils. Such a device is most often used for under construction, mostly one-story buildings, the foundation can serve more than 25 years.
An ideal option for non-refractory soil is a shallow strip foundation. On a soil that has an average heaving, you can make a column base (for light structures), and on a heaving one you need to make a deep strip foundation, digging a trench deeper than the level of soil freezing.
Tape foundations
 Tape foundations made from bricks
As non-refractive soil is found infrequently, we will consider how to independently make the recessed strip and columnar foundations.
For the first you need:
- Dig a trench of the desired depth.
- At its bottom make a sand pillow and tightly tamp.
- Make waterproofing the sole base.
- Make a concrete sole.
- Lay the brick with reinforcement. Cement layer should be minimal.
Only in this case, the properly made foundation will not be afraid of deformation, respectively, the cost of it will also be increased, but this is not the case when you can save or experiment.
Especially, you need to pay attention to reinforcement. For these purposes, steel rods Ø 6-8 mm are used, which must be completely hidden in the cement mortar, otherwise they will quickly rot. It is necessary to make 2 belts with 2 rods in each, at a distance of half a brick from the edge, and bend the ends at the corners so that perpendicular rods can be tied with overlap, but their length must be at least 30 cm.
The columnar foundation of brick is made a little differently.
The device of such a foundation, as well as a strip one, can be made shallowly buried or on weak heaving layers with depths made below the freezing depth. In any of these cases, the brick column is able to withstand a very large load.
Columnar Foundation
 Brick Foundation
Let's start in order:
- For each pillar, you need to dig a hole 1 * 1 m. The depth is determined by the type of soil and the required thickness of the foundation, calculated on the weight of the structure.
- Fill the bottom of the pit with sand and tamp it down.
- Level the site with a mortar to a horizontal level.
- Lay a roofing material over the tie. This will serve to protect the brick from penetrating moisture from below.
- Directly on the ruberoid, which plays the role of waterproofing, build a column of brick.
Similarly, all the columns that can be made rectangular or square are made. To improve strength, it would be nice to lay a reinforcing mesh every 3-4 rows of masonry. The most powerful pillars (51 * 51 cm) are made at the corners of the future building, others can be made smaller (38 * 38 cm), at intervals of 1.5-2 m. The height of the pillar above ground level is between 15-20 cm, it is plastered and after drying it is coated with hot bitumen. We lay ruberoid on each column and start building. Do not forget that all the pillars should be on the same level.
The column foundation cannot be left without load for a long time, because the processes occurring in the soil can deform them. Therefore, if its construction began in the summer, then do not leave it unloaded for the winter. Try to finish mounting the main structures at temperatures above zero.
We advise you to read:
- how to make a fence out of corrugated flooring with your own hands;
- a well in a private house with your own hands.
Search
Related Articles
instructions and recommendations for laying (photo and video)

Properly selected floors in a wooden house provide a more presentable look and a comfortable atmosphere in the rooms. Floor installation scheme in a wooden house. In wooden houses, the flo...
How to soak floor lags: types of modern impregnation
Restrict the construction of even a high-quality home is not enough. It is necessary to think about the upcoming protection of wooden surfaces of all structures using lag, i.e. impregnation, on whi...
Country toilet do it yourself (photo)

Any dacha must have a toilet. Moreover, it must be organized before the start of construction itself, because this room is the most necessary for people to stay in the country. The rest of the build...
Assemble the cabinet with their own hands: the preparation of elements, the assembly process
If you wish to fill the non-functional corners of a small room, you will not find a better solution than installing a corner cabinet in one of them. Before choosing the design of this piece of furn...
How to choose a gas column for an apartment or house

Despite the widespread modernization of utilities, the quality of their services leaves much to be desired. This is especially true of hot water. To solve this problem once and for all you need to b...