The erection of the roof of any building begins with the installation of the truss system. Having understood how the roof truss system is equipped, you can do this work with your own hands, saving a lot on the services of craftsmen. Installing rafters requires a competent approach. The roof of the house is subjected to constant atmospheric loads, so everything must be done, among other things, taking into account local climatic conditions. It is necessary to take into account the features of the roof itself. For example, the order of installation of a truss system for a multi-hoop roof differs from the features of the device of rafters for an ordinary single-slope roof.
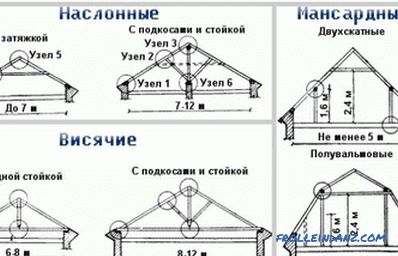
Figure 1. Types of roof systems.
Preparing for the installation of the truss system
Before you begin to work on installing the truss system for the roof, you must prepare the floor and the outer walls of the house. When performing preparatory work, it is necessary to take into account the fact that the material used for the construction of walls usually has some differences in size. These discrepancies gradually accumulate with crowns or rows. Visually, they are usually invisible, but it is enough to pick up a plumb line or level to notice that the angles deviate from the required 90 °, and the height of the walls differs by several centimeters.
Therefore, before you proceed to the arrangement of the roof truss system, it is necessary to measure the corners and walls, and then remove all irregularities. If your house is built of brick or foam block, you should use a cement-sand screed for leveling. If the structure is made of wood in any form, the alignment is carried out using wooden linings. This is done so that in the future the truss system for the roof can be made on the template, without the need to fit each element in place.
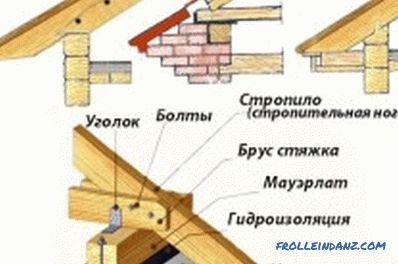
Figure 2. Basic options for connecting the power plate with a truss foot.
So you will save time and effort and reduce material consumption. The load on the nodes is calculated taking into account the fact that the articulation angles of the walls must be straight, and the initial surface must be strictly horizontal. If there are discrepancies of any kind, the strength and reliability of the roof truss system are reduced.
The installation of a truss system for the roof of a house requires the following tools:
- a hammer and an ax;
- a gasoline or electric saw (in the absence of these tools, you can do with a hacksaw for work with wood);
- measuring tape for taking measurements;
- level and plumb for checking the flatness of walls and floors;
- electric drill;
- nail puller, nails of length 8-20 cm and metal brackets with a length of 20 cm;
- pencil.
Before embarking on the main stage of work, study a diagram that demonstrates the main types of roof systems (Fig. 1).
Step by step instructions for installing a power plate
Mauerlat are the beams on which the roof truss will be installed. These beams gird the surface of all the supporting walls of the structure. The width of the beams of the mauerlat should be the same as the thickness of the walls of the building on which they are laid. To further save money, you can use individual bars about 60-70 cm long. To seal the grooves, use the same material that was used to erect the "box" of the building.
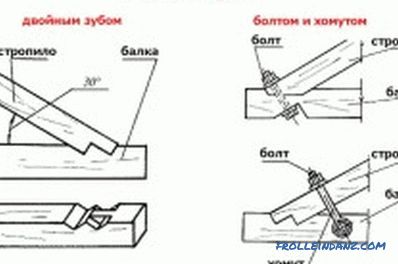
Figure 3. Basic methods for connecting rafters.
The fastening of the mauerlat beams to the walls is carried out using anchors. Before proceeding with the assembly of these support beams, be sure to plaster the surface and apply waterproofing. Most often, roofing material and bitumen mastic are used as a waterproofing material. In the process of installing the power supply monitor the horizontal installation of the system.
After the beams are installed and fixed, proceed to marking the places to install the future truss system. In accordance with the marking grooves are prepared for future assembly of the structure. Finished grooves are additionally processed with compositions to protect the wood from rotting and other adverse factors.
To make it easier to work, consider the basic options for connecting a power plate with a rafter (Fig. 2).
Features of the installation of the floor
The rafter system for the roof can be arranged with a lying or without it. If the installation is carried out using deck, it should be installed immediately after the completion of the installation of the power plate.
First you need to find the middle axis on which the plane will be placed. Measure from the power plate, since the perimeter errors were eliminated using this element. If the roof of the house is hipped, the ends of this breech need to be located at equal distances from the gable and lateral mauerlat. This will provide the same angle of inclination of the hip and the main skates.If the project does not require the creation of identical angles, measure the distance that is provided by the project.
Ground installation plan.
A double layer of waterproofing is laid under the floor. The easiest and budget option - roofing material. The fixing of the shed to the inner walls is carried out with the help of staples or wire twists. It is advisable to lay the twists at the construction stage of the walls. Otherwise, you must additionally use anchors for fastening.
If the building is constructed of foam concrete and other lightweight materials, the reinforcing belt must first be prepared, and then anchors will be produced. It will be to them that the fixing of the lying will be carried out. If brick walls are installed under the basement, it should be fixed to the inner walls. After completing the installation of this element, be sure to check its horizontal position with a building level. All existing deviations need to be corrected immediately.
Rack and Girder Installation Guide
The rafter system in question is intended for a roof with one ridge girder or with additional side girders. If necessary, you can adjust the system to fit your roof: you do not have to make significant changes, so no difficulties should arise.
Saw racks of the same length, install them and check verticality with a plumb line. Pre-fix the racks with boards to the previously prepared forests. Forests can be rented or made independently. Side and ridge girders are put on the racks. If the walls of the building have large differences in the gable, you will have to make racks of different lengths. It is important that the run is laid down in a strictly horizontal position.
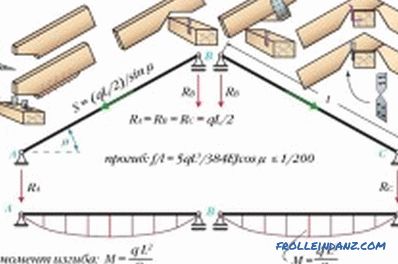
Calculation of rafters.
At the hip roofs, the girder extends beyond the pillars, remember this. After the run is installed, a repeat check of the flatness of the run setup and racks is performed. It is important that the racks are installed vertically and the run horizontally. If necessary, make amendments and secure the nodes in accordance with the project. Temporary construction for now do not touch.
The following diagram shows the main ways of connecting rafters; Be sure to study them before proceeding with further work (Fig. 3).
Rules for marking rafter legs
First, several rails are prepared with a length corresponding to the distance between the side surfaces of the individual rafters. That is, you need to take away the thickness of the rafter from the design step. Directly truss feet mounted butt with slats. Until all the rafters are installed, they do not need to be fully secured, since the entire system must be checked once again for compliance with the project. Each rafter mounted in the appropriate place.
Next, you need to nail the fillies. On these elements the eaves sves is established. Its length without taking into account the additionally installed supporting consoles should not exceed 60 cm. The length of the fastening part should be 60-80 cm. You could effortlessly reach out and mount a hemmed material.
Options for sawing rafters
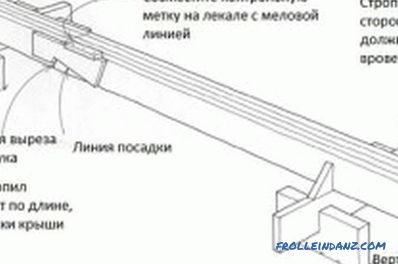
Scheme of sawing rafters.
When choosing a fastening method, consider whether your construction will be spacer or non-spaced. Eats 2 main ways, all the rest are simply derived from them.
In accordance with the first method, the installation of a rafter foot is either stationary or on a slider. The top must be laid on the girder and sew overlapped with another truss foot or rest against it or into the girder. The truss naga itself fits on the mauerlat and girder. The angle of the foot must be rest against the inner corner of the power plate. After that, take a pencil or marker and apply on the sides of the rafter leg the lines parallel to the mauerlat. The intended piece is cut down, then the rafter is laid on the mauerlat and the hemming bar is nailed. This is done if a fixed connection is necessary. On the other hand, another rafter fits, and all the same actions are performed. After that, it remains only to connect the upper ends. To do this, you can put their ends on the corner and connect end-to-end using a variety of fastener methods.
In accordance with the second method, the attachment is overlapped. One rafter leg is simply sawn parallel to the surface of the second rafter. The fixed fastening of the bottom and top of the rafter leg is ensured. This is done by cutting with the use of a tooth. The angle of the truss foot must rest against the outer corner of the mauerlat or at its center.
At the bottom of the rafter, you need to make a notch under the power plate. At the top you need to make a notch under the girder.Further below and at the top of the template the necessary piece is outlined. Rafter Naga simply turns. It is not necessary to remove it from the power plate. Then it turns around and is set in place.
Make the template from the same material as the rafter. After installing all the rafters, finally fasten them together, and then remove the previously installed auxiliary fasteners. Good luck!
Didn't find the answer in the article? More information on the topic:
-
How to repair your own stools with your own hands
Do-it-yourself stool repair: basic repair options for individual parts. Repair legs: installation with glue; thread restoration and improvement of the old thread. How to repair a seat.
