Not only can a properly chosen beautiful and expensive door give originality to a doorway, but also changing its rectangular configuration to an arched one. Moreover, the arch of plywood with their own hands can be made even by those who have never tried their hand at creating any volumetric structures from this material.
There are two main methods of creating an arch of plywood with your own hands.
Option One
 Materials for the manufacture of the arch
If you are not sure, you can bend the plywood sheet smoothly and smoothly to give it the shape of a semicircle, then you can use this option to create the arch yourself:
- Prepare the tool you need when working with plywood: electric jigsaw, grinding machine ( but you can get by with just a piece of sandpaper), a screwdriver, a hacksaw for wood.
- You will also need a pencil, a ruler, screws (for wood and for concrete), polyurethane foam, foam plastic, plywood, wooden bars and small boards.
- Start by dismantling the door frame, if it was previously installed in this doorway. Remove any remaining foam, pieces of mortar and other unnecessary protrusions on its sides.
- Then you need to carefully measure the doorway, the upper part of which you are going to round out. Remember that when you arrange the arch in a normal doorway, you slightly reduce its area. But you won't be able to increase the opening itself, since in its upper part lies a reinforced concrete beam, which holds all the upstream bricks or blocks from falling down. Of course, if desired, the top of the opening can be completely disassembled to the top floor, make the arch taller, and the rest also closed with plywood, so that you do not have to install a reinforced concrete beam.
- Now you need to draw on the plywood an arch shape that fits exactly to your doorway. Please note that in the central part of it you can go almost to "zero", that is, to the level of the lower edge of the reinforced concrete beam. And the side of your arch should not go beyond the doorway.
- Having decided on the arch configuration, cut wooden bars 5-6 inches long less than the side of the arch made of plywood (they should not look out from the bottom of the arch) and attach them to the top of the sides of the doorway using self-tapping screws on to concrete. The bars must be fixed in such a way that the plywood attached to them forms one plane with the wall surface around the door.
- Similarly, cut wooden blocks to attach the upper part of the plywood arch and fasten them to the reinforced concrete beam.
- Attach an arch to the bars that was cut from plywood.
- To fill the arch “body”, use foam and assembly foam.
- Along the bottom edge of the arch made of plywood, fasten small planks so that their bottom edge does not look beyond the limits of the arch. The length of the plates must exactly match the thickness of the arch.
- Fill the space between the boards with foam.
 Serpyanka
- Wait for the mounting foam to dry, cut off its excess and putty the entire surface of the arch, using serpyanka (mesh tape having one sticky side).
- Paint or paint over the arch.
- Along the perimeter of the arch, you can decorate it by laying out a decorative stone.
The second option. Bent plywood
 Plywood arch scheme
And in this case, all work begins with the preparation of the doorway , releasing it from the old door frame, and leveling the side and top surfaces of the slopes. Then you need to carefully measure the opening to make the drawing of the future arch. To do this, take a thick cardboard and draw on it the lower part of the arch. Then cut it - you need the lower part of the cardboard, which will become a kind of stencil.
- Measure the length of the lower semicircular part of the arch on your stencil.
- Add one centimeter one side on each side and cut the size of plywood out of plywood, the width of which should be equal to the thickness of the walls of the doorway. Roughly cut the short portions of the rectangle to an acute angle (this will allow the plywood to "move" smoothly into the doorway when you fasten it on it).
- Thoroughly soak the plywood with water so that it becomes flexible and does not crack when you try to bend it.
- Attach wet plywood to the doorway, fix the center of the sheet with self-tapping screws, and fasten it to the reinforced concrete beam.
- Adjust the position of the plywood by placing a cardboard stencil on the bottom. Secure the lower part of the arch with screws.
- Wait until the plywood is completely dry.
 Using foam in the manufacture of
Now you just have to fill the space between the bent in shape Arches with plywood and the upper part of the doorway (use pieces of foam for this purpose and assembly foam), and then putty the surfaces, leveling them with the walls adjacent to the arch.
Photo
One of the options for building an arch made of plywood:
 Fixing the bars
 Shaping the arch
 Fitting the design
 Cutting the arch framework
 Fixing frame
 Holes for lamps
Search
Related Articles
Laying sewer pipes do it yourself
A house without plumbing and sanitation will never be comfortable. Improvement of these communications should be dealt with in the process of building design, or during reconstruction, if it is alre...
Eco-friendly log house with your own hands - from the walls to the finish (photo and video)
Eco-friendly housing with natural and safe materials is increasingly being built today. The cost of such buildings is much lower than that of traditional concrete and brick, but many indicators, in...
construction from the foundation to the roof
Construction from natural materials is becoming increasingly popular today. Eco-friendly houses, as a rule, are erected from wood, they are also called frame houses, since their construction is car...
How to make a change house with your own hands
A small house called a small auxiliary building made of wood, metal or any other building material and equipped with everything necessary for temporary residence in it. In addition, in buildings of...
How to remove the snow from the roof with their own hands
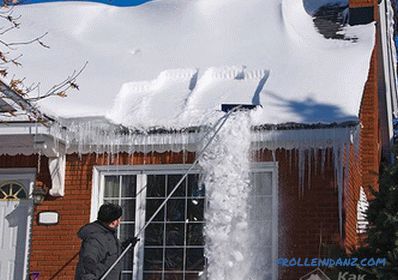
To some extent, snow cover can serve as a heater in the winter period of time. Problems begin when precipitation is large. Their considerable weight can damage the entire structure. Also, the layers...