Today, wooden buildings are becoming increasingly popular. But, since hiring qualified builders to build a wooden house is not cheap, many people undertake to build a log house on their own, but without having enough knowledge and skills, they do not get the result they expected. To successfully perform such work, you need to at least understand how to chop a log house into a paw and how - into a bowl.
")
Scheme of felling into a paw.
Advantages and disadvantages of cutting into a paw
A special feature of forging a log into a paw is that the ends of the logs do not enter beyond the corners of the building under construction. The main advantage of this method is the relative ease of cutting the grooves compared to cutting into the bowl. Not the last role in the popularity of this method of cutting is played by the fact that when it is used, timber or round timber is used to its full length, with no residue, which saves on material.
")
The scheme of cutting into a paw with a tooth.
But still this method of cutting has significant drawbacks. Kicked out in such a way log houses are less stable. In addition, the corners they get cold, poorly retain heat inside the building. Therefore, for houses that have been felled into a paw, additional warming is necessary.
However, this minus can be easily turned into a plus: it is enough to cover the inner surface of the house with beautiful finishing materials, such as siding, and the problem will be fixed. Moreover, such a finish will also look pretty impressive. For a log, made in the bowl, with protruding ends of the corners such finishing is impossible.
Marking of the framework
Despite the relative simplicity of making the grooves, it is only possible to chop a log cabin into a paw properly if the marking of the ends of logs or lumber is done correctly. When using lumber, it is always better to take material of the same thickness, and the lumber is thicker, the smaller the connecting grooves in the corners, respectively, such a house will become warmer. When chopping logs from a log, it is always necessary for a sample to take a log with a smaller end and to adjust the rest.
For marking, it is much more convenient to make special templates than to work with each end separately. Such templates are made of thick cardboard, and marking is carried out with their help, simply by applying them to the ends of the logs.
To cut a log house, you need tools:
")
Cutting the corners of the walls “into the paw” and the order of its marking.
- saw;
- ax;
- chisel;
- plane;
- tape measure;
- level;
- plummet;
- hammer;
- mall.
The planer needs to completely polish the other side of the logs or lumber that will be laid inside the room. The opposite side is treated only at the ends, the length of the sections to be processed should be in the range of 2 to 2.5 diameters of the log. The two remaining sides are equal at the ends of 1-1.5 diameter of the log each.
The technique of cutting into a paw
To chop a log house always begin with the laying of the first, so-called finishing crown. In the selected area, 2 logs are laid parallel to each other, on the ends of which the next 2 are placed at right angles. As a result, a square is obtained, which is fitted to the level in a single plane.
At the ends, marking is made and grooves are made for planting logs. The overall depth of the groove sample must not exceed half the thickness of the log.
You should always choose the thickest logs for making a round crown.
After all, the quality and reliability of the entire future log house largely depends on how correctly and smoothly it will be laid out.
")
Recommended dimensions of corner log connections in a paw.
A log is laid into the groove on top, and the upper part is prepared for laying the next log. The grooves must be marked and prepared in such a way that when laying the next crown, it fits into the prepared groove as accurately as possible. And this concerns not only the accuracy of the entry of the crown into the nest, but also the constant control of both horizontal and vertical laying of the crowns.
When forcing a log house into a paw, the technique for laying crowns from logs and logs is somewhat different. The wooden bar having equal sides just install a wreath on a wreath. If, however, to cut a log house, then the upper crown must be laid on the rounded surface of the lower one.
In order to make the crowns more dense, a longitudinal groove is made in the lower part of the upper crown along its entire length. Then the upper crown is placed in the log house and look like it is adjacent to the lower one. If the density of the fit is insufficient, the upper crown is removed, the groove is adjusted, and the entire installation procedure is repeated from the beginning. And only by ensuring that the crowns fit snugly together, can we move on to the next crown.
Often, due to the inexperience of a carpenter, "paws" in the corners fail to fit tightly enough, and gaps appear between them. If these cracks cannot be removed with an ax, then they need to be eliminated by hammering a wooden wedge into the slot that is the best in thickness and width. But it is better to try to do without such connections.
Fixing the crowns
When chopping a log house into a paw, additional fixation of the crowns is far more important than when chopping into a bowl. Fixation of logs when cutting into a paw is performed in two ways: using plug-in or root spikes. The first one is simpler to perform, with the second log being fixed more reliably.
The first option provides for the installation in the "paws" of 2 connected rims of a vertical opening of Ø 3-4 cm. A wooden stake is driven into these holes of the same diameter. In each paw, with the exception of salary crowns, two such straight spikes are obtained, and they are inserted in a checkerboard pattern so as not to fall from one wooden peg to the other. In order to enhance the overall rigidity of the structure, straight spikes are often driven in along the entire length of the rims in 1.5-2 m increments.
Experienced carpenters to give greater strength to the corner joint are often arranged at the junction when cutting a log crowns special thorn, called "root". It is arranged in each underlying crown and has the appearance of a small (from 2 to 4 cm, depending on the thickness of the log) protrusion. There is an unwritten rule that the area of the root thorn should be a quarter of the total working area of the paw. Such a protrusion is always arranged from the side of the inner corner, and on the crown superimposed on top, the same shape and depth is made.
If theoretically you all know how to chop a log house into a paw, but you do not have enough practical experience, then before proceeding directly to the felling of a log house, it is better to make sure and perform a trial felling on 2-3 logs. If you manage to put them together in a paw without visible gaps, then you can always use them for a log house. Well, if the first time does not work, then you will have a clear opportunity to see, analyze the reasons for the failure and continue to cut log houses correctly.
Didn't find the answer in the article? More information on the topic:
-
")
How to properly heat a log house
Instructions and detailed description of the process: how to insulate a log house. Practical recommendations. The device ventilated facade technology log house insulation.
-
")
Is it better to level the wooden floor?
How can you level the wooden floor: methods. Determination of the state of the wooden floor. Wet screed, sanding, putty and PVA glue, using plywood to level the floor.
Search
Related Articles
Wooden gazebos do it yourself: construction features
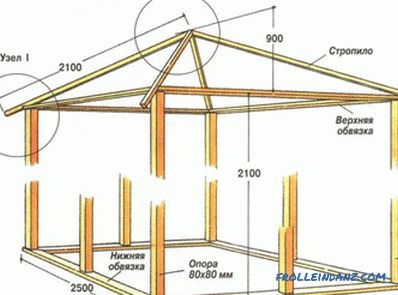
Sooner or later, but the construction of your house ends. Then you have to think about what buildings will be needed in the yard. You may need a bath, garage, shed, other farm building, as well as...
Do-it-yourself balcony door adjustment
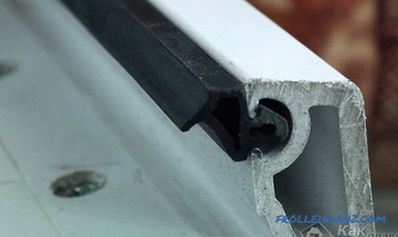
The balcony door has the greatest impact of adverse climate events, a significant temperature and humidity drop. Even with a glazed balcony, the door to the interior becomes a kind of “cold bridge”...
Houses from a bar - pros and cons of profiled, glued and solid timber
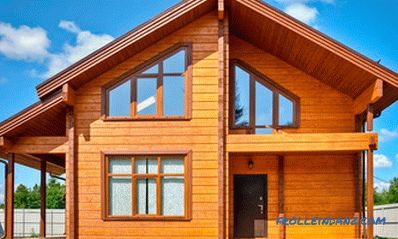
Houses from a bar last years became rather popular. One of the main reasons for this popularity is a stylish look, special architecture, rooted in the history of ancient Russian architecture. But be...
How to choose polycarbonate for the greenhouse considering all the parameters + Video
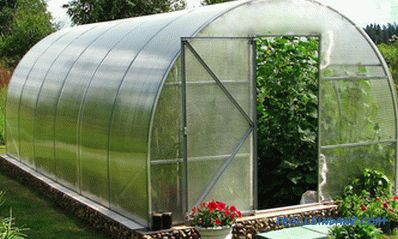
Sustainable yields in many regions of our country can only be obtained using protected farming technologies. Polycarbonate is the best material for greenhouses and greenhouses. Buildings of this kin...
Bench for a bath with his own hands
Logs chopped from logs are gradually receding into the past, unable to compete with light, modern, inexpensive materials, but the steam room and furniture are necessarily made of wood. Only this mat...