Building a bath is only half the work. After the construction is completed, you must proceed to the finish. Interior decoration performs not only an aesthetic function. It includes a whole range of functions for the protection of walls, floor and ceiling. You also need to make bath furniture to give completeness to the interior space. To perform the work, you can invite a team of specialists. However, if there is a desire and some knowledge in this area, everything can be done independently. In the article we will tell you how to make the interior decoration of the bath with your own hands, show photos and video instructions.
Material selection
")
The interior finish begins with the choice of material. Most often used for this tree. But not every wood material will do. This is especially true when it comes to the steam room, where there will always be high temperatures and high humidity.
Some materials emit substances hazardous to health at high temperatures.
The following materials are strictly prohibited in the steam room:
- Pine. Pine wood releases resin at high temperatures. These substances can be dangerous to the health of people who soar in the bath. Therefore, in no case should pine boards be used.
- Fiberboard and particle board. These materials release toxins and can lead to poisoning. In addition, they swell.
- Linoleum. It is not used for the same reason. It releases harmful substances, decays and collapses.
What can not be used in the steam room is perfect for a waiting room and a rest room. It is best to decorate the waiting room pine. Wood will give a pleasant aroma to the room and provide an opportunity to enjoy a real Russian bath.
Best for finishing steam rooms lining of linden and larch.
It is better to use larch for the steam room. This is a very durable material that will serve for many years. It is not destroyed by high temperatures and humidity. Another good option for a steam room is lime.
It is better to use wood in the form of lining. Panels are easy to install, breathe, and can be simply replaced. Lining - an ideal finishing material, especially when you consider that under the finish will be located insulating layer.
Finishing process
") Trowel for a tile
Trowel for a tile
Before you finish the interior baths, it is necessary to understand the intricacies of the process. Finishing wooden and brick bath is almost the same.
Work starts from the bottom up: from floor to ceiling.
- First the floor is laid. It is not recommended to use oak boards here, they are very slippery. It is better to use a larch edging board. The floor in the steam room is better to raise ten centimeters to ensure the preservation of heat.
- The shelves must be raised above the level of the furnace by 10-15 cm.
- After that, the walls should be sheathed. Lining is installed on the crate.
- When the walls are decorated, you can start working on the ceiling.
- Finishing is completed, now we need to start installing various equipment and furniture for the bath. All this can be bought.
Advantages
") Bath lighting Linden wall paneling is a rather expensive material. However, it is his best to choose for finishing the steam room. Lime wallboard has a number of advantages, it:
Bath lighting Linden wall paneling is a rather expensive material. However, it is his best to choose for finishing the steam room. Lime wallboard has a number of advantages, it:
- resistant to moisture and temperatures;
- breathes;
- looks aesthetically pleasing;
- is durable;
- it smells good.
Lining
") Types of lining
Types of lining
- Before starting Works need to carefully align the surface. If they are uneven, then the panel will be "waves".
- Material should be brought and left for one or two days to adapt to the microclimate.
- Work begins with the installation of rack battens. To do this, you will need slats, which must be installed at a distance of 70 cm from each other. The first fasten the most extreme slats. In work plumb and level is used. Screws must be taken galvanized or stainless, because the usual very quickly collapse from corrosion. If the walls in the room are perfectly smooth, then you can try to install the wall paneling without crates. It is fastened with screws or special brackets directly on the wall. However, if there is no confidence in the flatness of the walls, then it is better not to risk it.
- After installing the batten, you can begin the installation of the wall panel. This is a very simple process, it is available even to the beginner. Work is performed using corrosion and high temperature resistant fasteners. This is the easiest way for beginning masters who are interested in how to trim a bath inside without having special knowledge.
The need for a vapor barrier
") Steam insulation
Steam insulation
The bath is where always high humidity. However, a number of materials perfectly ventilated.The question naturally arises, is it necessary to install a vapor barrier here? It all depends on what materials were used in the construction of the structure and its finishing.
If lining is installed, and the bath itself is wooden, then a vapor barrier may be superfluous. The walls and so beautifully "breathe." In the brick structures to install a vapor barrier, most likely, it is necessary. However, if the design provides good ventilation, you can do without it. The question of installing a vapor barrier is individual, and only the master can solve it.
Tile
") Rectangular tile
Rectangular tile
Tile is an inexpensive and practical material. In the steam room, it is better not to use it, but in the washroom and the dressing room it will be just right. This material does not need to be replaced over a long period of time. The tile does not collapse from moisture and high temperatures; it does not rot and does not require maintenance.
") Ceramic tile There are several types of bath tile, but there are two main types of bath tile.
Ceramic tile There are several types of bath tile, but there are two main types of bath tile.
- Glazed (enameled).
- Not enameled.
For a bath, the ideal choice would be a glazed tile type. Such material is the most resistant to various influences. The non-enameled tile does not tolerate temperature changes, which occur constantly in the bath.
When choosing a tile, it is better to dwell on those samples that have a rough surface. This will prevent slipping and falling.
Relying on the wall, it is better to be sure that it will not cause the slide. Therefore, not only the tile on the floor, but also the tile on the walls should be rough.
It is necessary to pay attention to what is the basis of the tile. It is better if it is smooth. The porous base can cause the spread of the fungus.
As for the shape, the tiles are produced both traditionally in squares and rectangles, and asterisks. There are among the varieties and complex structures. It is better for a beginner to take a rectangular tile, as it is laid very simply.
When buying, you need to know exactly how much material is needed. At the same time, you need to buy 5-10% more tiles than you need. After all, it is very fragile material.
") Grouting the tiles
Grouting the tiles
- First, the tile is soaked in water for a few minutes. This technique will save the master a decent amount of glue. The fact is that dry tile will absorb glue, while wet tile will not.
- Tile installation starts from the most conspicuous angle in the room. In order to define it, you must look at the interior of the bath from the entrance.
- Tile adhesive is applied to the surface. After the tile is attached to the site, you need to lay a mallet on its edge. For the application of glue will require a special trowel-comb.
- Cross-dividers should be installed between the tiles.
- When the glue is completely dry, it remains to wipe the seams.
The tile looks great on the floor and on the walls. Especially beautiful is tiled mosaic. In some cases, the tile must be cut. It is not very difficult if there is a tool for cutting. After completion of the work it remains only to choose the furniture for the bath.
We advise you to read:
- a metal stove for a bath with your own hands;
- a wooden bath font for a bath with your own hands;
- a bath from a bar with your hands zero
Video
The following video will tell you about the methods of finishing the bath:
And if you are interested in materials for finishing the bath, then you need to will tell the following video:
You can also get acquainted with other videos about the finishing of the bath in a separate topic Video about finishing the bath with your own hands on our website.
Photos
")
") Aspen plating
Aspen plating
") Cladding of walls
Cladding of walls
") Unusual shelves
Unusual shelves
") Designer Interior
Designer Interior
If you don’t want to do the interior yourself, order finishing work in proven companies, focus on the reviews on the Internet.
Search
Related Articles
How to purge the battery heating - ways to purge batteries
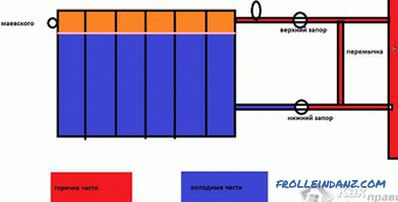
The efficiency of the heating of a dwelling is largely determined by how well the seasonal work has been done in preparing its heating system for operation. That is why with the arrival of cold weat...
Brickwork window laying
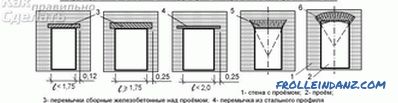
The design of window openings in buildings being erected is, as is well known, an indispensable component of the construction work carried out during the construction of residential buildings. When...
Decorating the arch with your own hands - decorating the arch in the apartment
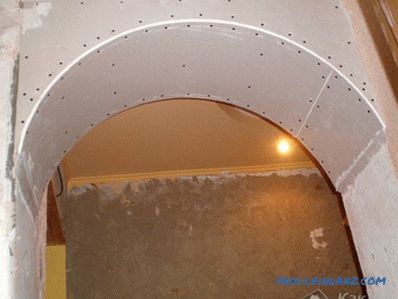
Doorways are a necessary element in each room, but, despite the standards (rectangular shape), many quite often choose another option - the arch. For its creation it is necessary to use the usual re...
Scandinavian style in the interior of a country house
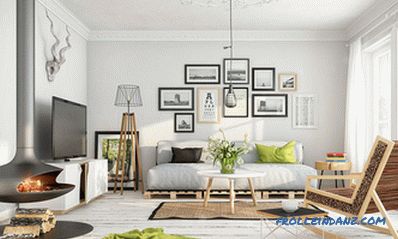
Modern Scandinavian design style, as is known, originated in the middle of the last century. This period is marked by a coup aimed at combining form and function in order to create comfortable and a...
The path in the country with their own hands
It's nice when the territory of a country house or cottage is refined. To move was convenient, you should make paths and paths. At the same time it is important that they fit into the landscape desi...