If you are tired of the usual netting-chain-link that serves as a fence for your land plot, attach some imagination, zeal, and ... make an original wicker fence. To master the basic principles of its creation, it takes not so much time, because the main "problem" that usually confuses those who are thinking how to make a wicker fence is finding the material for its manufacture.
What a braided fence is made of
") Branch harvesting
Branch harvesting
A wicker fence should be created from flexible branches (for example, from hazel or willow). They should be cut in late autumn, when the leaves of the trees have already been dropped, but the movement of sap in them has not yet ceased. "On the hunt" should go with a pre-prepared "yardstick" (in its role a branch having the desired length can play its role), and cut only those branches that fit you in size.
In addition to flexible branches for a wicker fence, you will also need branches that are thicker, but also necessarily straight, that will serve as supports in the fence. The thickness of the branches-supports should not be less than 4 centimeters, and the length - equal to the height of the fence plus 50-55 centimeters (it is at this depth you will hammer them into the ground).
Types of weaving
") Vertical weaving
Vertical weaving
Since you can make a woven fence with several ways, it is worth talking about them in more detail:
- Vertical weaving - for such a fence, the supports should be fixed both vertically (columns) and horizontally (the basis for weaving the fence). With this type of weaving, the length of the bent branches should be only 15-20 centimeters more than the final height of the fence.
- Horizontal weaving is a more familiar weaving method in which long flexible branches (at least 2 meters long) are horizontally placed between the vertical supports. In this case, the pitch of the supports should not be less than 30 centimeters (otherwise it will be difficult for you to bend the branches).
- Oblique weaving is another way to create a woven fence, in which some branches are often located diagonally between frequently located supports:
Creating a fence
") Fence from willow
Fence from willow
") Fence stakes Creating a wicker fence, regardless of the type used weaving, you should start with the installation of supports. The branches serving this purpose are not buried in the ground, but driven to a depth of at least 50 centimeters (otherwise the fence may tip over under gusts of wind). When hammering branches, do not forget to check their verticality, otherwise the fence will turn out to be crooked and ugly.
Fence stakes Creating a wicker fence, regardless of the type used weaving, you should start with the installation of supports. The branches serving this purpose are not buried in the ground, but driven to a depth of at least 50 centimeters (otherwise the fence may tip over under gusts of wind). When hammering branches, do not forget to check their verticality, otherwise the fence will turn out to be crooked and ugly.
The next stage is the fence itself. Since the branches are not connected with supports, then if you do not get a beautiful result on the first attempt, you can disassemble it and try again. Fences in which the branches are arranged in staggered order not one at a time, but two or three, look originally.
You can join branches along the length in one of two ways:
- Breaking the entire fence into "sections", that is, you will make a clear boundary separating all branches (from the bottom to the top of the fence) left and right. Such a boundary should fall on the gap between the branches-supports of the fence.
- Complementing each ended branch with another, without focusing attention on this moment. With this method of weaving, it is better to fasten the branches at the junction with thin wire to create the illusion of an "endless" line.
All joints should not be located in the same place, but should be evenly distributed along the entire length of the fence.
Pros and cons of a wicker fence
") Weaving wicker
Weaving wicker
Choosing for themselves the option with a woven fence, as its undoubted merits they note:
- environmental friendliness - only natural materials are used,
- originality and singularity,
- the ability to give the fence curvilinear form,
- ease of assembly,
- no need to concrete support or pour the strip foundation for the fence,
- its height depends only on the desire of its creator.
But the wicker fence from the branches has drawbacks:
- it is not very durable,
- combustible,
- branches-supports in 3-4 years in the ground they will rot,
- is only suitable for land plots decorated in a rustic style.
") PVC fence material
PVC fence material
Alternatively, you can install instead of a woven branch fence on its site its plastic imitation.
Such a PVC fence, having the appearance of an ordinary wicker fence of branches:
- firstly, it will last much longer than its natural counterpart;
- secondly, it can be disassembled and rearranged to another place;
- thirdly, it has an even upper and side framing, which gives it a more presentable look than a simple wicker fence.
Video
And here you will see how to make a fence using the technique of vertical weaving:
Photos
") Wicker fence pattern
Wicker fence pattern
") Horizontal weave pattern
Horizontal weave pattern
") How to create such a fence
How to create such a fence
") Watcher in the area
Watcher in the area
") Imitation of weaving
Imitation of weaving
") Horizontal weaving
Horizontal weaving
Search
Related Articles
The design of the frame house with their own hands: a guide to the device
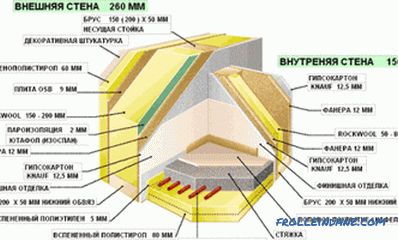
The construction of a frame house with your own hands is a completely feasible task. It is only necessary to understand the sequence in which the installation of the main elements is carried out, a...
Do-it-yourself multi-tip roof - how to build + schemes
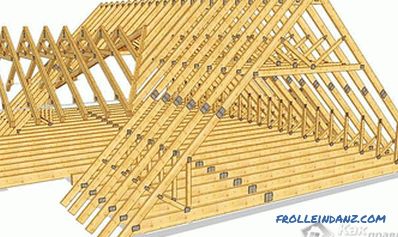
Among the various roof structures, the most complex and attractive is considered to be multi-tong. The peculiarity of its design lies in a large number of complex elements. These include pediments,...
Insulation for a frame house: which one is better
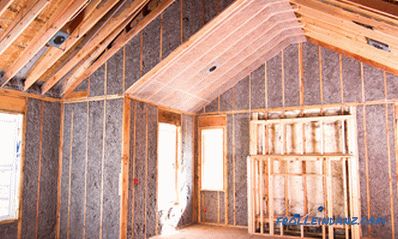
Anyone who has faced a frame construction at some point has to think about which insulation is better for a frame house. To make the right decision, it is necessary to know the properties of the mai...
How to install snow protectors - installation of snow protectors on the roof

Roofing a house is a very complex structure. There may be various devices and devices. One of the roof designs are snegozaderzhateli. This is an optional, but necessary element. The fact is that dur...
Bathroom design - 35 photos, ideas

Thinking through interior design is a very exciting activity, and even useful. It is necessary to take into account so many nuances: decide on the style of the future interior, choose finishing mate...