Do you need to arrange personal items? You do not have a specific place to store them? Then you need a rack. This is the easiest and practical way to solve this problem. The rack will be useful not only in the pantry, as many believe. Its use is practical in the garage, in the library, in the office, and even in the living rooms. In order to make a rack, you don't need superpowers, and you won't need special tools either. If your funds are limited, then you can make a rack from the materials that you have at home.
Designing drawings
In order to successfully design a drawing, you should accurately measure the place where the rack should be located in the future. If you need to make it for storing tools or for preserving, then you shouldn’t be more sophisticated with forms. It should have a standard height, which allows you to make the pantry or garage space. For convenience, it is better to make it to the ceiling. The photo below shows an example of how a typical drawing of a rack for a garage or storeroom may look.
As for the width of the shelves, it all depends on the items you plan to store on them. If we are talking about storing cans and books, then a width of 25-30 cm will be enough. As for the storage of the tool, then you should push off from its volume, the width of the shelves should correspond to it.
 The layout of a simple rack
The length of the shelves, like their width, also depends on those items which will be stored on them. For example, if the items are light, one shelf can reach up to 1.5 m, and if you need a bookshelf, for the sake of long-term preservation of the integrity of the shelving, each shelf should not exceed 90 cm in length. If you plan to store heavy tools on the shelves it is better to make a project with this fact in mind. In the process of manufacturing the rack, you will need to strengthen the frame profile of the metal.
 Choosing an unusual shape
Sometimes a rack is used to store various items in a residential area. In this case, it is better to take care of creating an interesting form of this design. So, you will be able to decorate the interior with a new piece of furniture and functionally fill the space.
 For a balcony
Materials and tools for manufacturing:
- Reiki for the manufacture of crossbars and slats.
- Bar used as temporary support.
- Shelves - in their quality can serve as a plate of MDF or chipboard, plywood.
- Dowels and screws.
- Screwdriver, or better screwdriver.
- Level.
- Tape measure.
- Mel.
If you decide to use a chipboard or MDF as shelves, you need to make sure that it is cut to the desired size. Often such services are provided in specialized stores.
We manufacture the base of the structure
 A rack from a wooden bar painted
The first thing you should do before installing any rack - this is to mark the wall. Wooden bars are best suited for the construction of load-bearing supports. The key to success will be the installation of a solid base of the rack. If the rack is designed for the entire height of the room, then it is important to fix the base to the floor and to the ceiling. If we talk about wooden bars, they can be either square or rectangular. Everything rests on the size of the finished design, the depth and width of the shelves.
 Bookshelf
The framework must be twisted with screws, and the corners must be reinforced with special slats. It is great if the base can be fixed to the wall, then the rack will be particularly stable, but in this case it will not be possible to install the back wall on the structure itself.
It is very important to ensure that during the installation the support legs are always positioned vertically. The lateral cross braces ensure greater reliability of the rack, which makes the structure more rigid. It is especially important to consider these factors if the rack is subjected to heavy loads.
Installing the box and shelves
 Rack assembly scheme
On At this stage, the rack can be sheathed with prepared chipboard or MDF plates, which should be attached to the bars - from the bottom, top and sides. The result will be a finished box without a back wall. But, if you have a desire, then you can make a construction with a back wall, here you can be guided by your own wishes or goals of using the rack. In general, the simplest design can consist only of bars and shelves. Bars and shelves can be painted.
With a standard room height, it is most practical to install 6 transverse shelves. You can determine their height by yourself. Recently, racks with an asymmetric arrangement of shelves are popular.The medium shelf is subject to the greatest stress, so it must be particularly durable. For better fixing of the shelves you need to use the corners of metal.
Another important detail: the thickness of the shelves should be 4-6 mm less than the length of the screw itself, which the shelf with the bar is connected to each other.
The design will withstand even heavy loads if the corners are securely fixed. For best results, it is important to check the level of each shelf before it is finally fixed. Corner joints should be strictly at an angle of 90ᴼ.
We are nearing the finish line. Fasten the front panels
 Melamine edges
If you are sheathed the rack with MDF or chipboard, then at the end plating, you need to stick a special melamine edge on all the ends of the parts. It will be possible to do this with the help of an ordinary iron. You lay it on an edge with an emery paper (fine-grained) butt and smooth it with a hot iron. Excess edges are cut with a stationery knife.
Some shelves can be closed by attaching beautiful doors to them. This type of rack can be used every day, and its neat appearance will be a good and original decoration of any living room.
Photos
 With drawers
 House racks
 Rack with doors
 Rack for garage
 Unusual for toys
Search
Related Articles
The device rafters: types, assembly and installation
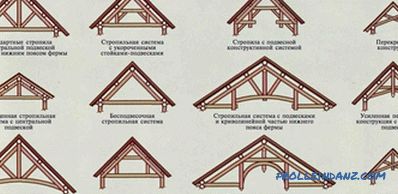
Not a single civilian structure can do without a roof. The basis of any roof in civil engineering is the truss system. Therefore, it is very important to know the device rafters of the roof. The r...
Ecostyle in the interior - the rules of design and photo design ideas
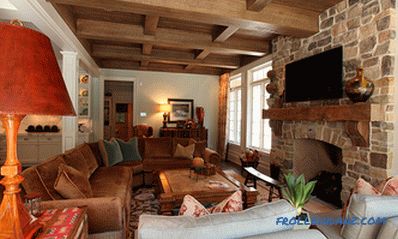
Eco-style in the interior is based on the design of modern styles, involves the effective use of natural surfaces. For example, bamboo cane, wicker, natural stone. The paradox of this style is that...
some simple rules, schemes (photo and video)
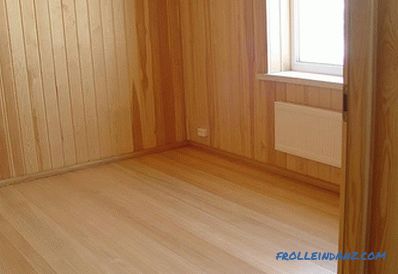
Lining today is one of the most popular finishing materials. It is made from either natural wood or plastic. The first type of lining is more expensive and in demand, it is made from various wood s...
How to install a bimetallic radiator - installation of bimetallic radiators + photo
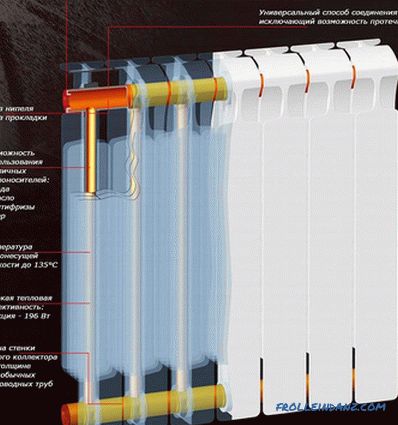
Having decided to make repairs in an apartment or in a private house, many people pay attention to the fact that old cast iron batteries do not fit into the interior. But it's not just beauty, becau...
How to make a chimney with your own hands
The chimney, as you know, belongs to the category of building structures used to remove combustion products and generate the necessary traction in furnaces. Errors in manufacturing can lead to serio...