It is extremely difficult to imagine modern life without a comfortably equipped bathroom. It is no secret that the toilet plays a key role in the bathroom. And so that its operation does not bring discomfort, the drain mechanism should work properly. In this article, you will learn how to install the fittings in the toilet cistern.
Features of the drain mechanism
 Armature for a double flush tank
There are several types of drain mechanisms. But regardless of the type, it must ensure a good discharge of all the water that is in the tank. In this case, the drain should be carried out by lightly pressing the rotary lever or button. Some drain mechanisms today can be equipped with an economy system, so that instead of one button you will see two, one of which drains a smaller amount of water at a time. The drain mechanism is equipped with overflow. It is necessary in order to prevent the tank from overflowing. The whole mechanism has two important parts:
- Drain siphon.
- Drain lever.
 Bottom inlet valves
The siphon has an opening which, when docked with the tank, forms tight connection. There are several types of siphons that regulate water in different ways. For example, "pear" is a rubber cylinder. To drain the water, use the handle or lever that pulls up or is pressed.
 Lever-type valves
Modern drain systems have a stem in the drain mechanism that lifts the pear. As a rule, when the mechanism is triggered, water enters the toilet bowl.
 Drain tank fittings in the parsing
Installation of the drain fittings
After installing the toilet bowl first going to the tank. Although there are different drain fitting systems, we will consider the most common installation. The installation process takes place in the following order.
 Installation of the valves
- The first step is to install a rubber gasket on the drain mechanism.
-
 Installation of the tank Then it is installed in the tank and tightened on the reverse side with a plastic nut.
 - Included with the siphon are special sealing rubber gaskets and washers for screwing the cistern to the toilet. From the bottom side, plastic washers are put on the screws and a nut is screwed on. Remember to put the rubber O-ring on the screw.
- After that, you need to connect the water supply with a hose. There must also be a rubber gasket on the hose that will provide a tight connection.
- At the very end of the lid is mounted on the toilet bowl.
- Then the drain button twists.
Depending on the design of the drain tank, the location of the drain knob may vary.
 Installation of the pushbutton assembly
That's the whole procedure for installing the valves on the drain tank . It remains to adjust the valve cistern.
Adjustment of the drain mechanism
After installation, it remains to check how the fittings in the tank work. It is important to correctly adjust the water level inside the tank. For this glass is fixed in the position in which the water will stop at the same level. Overflow height adjustment is also performed in parallel. Each locking mechanism is usually accompanied by instructions from the manufacturer. If you study it, you will learn how to adjust the toilet fittings correctly in your case.
 Adjusting the toilet fittings
In the attached video you will see how to properly install the toilet fittings. If you have experience in this work, then leave your comments at the end of this article.
Video
In the following video, the wizard gives a lot of useful recommendations for installing the valve in the tank, adjusting it, showing how to service the tank:
Example Mounting single-level fittings in the drain tank:
See also:
- How to install the drain tank.
Search
Related Articles
How to roof a metal tile with your own hands

Metal tiles are sheets of steel, copper or aluminum, profiled using cold pressure. The shape of the profile resembles ceramic tiles. This material is pleasant in appearance, affordable and durable....
Do-it-yourself wooden beams: special features
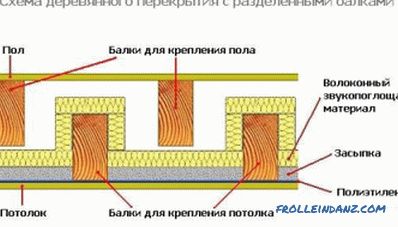
The overlap can be used no matter what material the walls of the house are built from. It is easy enough to make hardwood floors with your own hands. Wooden flooring scheme with separated bea...
How to determine the bearing wall - in a brick, panel and monolithic house
When performing repairs, there is often a desire to make fundamental changes in the redevelopment of living space. In this case, the question arises: how to determine the bearing wall, which can not...
types of coatings (video and photo)

The production technology of glued laminated timber became known only about half a century ago, therefore information about its durability can be only purely theoretical. Based on the fact that the...
How to lay gas silicate blocks - gas silicate masonry
Gas silicate blocks are a convenient and versatile material for building a house. They can be used not only for the construction of supporting structures, but also for the construction of internal p...