Many home masters know what a gas burner is. Thanks to her, you can perform welding, welding and other types of processing of metal products, heat them and connect. The principle of operation of such a device in the mixing of combustible gas and oxygen. As a result, you can get a stable flame that has a huge temperature that is hard to put out. These burners can be universal or designed for certain works. The fact that the flame is stable allows the unit to be used in air even in windy conditions. It can both be bought and made at home. If you are not one of those who are looking for easy ways, we suggest you to figure out how to make a gas burner for soldering with your own hands.
Materials and tools for work
 Tools for work
To make ordinary torch, you will need the following parts and tools:
- drill;
- Bulgarian;
- hammer;
- sandpaper;
- brass blanks for the nozzle and the divider;
- a thin tube of brass Ø15 mm;
- bars of wood;
- vice;
- FUM tape or compactor silicone;
- connecting hoses;
- adjusting valve.
Making the handle and nozzle
 Knobs for the burner
Take brass tube and attach a handle to it. If you have a handle from an old burner, you can use it - it will be much more convenient. If not, you can take a wooden bar. To handle comfortably lay in his hand, it can be processed. In it you need to drill a hole for a brass tube. Their diameter must match. After that, the tube is inserted into the timber and fixed there with silicone or epoxy resin.
For convenience, the brass tube should be bent above the handle at an angle of 45˚.
 If the nozzle is made correctly, the flame is even
The next step is to make the nozzle. This is a time consuming and long process. To him must be approached with greater responsibility. The desired nozzle opening size is 0.1 mm. It is clear that it will be very difficult to achieve this size on your own without special equipment, so you need to drill a hole a little wider and adjust the edges to the desired size. Everything needs to be done carefully so that the hole is smooth and does not direct the flame in different directions. After making a hole, fix the workpiece in a vice. Then gently hammer on the future nozzle. This should be done vertically, with a “snap” to the center of the workpiece. Gradually, the part needs to be scrolled, providing a perfect hole without a slope.
After performing the embossing of the part, the nozzle head needs to be sanded with fine-grained sandpaper. A thread should be applied to the back of the part to connect it to the tube. A simpler method of connection is soldering the nozzle to the pipe. But it should be noted that in this case the repair of any parts will be very difficult.
In principle, this is all, now you can connect a gas cylinder to the tube, set it on fire and the unit is ready for operation. But, now there are some difficulties that interfere with normal work and bring inconvenience. It turns out that the gas flow can be regulated only by opening and closing the valve on the gas cylinder. In this case, to achieve the required power of the flame will be very difficult. What to do?
Work to improve flame control
 Burners with flame power adjustment
In order to ensure the normal operation of our burner, it is necessary to equip it with a divider and a crane. A suitable place to mount the crane near the handle, 2-4 cm above. But it can be installed on the inlet pipe. A crane from the burner of the spent autogen or its other analogue will be suitable. It is permanently fixed to the tube with a threaded joint. Use a FUM tape to seal the joint.
The divider will be installed on the pipe with a nozzle. He also needs to be made of brass Ø 15 mm. The best option is a cylindrical part with a hole for the tube with a nozzle. If there is none, do the following:
- Take a brass pipe Ø 35 mm and cut a piece of 100-150 mm.
- Departing from the end, mark with a marker 3-5 points exactly distant from each other.
- Drill 8–10 mm holes in it with a drill and grinder, make smooth cuts for them.
- Now you can bend everything to the center and weld it to the burner tube.
 Burner nozzle device
In order to properly fix the divider, it must be positioned so that nozzle protruded 2-3 mm from the junction. Thanks to this adaptation, two goals can be achieved: to protect the flame from strong winds and provide it with a stream of oxygen, which is necessary for a more stable and strong flame.
All welds can be smoothed with a grinder.Then your homemade burner will look more solid. That's all. Now it only remains to bring the gas and use the burner for its intended purpose.
Making a mini-burner
 A miniature burner
If you need to work with small details or boards, such a large burner does not suit you at all. In this case, you can make a small burner from improvised means, which will give the temperature up to 1000ºC. You will need:
- Regular dropper - 2 pcs.
- Needle for inflating balls.
- Needle for a medical syringe.
- Soldering iron.
- File.
- Copper wire.
- Pliers.
- Grinding stone.
- Flux for soldering.
- Thermal gun.
 The device of a self-made mini-burner
Armed with all the tools, you can get to work. For convenience, we divide the process into the following steps:
- First of all, the file should be cut in the needle for the ball. It should be a little farther than the middle. There are needles in which such a hole is already there, it is even better.
- Then take the needle from the syringe and bend it about 45˚ in the middle.
- Since at the tip the needle is cut at an angle, it must be grinded on the grinding stone so that an even, straight cut is formed.
- Insert a thin needle into the hole of the ball needle. Its tip should protrude 1-2 mm.
- Fix the needle by wrapping the junction with a thin copper wire.
-
 Fixing the needle Grease the wire with flux and solder the junction to make everything airtight.
 - Take out the droppers and connect them to the bases of the two needles.
- Control clips slide to the needles, they will serve as a handle and regulators of air and gas supply.
- Connect them together with a thermogun.
- That's all, now it remains only to connect the source of gas (lighter or gas canister) and a can of compressed air.
Gas will flow through a thick tube and compressed air through thin (medical) air. Gas and compressed air pressure can be changed thanks to dropper controls. Such a small burner will be useful for use at home.
A gas burner is a useful tool in capable hands. In order to have it, it is not necessary to go to the store and spend money on a purchase. Everything can be done independently. The main thing is to prepare all the materials and tools, as well as explore the technology for the manufacture of the burner. Before you start working, we recommend that you familiarize yourself with the device and the principle of its operation. Then it will be much easier for you to do everything yourself.
Video
Watch a video on how to make a burner from scrap materials:
Video about making a miniature gas burner:
Search
Related Articles
How to build a house with your own hands from a bar: tips and general guidance
How to build a house with your own hands from a bar? This question is usually asked by every potential newcomer after seeing the prices of construction work. On the one hand, self-construction real...
Dovetail Spike Connection: Workflow (video)
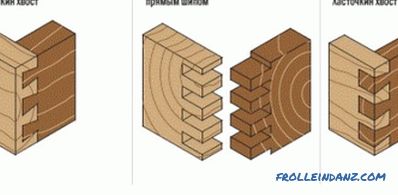
When constructing buildings and structures made of wood, you should always be able to make the right joint of wood among themselves. Various methods are used for this, but among all of them there i...
Artificial stream do-it-yourself - stream in the country
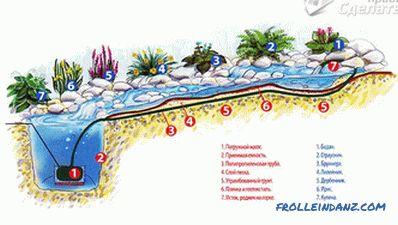
Spring is the time to equip the backyard plot, to bring in beauty and to create landscape design. The beauty of the brook in the garden is undeniable. And if you want to enjoy the gentle murmur of w...
Aerated concrete or foam concrete what is the difference
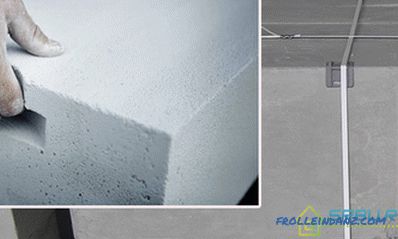
Before building a house, you need to decide what to build it from. It is the chosen material that determines how strong and comfortable the house will be. Good walls and heat will not give out to th...
DIY bath restoration - how to restore a bath
Any bath is not just a plumber, but a place where a person is used to relaxing and relaxing as much as possible from difficult everyday life. It is not surprising that with intensive use the bath lo...