Sooner or later, many owners of country houses are faced with the need to expand the usable area of their homes. The most budget and easiest option in this case would be a frame extension to the house.
")
Schematic frame extension.
The frame construction technology has a number of indisputable advantages:
- simplicity and ease of the process of erection of structures;
- the possibility of carrying out construction works by one person;
- relatively low construction costs;
- low specific weight of frame structures;
- with properly performed insulation, it takes a short time to warm the room to a comfortable temperature.
When building a frame extension independently, it is most convenient to use frame-frame technology. Elements of the frame with this method are assembled directly on the spot.
")
Tools for the construction of a frame extension.
This slightly increases the construction time, but allows even one person to work.
Of the tool can be useful:
- ax;
- plane;
- screwdriver;
- level;
- hacksaw;
- tape measure;
- hammer and others.
Nuances of building the foundation
In order for the erected extension to serve for a long time and not to “float” after the first winter, it is necessary that the foundations of the house and the extension either have a single whole or are independent of It’s best, of course, even at the construction stage of the main house, to lay a single monolithic foundation for the house and future extension, but rarely do so far ahead.
Most often, you have to make a separate foundation for the extension and hard, mortgage reinforcement, connect it with the main the foundation. Here the main thing is to achieve maximum identity in terms of the design and depth of both bases. If the monolith is impossible, the foundations are made independent. The so-called deformation or expansion joint is left between them.
The ideal case is the construction of an extension to house on a column foundation.In this case, with the same parameters of the foundation pillars and the correct pairing of walls, the influence of mutual displacements of structures will be minimized.
In practice, under the erected light extension, most often they arrange a columnar foundation or use ready-made screw piles.
Recommendations for the construction of the frame
")
Foundation layout for the frame extension.
After removing the pillars to the required height, the bottom piping of the future extension is laid on them through a waterproofing gasket. The thickness of the walls of frame houses is not less than 150-200 mm. Residences are rarely located in the annexes, usually there are rooms for household needs. Therefore, we can limit the wall thickness to 100 mm. Accordingly, the cross-section of the beam to perform the strapping and vertical racks will be the same.
Instead of a bar, you can use a cut board, spliced along the entire length of the screws to the desired section. The advantage of using the board over a bar is the formation of grooves and spikes, which are simpler at the stage of board splicing, for interfacing the framework elements.
In the grooves formed in the bottom trim, floor logs, vertical support beams and intermediate frame posts are installed. All vertical uprights of the carcass are tied together as a single upper strapping. To impart spatial rigidity to the frame, do not forget to install the stitches. The jibs are installed between the vertical posts at an angle of 45 °, closer to the outside of the casing. It is possible to neglect the installation of stitches if sheet materials (OSB, plywood) or a wide board (for example, imitation of a bar) are used for the subsequent plating.
Pairing the frame extension with the main house
")
Scheme of the lower trim of the frame extension.
No matter how well the foundation is made, due to the difference in the load on the soil of the house and the extension in the future, it is still possible that they will shift relative to each other. Therefore, it is not recommended to make a hard junction with the house. In practice, an adjoining groove-ridge connection is used. Two bars are fastened to the wall of the house, between which a vertical bar of the extension wall frame is installed. Such an adjoining of the frame wall provides leveling of mutual displacements.
The next important step is the manufacture of the frame and the sheathing of the roof and its mating with the main roof. Rafters with one end cut into the upper frame of the frame, with the other end attached to the truss system of an existing roof. The crate under the roof is made in such a way that the joint of the main and the attached roof falls between the crate boards.The roof covering in this case is made of flexible materials that can withstand some deformation. For the docking of the roof can also be used any architectural technique that allows the joint to mask the height difference.
Features of insulation
After the erection of the enclosing structures, you can calmly and without haste take up the weatherization of the framework. The principles of warming frame additions are similar to warming a frame house.
")
Warming scheme of the frame wall.
A variety of materials can be used as insulation: sawdust, ecowool, mineral wool, polystyrene foam. From the point of view of convenience, the most preferred is the use of mineral plate insulation.
Heater tightly fits between the frame racks in several layers.
An important point when laying insulation is the need to offset the joints between the plates relative to each other in different layers. In a similar way, laying of insulation between floor lags and ceiling beams is carried out.
Wall cake: characteristics
The goal of any construction is to create a solid, durable and comfortable in operation structure. When weatherize the walls of a frame house, you need to remember about the need to make the right steam and wind insulation. Otherwise, the laid insulation quickly enough to collect water from the air and significantly reduces its thermal insulation characteristics.
Pie wall in the direction of the street should look like this: inner lining, vapor barrier, insulation, wind insulation, outer lining. A small (10–20 mm) air gap should be provided between the inner lining and the vapor barrier.
Many types of vapor barrier membranes are now being produced. Their peculiarity is the different appearance of the sides (one side is covered with fibers, the other is smooth). Such membranes are installed with the smooth side to the insulation, and the fleecy to the side of the room. Villi prevent the formation of condensation on them, keeping the insulation from excessive wetting. As wind insulation can be used the most common asphalt or roofing felt.
Rationalization of construction
At the preparatory stages it should be remembered that if you approach the design of an extension from a rational point of view, you can significantly speed up and reduce the cost of the construction process. So, the pitch of vertical pillars, floor lag and ceiling beams is recommended to be used equal to the width of insulation plates (600 mm).
The height of the ceiling, the length of the walls, the location of the window and door openings should be better coordinated with the standard dimensions of the lumber produced. It is recommended to expose additional treatment with fire-and-bioprotective compounds to extend elements of the extension frame. If you use planed lumber, the consumption of antiseptics and flame retardants will decrease significantly.
Another important point that is often overlooked is compliance with safety regulations. When working, use personal protective equipment (respirator, goggles and gloves) and use only serviceable tools.
From all of the above, it can be seen that the construction of a frame extension to the house can, if desired, be carried out independently, without the involvement of third-party specialists.
For this, basic skills of working with basic carpentry tools, the availability of building material and, of course, the desire to build are sufficient.
Didn't find the answer in the article? More information on the topic:
-
")
Nuances of leveling the chipboard
Leveling the floor chipboard plates accompanied by a number of activities. Preparatory work, installing lathing, mounting chipboard. Practical recommendations.
-
")
How to make yourself a log house for a well
Instructions: how to make a log house for the well. The stages of the installation of the well do it yourself. What is required for work. The advantages of wooden logs over wells or concrete rings.
Search
Related Articles
Filtration field for septic tank - calculation and arrangement of filtration field
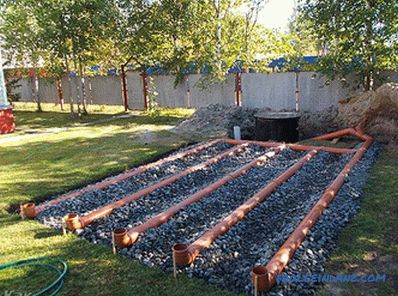
Few people need to explain how important it is to build a quality septic tank in a private house. Such a structure should always be working, because the breakdown or clogging of the septic tank can...
Optimal cultivators in quality and price

Agricultural work begins in the spring. Villagers and gardeners prepare the land to plant it with popular vegetables and provide a rich harvest in the fall. Cultivators significantly facilitate agri...
What is the difference between apartments and apartments?
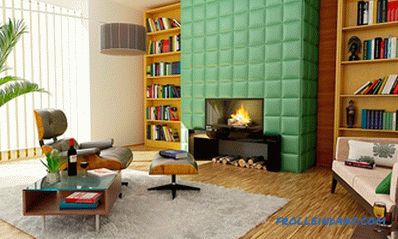
Today, apartments occupy more than 30% of the total market of new buildings and are becoming increasingly recognizable and in demand. We are offered modern construction technologies, high-quality de...
Swimming pool in the country with their own hands + photos, schemes
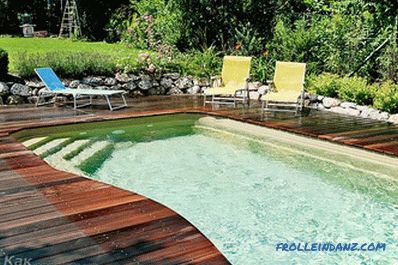
In the warm season, the townspeople go to the country not only to harvest and make harvesting for the winter, but also to rest. The pool is a great alternative to any body of water in the hot summer...
The best manufacturers of storage water heaters

The efficiency of storage water heaters is confirmed by the volume of their sales and production. This is one of the best solutions to provide the house with hot water and not to depend on the city...