Sooner or later, many owners of private houses visit the desire to increase their area. This is achieved by completing the construction of additional premises. In its essence, the technology of such an extension is similar to the technology of the initial construction, but there are some nuances. For example, an extension to a wooden house should be coordinated with it in order for the building to be a single whole.

An extension to the house of wood is made to increase the area of housing.
Stages of the construction of an extension
So, all the work can be divided into several successive steps:
- construction of the foundation:
- construction of walls ;
- roof installation.
Of course, each of these steps can be divided into a number of separate steps, but it’s wrong to consider them separately.
It must be said that all legal issues should be settled in advance, as well as to decide on the extension material. You can choose the following:
- foam blocks;
- glued laminated timber;
- laminated timber and insulation panels (framed walls);
- wooden logs and so on .
As you can see, there is plenty to choose from. It should only be noted that it is better to attach the same wooden extension to the wooden house.
Foundation construction works
At present, there are three types of foundations that are known for their construction:

Foundation for wooden construction .
- tape;
- slab;
- columnar.
Each of these types has its advantages and disadvantages, as well as its scope. It is not worthwhile to study in detail all these subtleties now. It is necessary to note only one thing - the foundation should be of the same type as the foundation of the main structure.
As a rule, a wooden house has a tape-type base under itself, therefore we will consider the construction of just such a foundation.
This is done in several steps:
- marking;
- earthworks;
- installation of formwork;
- working with concrete ;
- backfilling.
So, first the terrain is mapped. With the help of pegs and rope, the lines of the walls and the corners are marked.
To make the markings as accurate as possible, using pegs and a rope, you should mark both the inside corners and lines of the walls, and the outside, while checking the correctness.
A It is very easy to check the correctness of the markup. If there is a ready plan, but it should be, then it is enough just to compare all the dimensions of the resulting walls with those on the drawings. It is possible in this case to resort to some rules of geometry: in the rectangle both diagonals are equal to each other. This means that if the extension to the wooden structure has a rectangular shape, then to check the evenness of the markup, it is sufficient to simply measure the diagonals.

Scheme of a non-buried column foundation.
Then they begin to dig a ditch according to the marking. For this, it is best to use special equipment. It often happens that there is no possibility of its use for any reason. In this case, you have to dig with a shovel.
As far as dimensions are concerned, for an extension to a wooden log house it will be enough just 30 cm of foundation tape. You can do a little more for a foam block.
It must be said that the fundamental parameter for choosing the width of the tape is the thickness of the future wall.
The tape depth must be selected according to the maximum soil freezing index. For the middle lane, this figure stops at 1.2 meters.
To save on the erection of the foundation with such indicators, its lower part should be filled with any construction debris: broken brick, slate, glass, rubble and so on.
So, digging a trench by marking, while trying to do so that the walls were smooth.
Then the first 20-30 cm of the trench is covered with sand. It should be compacted. You can do this by pouring a large amount of water.
After this work we fall asleep another 20-30 cm of rubble.

Strip footing scheme.
Next we set the formwork. It must be said that the formwork may not be at all. This also applies when the foundation is made of concrete.
If the formwork is not necessary, then the roofing material falls to the bottom of the trench, which covers the walls of the trench from the inside. At the same time, its edges reach the surface of the ground so that they can then cover the entire basement part.
After that, all construction waste is filled up. For its bonding using a liquid cement mortar. Prepare it in the following proportion:
- cement grade M500 - 1 part;
- sand - 3-4 parts;
- water.
The solution should resemble sour cream in its consistency.
With this solution all the garbage is spilled and left to dry for a week. Only after that proceed to the device of the drain part. It is made either from concrete or from prefabricated reinforced concrete blocks.
The proportions for making concrete are as follows:
- 1 part of cement;
- 3-4 parts of sand;
- 2-3 parts of gravel or crushed stone ;
- water.
Concrete is poured over the ground level.
After this, the foundation must dry to gain strength. This may take from 2 weeks to several months.
The best option, and the most correct one, will be when further work begins only a year later. During this time, the foundation is completely dry and shrink.
Works on the construction of walls

Outline wall construction scheme.
The second step in the construction of an extension can be considered the installation of walls. The first rows of masonry or the first crown are placed only on the waterproofing. As such material you can use roofing felt, roofing felt or any other.
As noted earlier, the extension of the wooden house is also best of wood. Perfect frame extension.
There is one peculiarity: the walls of the extension to the wooden house should be slightly lower than the walls of the house itself. How much lower is hard to say. You can only say one thing - this value should allow you to arrange a roof extension.
Another subtlety is the method of conjugation between two walls - an extension and the main structure.
It is best to use the elastic binding method. The bottom line is that a small gap is left between the old and the new walls, about 2-3 cm. After the construction is completed, this gap is filled with such material as polyurethane foam, vilaterm, etc.
You can resort to the hard method connections. In this case, the frame struts are simply nailed to the walls of the house.

Schematic of the attached roof.
From the bottom, they are attached to the beams of the bottom trim. Top fastened with beams upper trim. The distance between the risers should not exceed 60 cm by 3 m of their height. The smaller the height, the larger it is allowed to do this distance.
In addition to the lower and upper straps, the risers are additionally fastened with horizontal bridges. In addition, structural elements such as windows and doors must be completely framed with beams.
All frame elements are fastened with nails and additionally metal corners. The latter are fastened with wood screws.
Roof construction
The roof of the frame extension to the wooden house is made of the same beams. Rafters are attached with the help of corners and nails. Additionally, they are fastened with staples.
The first and main rule of a roof of an extension to a wooden house indicates that it should be located exactly under the eaves of the main building's roof. That is, the upper roof should smoothly pass into the lower one.
The rafters of the annexe wind up under the roof overhang. In this case, the roofing material should fit as closely as possible to its wall.
To exclude moisture from oblique rain, special abutting strips are used, which are made in the form of corners from tin. On one side they are attached to the wall of the house, and on the other side they are placed and fixed on the roof of the extension.
Required documentation
It all starts with obtaining permission from the department of architecture and urban planning. The following documents are necessary for this:
- To the land plot.
- At home.
- Architectural design and construction project.
- Application for a permit.
Naturally, you will need a passport and photocopies of some of its pages.
Search
Related Articles
How to calculate the cubic capacity of round wood on the basis of tables
The log trunk represents a certain volume of lumber, the unit of measurement of which is the cube. This parameter is used when erecting wooden houses to calculate the required volume of roundwood...
Do-it-yourself garage building - overview of work stages
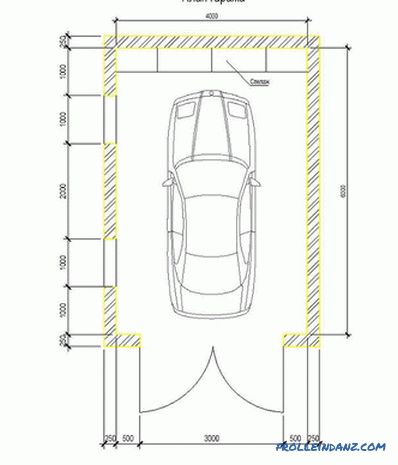
Before you start building your own home for a car, you will have to do a little but painstaking work. It is about designing and determining the optimal location for a future structure. Garage size...
How to connect plastic and metal pipes without welding

It will still not be possible to assemble the entire system of domestic plumbing and heating only from plastic pipes, no matter how much you want it to. Both heating radiators and heated towel rails...
How many lumber in a cube: the volume of timber (calculation table)
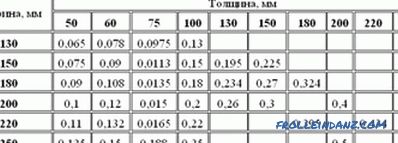
The volume of a unit of cut timber having standard dimensions is easily determined. Therefore, having a project at home, it is easy to calculate how much a bar (in pieces) will be required for the...
Live gazebo do it yourself (photo)
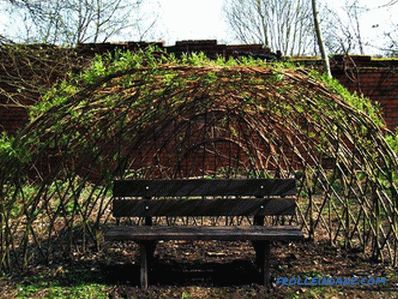
A lively gazebo can be a place for relaxation and a wonderful decoration of the exterior of landscape design. The construction of a live arbor is very different from capital construction. This is du...