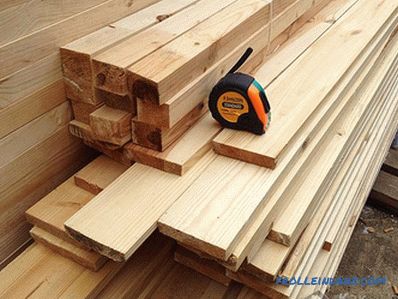
Every person wants his home to have exceptionally high-quality furniture, which also has a presentable appearance. For a long time there were only 3 options - an array, edged board and chipboard, but in the late 19th century, furniture made of shields began to spread widely.

For making a bed, it is better to use a furniture shield made from pine needles.
Basic data on the material
The methods of non-chemical pressing of the tree have existed for many centuries, but only at the beginning of the 20th century this procedure became so inexpensive that it came into use under the name of a furniture board. It is made of compressed boards and boards, and the tree can have any kind of wood.
Due to the high quality of the joint, you should not worry about durability and endurance, since this material is not much inferior to solid wood, but it is much more pliable in processing. Pricing depends on several factors at the same time, the dominant of which are the wood species and its thickness.
Usually, the work is carried out through three main tools - jigsaw, screwdriver and electric planer, while the list of additional tools depends solely on the circumstances.
After the manufacture of furniture is completed, it is necessary to additionally coat it with varnish or stain, so that there are no complications. The varnish dries for 36 hours, even if after 10 hours it no longer smells and does not stick, it does not cease to release harmful substances into the air.
Practical example of work
Tools and materials:

Scheme of manufacturing furniture panels.
- jigsaw;
- electric planers;
- screwdriver;
- level;
- tape measure;
- furniture panel;
- bar;
- self-tapping screws;
- steel corners.
Most often beds are made of furniture panels, but for a start it is better to perform the simplest option - the last one shown in fig. 1, 2, 3. All elements are visible, so you can start cutting:
- 2 identical plates 2100x1050 mm, but if you like, you can lower one of them to 550 mm;
- 2 plates of 2050x300 mm, which will serve as side shields;
- 3 beams 50x50 mm for a length of 2050 mm (they will serve as stiffening ribs).
At this stage, all the wood must be treated with an antiseptic, so that you can continue without fear for the terms of operation. It is desirable to choose an antiseptic agent at the same time against moisture and insects.
Two plates, which will be located at the head of the bed and at the foot, are set aside separately, since they have yet to work. To begin with, the side is selected, which will be on top, after which the corners are cut to the arc state. The remaining edges are rubbed with an electric planer to a rounded condition, so as not to be injured in future operation.
Use the mounting corners to mount the frame.
Legs are formed in the lower part, for which there is an indent of 20 cm from the edges, and then an arc is drawn through the center (maximum elevation in the central part is 5 cm), along which the cut is made by jigsaw. It is rarely possible to make a good cut, so you have to correct with an electric planer, and the edges are ground again.
Only now it is possible to connect 4 elements together. The side slats are located 10 cm above the floor surface, as otherwise cleaning under the bed will be a problem. For the joint, furniture screws (2 for each joint) are used, for which narrow holes are pre-drilled. If you do not make a hole, you can most likely split the wood. It is not necessary to make screeds with the help of bolts and nuts, since the furniture screw quite adequately copes with this task.
Now you need to provide stiffeners inside the case. For this, 2 beams (tsargs) are mounted in the central part of the side shields. They should be located not only strictly horizontally (this is measured by the level), but also ideally parallel to each other, because otherwise it will not work out to put the mattress normally. They are fixed with the help of the same furniture screws, but you need to carefully consider the depth of drilling, so as not to pass through the furniture shield through. To do this, use a depth gauge or drill in the right place wrapped with tape, which will limit the progress.
In the center, exactly between the tsargs, one more timber is fixed, which will provide the maximum reserve of rigidity. In this case, you will have to use galvanized screws for wood and steel corners, and the length is carefully chosen so as not to penetrate the furniture board through. Total fixation points 4 (2 on each side).
Shut down
To mount the support to the frame, use the support bracket and the locking tongue.
Tools and materials:
- tape measure;
- jigsaw;
- screwdrivers;
- bar;
- edged board;
- self-tapping screws;
- varnish and stain;
- flat brush.
At the very end, a pad is made. For this purpose, a 25x40 mm bar is laid along the perimeter, where oblique cuts are made from all the ends. The joints are made with ordinary screws, but the hat must be drowned in wood (the recesses are made with a chisel). At the end exactly one more block is laid in the center (above the stiffener).
After that, a cut board is laid across with a step of 10-12 cm and fixed. If you take a bigger step, then the mattress will fall into the resulting cracks, and with a smaller one, the rigidity will increase significantly. Each board is fixed on 2 screws, and the caps need to be drowned in wood again, otherwise they will tear the mattress during operation.
Now the whole structure is ready, after that it remains to cover it with varnish and stain, and then leave to dry. Places that are not visible, do not need to be coated with varnish, since there is no practical sense in this. And after the allotted 36 hours, you can begin operation.
Before you make furniture from a furniture board, you always need to acquire in advance all the necessary tools and materials that you may need, since interrupting activities, and then returning and a new attitude to work takes too much time.
Anyone with any patience and minimal skills in handling the tool will be able to make any furniture construction from shields with his own hands.
Didn't find the answer in the article? More information on the topic:
-

How to make a wooden floor on the ground?
Wooden floor on the ground: the device of the coating, the required materials and tools. Technical features of the work stages. The process of mounting your own hands.
Search
Related Articles
How to make a canopy in the bath
The most important attribute of any steam room is the so-called canopy, the comfort of which depends on the comfort of bath procedures (including their safety). A competent approach to the choice of...
House of timber with their own hands

Wood is one of the most environmentally friendly building materials, so the desire to have a wooden house is quite understandable. Buildings from timber are becoming popular today, so construction c...
How to glue wallpaper on drywall and properly prepare the surface + Video
Wallpapering is the most popular type of wall decoration. It is easy and quick to glue wallpapers, this process is relatively simple and does not require any special skills or high qualifications o...
How to install an acrylic bath with your own hands + photo, video
Sooner or later, but still there comes a time when the house needs to be overhauled. It is no secret that one of the most visited rooms is a bathroom. In this room there are a lot of plumbing items...
How to properly lay wooden floors: instructions
Today, wood remains one of the most popular building materials for arranging flooring. Wood is an excellent material for flooring. It is environmentally friendly, durable and beautiful....