As a rule, buying a door, you get it finished with hinges already. But if you purchased the structure in the analysis, then you have to embed them yourself. If you cut the hinges incorrectly and allow at least a slight bias, then this will lead to unnecessary consequences in operation: the door will not close tightly or the lock dog will not reach its place.
In order to carry out the replacement work correctly, you need to know in what sequence the door hinges should be installed with your own hands, later this will help you avoid problems in operation.
Choice of loops
 Brass hinges
Before you buy loops you need to decide which ones are right for your door, they are conditionally divided into three types.
- Brass. Such loops are widely used, because brass, thanks to its plasticity, is easily processed: chrome-plated or polished.
- Brass. As a rule, such loops are made of various alloys, and are coated with brass spraying, as well as other compounds that mimic the similarity: chrome, bronze or gold.
- Steel. These are the most reliable and high-quality loops, because unlike brass, the loops of which are grinded over time, steel loops are not subject to such a process, and therefore they can be considered as eternal.
 Steel door hinges
When choosing hinges, you need to take into account certain factors that depend the duration of their work.
First, the weight of the door. Usually, two hinges are enough for one door, but if the door is made of solid wood, then it is, accordingly, heavier, and therefore it is better to hit three loops.
Secondly, bearings in hinges. This design of the loop will not creak after prolonged use.
Secondly, depending on the side of the door opening, the hinges can be with left-side opening and vice versa.
What you need for self-installation
 We mark the door under the hinges
- Loops.
- Chisel and hammer.
- Screws and screwdriver.
- Pencil for marking.
- Wooden wedges.
- Level.
We make the markup and cut out the seating places
 The installation position of the loops
Correct installation of hinges should be indented 20 or 25 cm from the bottom and top of the door. But at the same time carefully inspect the surface so that there are no knots or chips in the places of the proposed installation. If you screw the screw in such a place, it can split the box or go against it, which will not allow to fix the loop qualitatively. If there are such places, the attachment should be moved a few centimeters up or down.
 Deepening under the hinges
First we do the marking with a pencil on the door. We put the loop in the place of the proposed fastening and circle them. Then we apply the chisel to the markup and gently knock with a hammer along the whole marking in order to cut the outline of the loop. After that, you need to make several cuts along the length and tamping with a chisel from the side to make a recess.
If you make the groove more than the thickness of the hinge, then when you close the door, the second half will rest against the box, which will later lead to the deformation and upholstery of the door.
 We fasten with screws
The same procedure should be done with the second seat. Then, attach the loop and fasten it with self-tapping screws. Everything, the door is ready, now it is necessary to cut loops into the box.
How to make a markup on the box
 Grooves for the hinges on the box
here you will be a little more difficult to schedule a place. To do this, install the door in the box and fix it with wedges in the intended place of closure. If a lock is embedded on the door, it will greatly facilitate the work, you can close it and adjust the door. We substitute the wedges under the bottom and with the help of the level bring it to the line.
It is necessary to adjust the door in the box both horizontally and vertically. If you put it in the wrong direction horizontally, then the door will be set back and it will be difficult to close. A wrongly installed door vertically will open independently.
After aligning all the corners, with a pencil, we make notes in the places where the hinges are in contact with the box. It will not be possible to completely mark out here, and therefore it is better to unscrew the hinges from the door again, outline their contour on the box and screw it into place.
After that, you need to cut out the grooves for them in the same way as you did on the door. The rules are the same - the main thing is not to overdo it with depth. When you have everything ready, we put the wedges under the bottom again, move the door to the box and fix it in place with self-tapping screws. Everything is ready to check it for the quality of opening and enjoy the result.
To prevent the door from cracking during the fastening with screws, you need to do it in places where the hole is screwed in with a thin drill.
Butterfly hinges

If you do not have the necessary tools or you do not have the skills of such works, then you can purchase butterfly loops. They belong to the class of "bezrezny" and can install them any. The principle of operation lies in the fact that in the closed state of the card (the side of the loop) are one to another. Due to this, such loops do not require tie-ins, and the gap in the closed position is small.
We recommend reading:
- installing a box of interior doors with your own hands;
- leveling the walls along the beacons with your own hands.
Video
Recommendations for hinges in interior doors. Some clever tips:
Search
Related Articles
How to calculate the cube of edged and unedged boards: technology
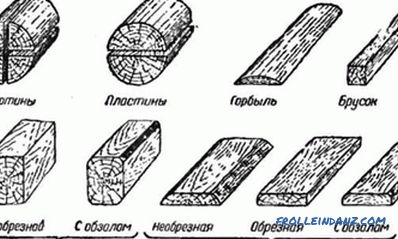
Any construction work begins with the drafting of the project and estimates, which involve the calculation of the amount of building material. The boards, the number of which must also be correctly...
Wall basement drainage - foundation with drainage system
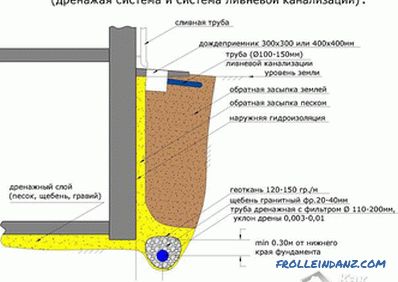
In order for a residential house in the private sector within the city or outside it not to be submerged, wall foundation drainage should be made. This construction allows you to limit the height of...
How to make a chaise lounge with hands with wood + drawings, photos, videos
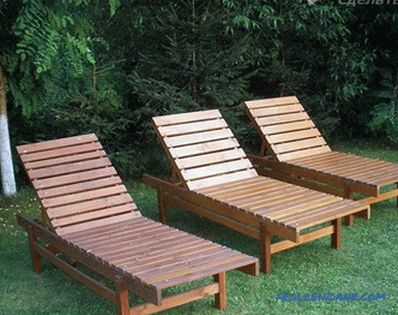
Sun loungers are comfortable, lightweight seats that often equip seating areas. They are set on the beaches and near the outdoor pools. To give this item may be part of the exterior. On it you can r...
How to clean the clog in the bathroom with their own hands
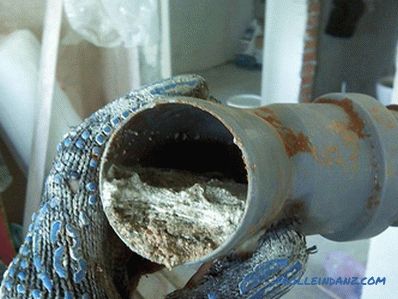
Usually, a person is not interested in the way sewage works, but this only lasts as long as it functions properly. Otherwise, you have to figure out why the trouble happened, how to clean the blocka...
How to choose a countertop for the kitchen
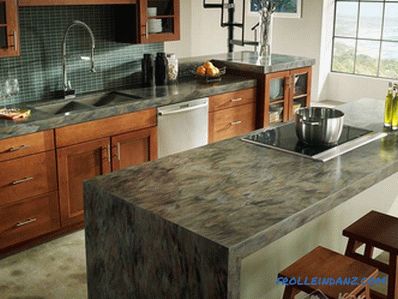
A kitchen is the most visited place in every home. It is here that tenants spend most of their time in the process of cooking and eating. So that the work does not bring inconvenience, and it was ea...