Depending on the model of the autonomous power supply and the layout of the input panel, the connection of the generator to the country house network may differ slightly in details. There are well-known differences between manual start and automatic, the nuances of connecting one and three-phase generators, but in general, with minimal skills in working with electrical circuits, everything will turn out to be done independently. Well, if you understand the principles of operation of the electromagnetic starter and the relay, then you can set up the autostart and the usual generator, which in another case would have to constantly start the key.

"Emergency" connection methods and their disadvantages
Usually, "fire" methods are used in cases where, for whatever reason, you cannot use the generator directly - it is required to include it in the home network urgently, and there is no time to mount a separate connection scheme.
A specialist from a simple philistine, among other things, is distinguished by knowing the causes of prohibitions - this is exactly what allows to get around them at the right moments: to do something not according to the rules, but to get the desired result. Only we must not forget the banality - electricity does not forgive mistakes, and therefore it is necessary to calculate their actions a few steps ahead in order to exclude all possible overlays.
Connecting through a socket
The most common of the "fire" methods of how to connect a generator to a house, is its banal plugging into the outlet, for which the "carrying" with plugs at the ends is bought or made by itself.

It is strongly discouraged to use this method, but its simplicity of use over and over again attracts many owners of low and medium power generators.
The principle of using such a connection becomes clear if you look at the standard home wiring diagram. Indeed, if a current source is connected to one of the sockets, the voltage will appear on all sections of the circuit.

1. Introductory automat. 2. Electricity meter. 3. Generator. 4. Switchgear. 5. Sockets.
There are not so many disadvantages to this method, but you should remember about them in order not to spoil the generator.
1. Wire overload .
At this point, attention can be ignored if a generator with a capacity of up to 3 kW is used. Socket lines are normally connected with a 2.5 mm² wire, and the sockets themselves are designed for a maximum amperage of 16 Amps. According to the table, the ratio of the cable cross-section to the strength of the current that they can skip, even aluminum wires (which are already forbidden to be installed) of this cross section can withstand power up to 3.5 kW.
| Cable cable section, mm 2 | Diameter of cable core, mm | Copper conductor | Aluminum core | ||||
|---|---|---|---|---|---|---|---|
| Current, А | Power, kW at a voltage of 220 V | Power, kW at a voltage of 380 V | Current, А | Power, kW at a voltage of 220 V | Power, kW at a voltage of 380 V | ||
| 1 | 1.12 | 14 | 3.0 | 5.3 | - | - | - |
| 1.5 | 1.38 | 15 | 3.3 | 5.7 | - | - | - |
| 2.0 | 1.59 | 19 | 4.1 | 7.2 | 14 | 3.0 | 5.3 |
| 2.5 | 1.78 | 21 | 4.6 | 7.9 | 16 | 3.5 | 6.0 |
| 4.0 | 2.26 | 2 7 | 5.9 | 10.0 | 21 | 4.6 | 7.9 |
| 6.0 | 2.76 | 34 | 7.7 | 12.0 | 26 | 5.7 | 9.8 |
| 10.0 | 3.57 | 50 | 11.0 | 19.0 | 38 | 8.3 | 14.0 |
| 16.0 | 4.51 | 80 | 17.0 | 30.0 | 55 | 12.0 | 20.0 |
| 25.0 | 5.64 | 100 | 22.0 | 38.0 | 65 | 14.0 | 24.0 |
| 35.0 | 6.68 | 135 | 29.0 | 51.0 | 75 | 16.0 | 28.0 |
By the formula for finding the power P = I * U, you can determine the maximum current delivered by the generator. If its power is 3 kW, and the voltage is 220 Volts, then I = 3000/220 ≈ 13.65 Amps, i.e., even a standard outlet should have enough safety margin (of course, if it is not outdated, even Soviet models, calculated maximum by 6.3 or 10 Amperes).
Another thing is more powerful generators - for them all the calculations must be carried out separately. True, they are usually connected permanently and the urgent need to “pop them up” through the socket can only arise in the event of a wiring malfunction. This is where you need to firmly know what is being broken and whether it can be done.
2. The human factor .
Before turning on the backup generator, it is imperative to turn off the input automats. If this is not done, at best, some of the power will simply go to the neighbors, and the generator will stall from overload. It will be worse if at the time of the attempt to start the generator the supply of electricity to the main line is resumed - this is guaranteed to burn the winding of the electric motor with counter currents.
If trouble is possible in principle, then sooner or later it will occur. Even if you attach a large plate on the generator case reminding you to turn off the input automat, then there is always the possibility of making a mess of something in a hurry.
3. Use of safety devices .
If the house is wired in accordance with the EI recommendations, then separate outlet lines, apart from standard circuit breakers, will be protected with the use of residual current devices (RCD). Besides the fact that they must be connected with the polarity, many of them are designed to turn on the current source to the upper terminals, and the load to the bottom.

1. Introductory automat. 2. Electricity meter. 3. Switchgear. 4. RCD. 5. Consumer machines.
Accordingly, when the generator is turned on, it will be necessary to keep track of where the phase is and zero, and the situation is quite likely when only neighboring sockets will work, and if you try to turn on the light at least, it will knock out the RCD. There is no point in correcting the scheme for the sake of several hours of operation of the generator, so the only way out here is to turn it on directly through the switchboard.
In addition to all existing disadvantages, the emergency connection of the generator to the network at home through an outlet does not imply the ability to track when electricity appears on the main line in order to switch back in time. This requires at least a separate warning light, but since the input automaton is turned off, it is not possible to use it.
Connecting the generator to the switchgear
This is the most correct way to quickly connect the generator, but with some nuances that must be taken into account.
The easiest way is to make such a connection if there is a socket next to the distribution machine - it is often installed in case of repair work or just for insurance. True, it is necessary to precisely imagine for yourself exactly how this socket is connected - the best option is shown in the diagram.

1. Introductory automat. 2. Electricity meter. 3. Generator. 4. Socket. 5. Switchgear.
In this case, everything rests only on the bandwidth of the outlet itself (16 Amps) and we must remember about turning off the input machine.
If such a socket is not foreseen when mounting the panel, you will have to open the wiring from the input of the switchgear and connect the generator to it directly
If there is a RCD further in the circuit, then you must observe the polarity.

1. Introductory automat. 2. Electricity meter. 3. Generator. 4. Switchgear.
The main thing here is not to confuse to which machine to connect. If suddenly there is access to an input automat in front of the counter, and a generator is connected to it, then the circuit as a whole will not change ... It will simply include an electricity metering device, which doesn't care what to consider - the current from the main line or generated by the generator.

1. Introductory automat. 2. Electricity meter. 3. Generator. 4. Switchgear.
However, the probability of such an error / connection is small, since the meter and the introductory automat are sealed by the inspectors from power control.
Since the wires from the trunk line are folded back, a control light can be connected to them - when it lights up, the generator can be turned off. The introductory machine must be left on.

1. Introductory automat. 2. Electricity meter. 3. Generator. 4. Switchgear.
Connecting the generator through a thumb switch
In essence, this is the same connection of the generator to the switchgear but already equipped with a stationary three-position switch so that you do not have to unscrew the wires from the terminals of the circuit breaker.
A three-position means a switch to which the current can come from two different branches, but the load is connected only to one of them. The third position is neutral to exclude the contact of incoming wires. Since the generator has its own zero, then the switch must be selected appropriate - to install a single-wire, through which only the phase switches, here it is impossible.

If there is no three-position switch on hand, then a two-position reversing device can be made of two two-pole machines. It is desirable to take them from the same manufacturer and nominal, so that the sizes coincide.Automatic machines should be installed side by side, but one of them should be turned upside down, and the keys should be fastened together - for this, manufacturers have holes for pins.

An electrician who understands an electrician can build such a device from four single-pole automata — do not turn them over and switch each one individually. But if someone besides him starts the generator, then it is better to take care of the “fool protection” right away.
The switch itself is installed near the generator. This is most convenient, since its start-up is performed in a certain order: first, the generator itself starts, and when it warms up, the load is connected to it.
In order for the generator not to work in vain, after switching on the electricity on the main line, it is necessary to reject the signal lamp and place it in a visible place. So that it does not shine all the time, then it must be connected through a switch. If there are concerns about forgetting to turn it on, you can add an automation element by connecting the lamp through any normally open contact of the starter. The whole wiring diagram of the generator through the rocker switch and with the signal lamp is as follows:

1. Introductory automat. 2. Electricity meter. 3. Generator. 4. Switchgear. 5. RCD.
As long as there is voltage on the trunk line, the whole circuit operates normally - the current passes through the switch and then goes to the switchgear. When the electricity disappears, it is necessary to manually start the generator and transfer the load from the house to it. When starting the generator through the coil of the KM starter, the current passes and its contacts close - the signal lamp turns on and when electricity appears on the main line, the light will light up.
The simplest autotransfer
In order to start up the generator every time you don’t have to use the switch, you can build a simplest autotransfer of the current source. This is not an autorun system - its purpose is only to perform input switching between the trunk line and the generator, and the engine must be started and stopped manually. The minimum required parts for this are two starters (contactor) - KM1 and KM2 with cross-connection. They will involve power contacts (KMK) and normally closed (KMnz). In order for the generator to have time to warm up, it is additionally desirable to use a time relay.
The figure shows such a scheme how to connect the generator to the network at home — it works according to the following principle:

1. Introductory automat. 2. Electricity meter. 3. Switchgear. 4. Generator. 5. Time Relay. 6. Main input contactor. 7. Backup input contactor.
While there is electricity on the trunk line, the coil KM1 keeps the power contacts KMk1 closed and the normally closed KM1nz1 and KM1nz2 open. When electricity is turned off, the KMK1 power contacts are opened, and KM1nz1 and KM1nz2 are closed - now when the generator starts, after the time the relay is designed, voltage will appear on the KM2 coil, KMk2 power contacts will close and the current will flow from the generator to the house.
When electricity appears on the main line, the KM1 coil is triggered - the KM1ns1 and KM1nz2 contacts open, de-energizing the KM2 coil. Power contacts KMK2 open, and KMK1 close and power to the house again goes from the trunk line. It remains only to remember to turn off the generator itself.
Autostart of the generator with your own hands
With certain skills in electrical engineering, you can independently assemble a circuit that can start the generator without human intervention when electricity is lost on the trunk line. The main condition is that a generator model is needed for this, which starts and stops with a key, since it is unrewarding to automate the starter that needs to be pulled over the cord.
In order to understand how an automatic start works, you need to be fully aware of the whole procedure that you need to do to turn on the generator:
1. After 1-2 minutes after the light disappears, open the engine air damper and start it. The time delay is needed in case the light just blinked or turned off for a few seconds.
2. After another 2 minutes, when the engine warms up, transfer the load from the main line to the generator, then close the choke.
3. When electricity appears on the main line after 30-60 seconds, turn off the engine and transfer the load from the generator to the trunk line
To implement this algorithm, you will need four time relays, four electromagnetic starters and magnetic pushers with limit switches, like servo drives that are used for car central locking.In the standard electromagnetic actuator there is a coil (KM), normally open power contacts (KMK), 2 normally open control contacts (KMnr1-2) and 2 normally closed control contacts (KMnz1-2).
In the figure, the general scheme of connecting a generator to a house with auto start is the principle of its operation as follows.

1. Introductory automat. 2. Electricity meter. 3. Generator. 4. Switchgear. 5, 6. RCD.
When the power is turned off, the KM4 coil stops holding the contacts KM4nz2 in the open state, which turns on the ignition of the generator. Also, the coil KM1 ceases to hold the contacts KMK1 - they are opened and now the line is disconnected from the home network. In parallel, normally closed contacts KM1nz1 and KM1nz2 are closed. They start the servo, which opens the air damper of the engine, and give an impulse to start Time Relay 1 - after a minute the key's contact closes and the starter starts the engine.
The start of the generator triggers the KM3 coil, which opens the normally closed contacts KM3nz1 and KM3nz2, which stops the starter and de-energizes Servo-1. Parallel closure of a normally-closed contact KM1nz2 sends a pulse to another time relay - Servo-2 starts up in two minutes, closing the air damper, and the KM2 coil activates, closing the KMk2 contacts, after which the current flows into the house from the generator.
To ensure the reverse switching, you first need 1-2 minutes after the appearance of electricity to open the circuit of the KM2 coil and stop the engine, for which Timer 3 and the KM4 starter are used, when activated, the normally closed KM4nz1 and KM4nz2. When the KM2 coil is disconnected, the normally closed contact KM2nz1 closes, which after two minutes, switches on the KM1 coil through Time Relay 4 - the generator is now de-energized and ready for the next start, and the power is supplied to the house from the trunk line.
This is only one of the possible options for automating the launch. For example, if you wish, you can simplify the circuit by removing time relays and air damper servos from it. True, this can be done only if the engine is well started, and in general all its components are well-established.
The main drawback of any such scheme is that it controls the generator's start-up, but it cannot respond to even a minor emergency situation. For example, if the air damper is stuck, the engine will run at elevated speed, and if the internal combustion engine malfunctions - if it does not start - at best, the battery will sit down.
Autostart of the generator through the ATS unit
The purpose of such devices is to partially or completely exclude human participation in the operation of the generator. There are two main types of such devices. The first one completely copies the autoswitch system, which runs on two starters, but with the addition of an electronic unit for starting and stopping the generator. From the main power supply line, a low-current cable is supplied to it, through which the unit receives information about the presence or absence of voltage in the network. Depending on this, he commands the engine to start or stop, and the switches between the input from the trunk line or from the generator are performed by the starters themselves. In general, this is the same system as the proposed scheme for self-assembly, but there is no need to invent anything here - just install the finished unit.
The disadvantage of this unit is the same - its purpose is only to start and stop the engine without additional protection.
The scheme itself looks like this:

1. Introductory automat. 2. Electricity meter. 3. Block automatic start generator. 4. Generator. 5. Time Relay. 6. RCD. 7. Main input contactor. 8. Backup input contactor.
A more advanced version is a complex system controlled by microprocessor electronics. In general, it works in the same way as an improvised autorun system, but its main advantage is the presence of numerous sensors that control all aspects of the generator. If any malfunction of the equipment occurs, then the ATS unit will be able to react adequately - not to torment the generator with autorun attempts, and if there is a GSM module, send the malfunction message to the owner.
The ATS unit itself is mounted instead of a switchboard - it does not require much knowledge - you just need to connect wires from the trunk line, power cable and control cable from the generator to the house.

1. Introductory automat. 2. Electricity meter. 3. AVR. 4. Generator. 5. Control cable. 6. Consumer machines. 7. Zero bus. 8. Ground bus.
Such a unit is a complex set of equipment and its cost in some cases may be equal to the price of the generator.Therefore, its acquisition is justified only in the case of frequent power outages and for sufficiently powerful generators.

Difference between one and three-phase connection
All connections that are single-phase, that three-phase networks are completely identical, except for the number of power wires. The only important nuance concerns the so-called control phase - if the starter is connected to the network, its main contacts are connected and disconnected from the network by the power wires, and the power for the electromagnetic coil must also be taken from somewhere.
There is no problem in a single-phase network - there is one phase and this question simply does not exist, but in a three-phase network everything is somewhat more complicated - there are L1, L2 and L3. Without going into technical details, the answer is one - one of the phases can be used for control circuits, but only one. That is, if the KM1 coil is powered from the L3 phase, then the control of the other starters, the “Start” and “Stop” buttons, too, need to be “suspended” only on it. This is not difficult to do - just note what color the wire is at the desired phase, and if you have a cable with monochrome conductors, then stick or draw on them markers.
Grounding
The principle of operation of the generator implies the appearance of static electricity on its case, therefore all stationary devices must necessarily have a separate ground loop.
The ideal option is to create a full-fledged ground loop, but in general, you can get by with the simplest method for which you need a metal rod, 1.5-2 meters long, a steel bolt or clamp connection and a soft copper wire. The bolt is welded to the iron rod, and the pin itself is hammered to its full length into the ground. Copper wire is screwed on one side to the bolt (or clamped with a clamp), and the other to the generator body - the ground is ready.
These are all basic ways of how to connect the gas generator to the network at home and possible nuances. The presented diagrams will help determine whether it is worthwhile to install startup systems or it will be easier to manage with manual switching. Of course, when installing each individual generator, automatic transfer switch or self-made startup system, additional questions may arise, but they will have to be solved in each case separately, depending on the device model and the home power supply circuit.
Search
Related Articles
How to make a gabion yourself
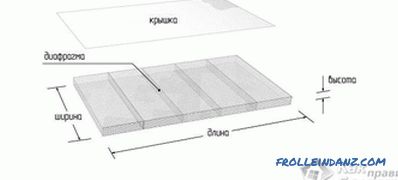
Recently, when creating a landscape design for the construction of walls of houses, fences and other purposes, gabions are installed, which are a metal frame in the form of a grid filled with stones...
installation of cladding panels do it yourself

Nowadays, decorative block-type lining boards are often used in construction during the finishing works. By its appearance it resembles a rounded log, this gives the house a colorful appearance. Ma...
Aerated concrete or foam concrete what is the difference

Before building a house, you need to decide what to build it from. It is the chosen material that determines how strong and comfortable the house will be. Good walls and heat will not give out to th...
How to raise an old log house: features of work

The foundation of the house may eventually become covered with cracks or even partially collapse, which makes it necessary to replace or repair it. The latter implies the strengthening of the basis...
preparatory stage and main works
Wooden house still remains one of the most popular options for country living. And this is not surprising, because it creates all the conditions that are so necessary in the life of every person:...