Arbor - one of the most necessary buildings in the country or in the courtyard near the house. This is the place where the whole family can gather at dinner. In the hot period of the day you can hide from the scorching sun, and the rain will not interfere with evening barbecues. A gazebo with a lean-to roof with their own hands may well be built.
Whether it is worth
In order to decide whether to build an arbor on its own, it is necessary to consider all the advantages of such a structure.
- ease of construction;
- low cash costs;
- freedom to choose material;
- ability to create a unique project;
- fast and cheap repair;
- advantage of the construction of a collapsible design.
Such a roof has almost no flaws. In addition, you can make the structure in such a way as to hide the main components of the structure for the winter.
Views and the form
 Open
Open
Nothing restricts what It is the form chosen for the future design. There are 3 main types:
- Open. The easiest to build. This option is great for spending time in good weather or in rain without wind. Otherwise, precipitation will blow with air.
- Half open. In this case, several sides of the gazebo have fences of a certain type, which partially prevent the entry of splashes and gusts of wind.
- Closed. In some respects they may resemble a summer kitchen. Such an option, for example, can be entirely assembled from a metal-plastic frame and double-glazed windows. It looks very impressive, and inside it is cozy in any weather.
 Semi-closed
Never try to lock yourself in standard square or rectangular shapes. There is no interference that part of the structure was made in a semicircle. There is an opportunity to build a triangular or hexagonal arbor. The main thing is to calculate everything correctly so that the structure is stable.
 Glazed arbor
Most often, for arbours, wood is chosen as the building material. And this is really justified, because it is easy to process, but requires proper care, in order to avoid cracking and cracking when exposed to weather conditions. Nothing prevents to apply a shaped metal pipe or lightweight frame profile. For semi-closed and closed options fit any kind of building blocks that can be purchased or made independently.
Preparation of the base
The following can be used as a basement for a gazebo:
- non-buried tape;
- columnar;
- slab.
Each of them has its own advantages and disadvantages. Also, some of them cannot be applied on mobile soils. We will consider the device of each with the nuances of installation. To complete the tasks, you will need the following tools:
- a concrete mixer or trough to prepare a mixture;
- shovel and bayonet spade;
- tape measure;
- twine;
- pick;
- construction level (laser level would be very useful);
- basis for formwork (edged board, plywood or other material);
- roofing material ;
- clean sand;
- cement;
- medium grained crushed stone.
An unburied strip foundation is a great option if you are planning to build a gazebo of regular geometric shape. With this option is very difficult, but it is possible to make a round base. To do this, you will have to suffer a little in order to bend the reinforcement.
 Layout of non-buried strip footing
- A place is chosen for the future structure. Well, when there is an opportunity to allocate it near a pond or other reservoir.
- All space is cleaned to the very ground, so that it is easier to work. If necessary, mow the grass and clean up the garbage.
- From the plan, the markup is transferred to the terrain. To do this, you can use twine or fishing line, which is tied to the pegs. To ease your task, you can pull two with a distance of the width of the foundation.
- Diagonals for equivalence are checked.
- A 20 cm wide base is enough for such a structure. A trench is dug to a depth of 50 cm.
- Sand bedding is being made. Its layer should be not less than 10 cm. With the help of a log with a cross handle, tamping is performed. At the same height, small gravel can be laid and it is also good to compact it.
- Formwork is made from the prepared material.
- Its height may be 20–30 cm above the surface. It is on this size that the future foundation will be poured.
- In addition, the trench walls can be closed with sheets of roofing material to reduce the amount of moisture entering the concrete.
- The reinforcement base is laid inside. You can make it out of glass-fiber reinforcement. It is of sufficient strength, and costs less than metal.In addition, you can deliver it in the trunk of your own car, because it is sold in bays.
- A solution is being prepared. Cement is better to take the brand M300 or M400, the ratio of sand and rubble will be 1: 3: 4. Water is typically used at half the amount of cement. But you need to look at a specific consistency.
- The mixture is poured into a trench and well compacted with a vibrator, as a last resort, you can use the tools at hand - trimming fittings, a shovel or wooden bars.
- With the help of a trowel and a rule, approximately the same plane is displayed, which will greatly simplify further construction.
- In a week the formwork can be dismantled. Further work continues at least after 2 weeks, and preferably after 1 month, when the foundation has gained its full strength.
- In hot weather, concrete should not be allowed to dry. It is better to cover it with a film or roofing felt, and also periodically water it.
 Non-buried tape
The bar foundation is much more economical in erection, and also delivers less trouble when performing work.
- The markup is done in the same way as in the previous case.
- A hole is dug through every meter to the depth of soil freezing. Its dimensions should be such that a formwork with a size of 30 * 30 cm can be easily installed inside. An asbestos pipe with a diameter of 25 cm can be used as a formwork. In this case, excavation can be carried out using a hand drill.
- The solution is prepared in the same ratios as in the previous case.
- At the bottom, sand is laid in a layer of 15‒20 cm and rammed.
- If you are mounting a formwork made of wood, then it must be well fixed so that it does not move. On the inside of the walls fit ruberoid. The solution is poured in, it is well rammed, and several bars of rebar are immersed in it.
- In the case when an asbestos pipe is used, the well is wrapped with roofing felt. Inside the sleeve is immersed. The solution is poured in, the nozzle is slightly raised and lowered again so that part of the mixture goes outside and ends up around the walls. A few bars of reinforcement are inserted inside. The space around the pipe is rammed with rubble or sand.
- The standing time is the same as in the previous version.
 Columnar for gazebos
In order to maximally facilitate further installation, then In the still fresh solution, you can lay two metal plates with a distance between them for the width of the beam that will be stacked. Then it will be much easier to fix.
 The slab foundation
A slab foundation will also be a good solution. It can also serve as a floor at the same time, so no additional laying of the flooring is required.
- According to the size of the future gazebo, a foundation pit is dug. Its depth should be about 30 cm.
- The same bedding is made at the bottom as in the two previous cases.
- If it is not possible to use reinforcement to stiffen, then you can use a construction booth or natural stone. It is laid out in the same layer and is also well rammed.
- The formwork is set along the edge. The height above the ground can be 10 cm.
- The solution is prepared and poured into the middle.
- The alignment is performed using the rule.
- At this stage, you can try to keep a small slope of 1‒2 cm. It will be needed so that the falling precipitations can flow freely.
 Layout of the slab foundation
Basic construction
If the main material wood was chosen, then you need a timber of 10 * 10 cm or 15 * 15 cm, edged board 5 * 15 cm or 5 * 10 cm.
 Frame assembly
- If a belt or columnar was used as a foundation, then it is necessary to install a grillage or a wooden base on it. To do this, pieces of timber are made, the size of which is equal to the length of the walls.
- Waterproofing of ruberoid is laid on concrete. It will prevent moisture from getting wet and the wood getting wet.
- The board is attached to the foundation with pre-laid plates or anchor bolts.
- In order for the logs to be a monolithic skeleton, they must be joined together by a spike joint or a half-size gash. Before final fixation, diagonals are checked again.
- Additionally, it is desirable to install another transverse element in the middle, then you can be sure that the floor will not sag.
- Side racks are installed from the same material. You can fix them with metal corners. Also in the end you can make a spike, and in the base there is a notch for it. It is important to remember that one pair of racks must be made 15‒20 cm more than the other. This is necessary for the further installation of the shed roof.
- With a trim board, the top trim is made. To do this, from the outside and inside is nailed along one bar to fix the entire structure well.
- If necessary, you can install slanting supports at the top and bottom. They are made of scraps of the same board that was used for strapping.
- Additionally, vertical pillars are mounted that will create stiffness.
- The next step is to mount the rafter beams. To do this, simply cut out the number of parts that is needed to accommodate them in increments of 40-50 cm. Their length should be 30-40 cm larger than the size of the whole building. If necessary, the flight can be made large so that the water flows further from the gazebo.
- You can use any material you like for roofing. If you do not want to use roofing materials, then the area around you can be planted with ivy or wild grapes, which over time will braid the entire structure.
 Fixing rafters
There is no need for a grillage for slab foundations. Racks in this case are attached to the posts, which are made as described for the foundation of asbestos pipes.
Refinement
First of all, a good floor is laid. It can be made of edged boards, which fits tightly and is nailed to wooden beams. Next, the floor is thoroughly polished using an eccentric or belt typewriter. To make it last longer, it is covered with an antiseptic, yacht or other varnish resistant to the effects. They can cover the entire structure. If you want to give a shade that will better fit the structure to the exterior, you can use the stains. Ceramic tile is laid on the concrete base. It is desirable that it be matte and grooved. So there will be less chance of injury, because it does not slip.
A table and chairs are placed inside. You can make stationary benches and countertops. There is another option - to mount the sun loungers and reclining dinner. Additionally installed grill or stove, which will allow to cook meals in the fresh air.
Several side edges can be covered with a decorative wooden lattice. Another solution would be the use of facing bricks. They can be laid to a certain level, and the rest of the space left open, insert double-glazed windows or use the previous version.
Video
An example of building a single-roof gazebo in the following video:
Schemes
 Drawing of a single-shed gazebo
 Foundation and frame drawing
 Arbor dimensions and drawing
Photos
 Simple and original
 Interesting design
 Large gazebo with a lean-to roof and a canopy
 Wooden arbor
 A simple arbor
 With a shed roof of polycarbonate
 With a barbecue
 A large open arbor
 With two single-sided roofs
See also:
- How to build a gazebo from polycarbonate
- Construction of a live arbor
- Roof covering for a gazebo
- How to make a gazebo from metal
Search
Related Articles
The design of the roof truss system and its installation (video)
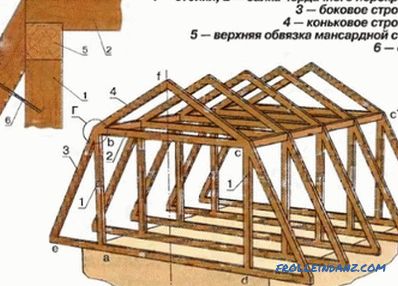
The roof structure of any house must be extremely reliable and durable, otherwise the entire building will be endangered. That is why experts recommend to pay close attention to the roof truss syst...
Do-it-yourself wooden bathhouse: how to build?

A bathhouse on a household or dacha plot is a place not only for hygienic procedures, but also for rest after working days. A visit to a well-heated bathhouse will raise your spirits and help relie...
How to cut a tabletop under the sink

To install the sink in the countertop, you need to spend a lot of time and labor. But if you properly cut a hole in the furniture unit and make installation, washing dishes will not seem such a burd...
How to wash whitewash from the ceiling quickly and without dirt
The variety of surface finish of the ceiling that can be observed today was not always the case. At one time whitewashing was one of the main options. One can argue about the pros and cons of this a...
Rating of shower cabins by quality - the best open, closed and combined
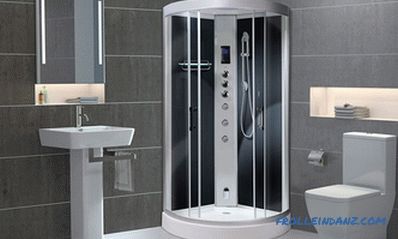
Any shower cubicle to some extent is built-in equipment that does not imply easy and quick replacement. Therefore, an error in choosing the right type of device at best means that, until the next re...