Before some wooden houses I want to stop to admire their beauty. There is a desire to have such a home. But not everyone knows that such beauty can be created by hand with the help of excellent material - the house block. These are specially processed boards that resemble a wooden beam or a round log from the side. The walls are covered with this material both outside and inside the building.
")
Block house device diagram.
Distribution of material by grades
Several grades of this finishing material are on sale:
- Extra grade;
- Grade A;
- Grade B;
- Grade C.
Extra grade is a material that does not have mechanical damage. There are no knots and cracks on the panels. Pitch pockets and wormhole traces should also not be.
Grade A material may have no more than 2 knots up to 3 mm in size on each meter of the board. Cracks and other damage is not allowed.
Grade B material allows for a single chip on the inside of the board 2 meters in length.
Variety C may have knots with a diameter of up to 30 mm, cracks and resin pockets.
What is needed for work?
")
Tools for mounting a block house.
For facing the house with a block house you need to prepare:
- wooden blocks;
- self-tapping screws;
- fishing line;
- level;
- material for thermal protection;
- vapor barrier film;
- moisture insulation film;
- construction stapler;
- dowels for fixing plates insulation;
- block house;
- impregnating compounds;
- fasteners for house block;
- hacksaw;
- jigsaw;
- hammer;
- screwdriver;
- scotch;
- electric drill.
Work execution stages
Mounting the house block resembles work using clapboard. It should be remembered that the boards of the block house are wide and narrow, thin and thick. Thick and wide boards choose to trim the house outside. Inside it is customary to use narrow and thin materials. All work is carried out in several stages:
- wall preparation for finishing;
- selection of suitable methods of fastening;
- design of corners.
")
Methods of securing the block house.
Stage 1. In order to prepare the walls, you need to decide how to install the house block boards. The most commonly used horizontal arrangement of the material. To do this, you need to mount the crate, perform hydroprotection and thermal protection of the walls. The surfaces of the walls need to be cleaned, plastered uneven, treated with antiseptic compounds. This applies especially to wooden walls. They need to caulk the gap, seal the crowns with tow or jute.
The vapor barrier film is fixed on the wall surface. The sheets are stacked on each other with an overlap of 10-15 cm. The joints are fixed with adhesive tape. Work begins from below.
After fixing the film, proceed to the installation of the batten. For its manufacture requires dry bars, treated with refractory and antiseptic preparations. The thickness of the bars may be different. It should be equal to the thickness of the material insulation. Wooden parts of the batten are installed in a vertical position. The distance between them should be 1-2 cm less than the width of the insulation. In this case, the insulation, which is usually used as a plate of mineral wool, tightly and without gaps will enter between the racks of the batten.
First, set the extreme pillars strictly level. Between them they stretch the line from below and above, which will serve as a guide for the installation of the following elements. Bars are attached to the wall with screws.
Insulation plates are laid between the bars. There should be no gaps between them. Additionally, they can be fixed with special dowels with large caps. A moisture-proof film is laid over the layer of insulation. It is attached to the crate with a stapler.
")
Blockhouse wiring diagram.
From the top of the moisture protection film to the already installed bars, you need to attach an additional crate with self-tapping screws for attaching the house block to the boards and to create an air gap for ventilation of the wall. For the construction of this lathing, bars of 5x5 cm are used.
Stage 2. The block house is better to choose from pine and larch for facing the house from the outside. Its optimum width is 10–20 cm, length is 4–6 m. The material must be acclimated for several days in order to acquire moisture that is appropriate for the environment. If you plan to paint the facade, then the spikes and grooves of the boards need to paint over to install them. Boards can be treated with antiseptic.
A block house can be attached to the wall in several ways. When any of them board is spike up. This protects the material from water ingress into the groove. Fastening can be carried out with nails, screws, clamps.Fastening with nails is the cheapest, but also the most short-lived way. If nails are used, their caps need to be dug into the wood with the help of an adhesives.
Self-tapping screws are usually used for exterior decoration. For self-tapping screws, it is recommended to pre-drill the holes so as not to split the board. The cap of the screw is masked with a wooden cork or the next board.
Clamp is a special mounting device in the form of a bracket. It is attached to the crate with screws. Board house block groove is inserted into this bracket. This mount is very reliable and durable. From the side it is almost not visible.
")
Classification of a wooden block house.
For high-quality installation, it is recommended to choose fasteners anodized or galvanized. The cost of installation in this situation will increase slightly, but the quality of work will also increase. No corrosion will appear in the attachment points. The length of the screws should be approximately twice the thickness of the boards block house. It is possible to begin work both from below, and from above the wall. Between boards it is recommended to leave a gap of 1-3 mm. It is needed to compensate for seasonal expansion of the material during temperature fluctuations. The next board is inserted into the spike of the previous groove and is attached to the crate.
Stage 3. The joints in the corners are made in different ways. You can do washed down boards at an angle of 45 °. To do this immediately is not always possible. You can arrange the corner with a special corner. It is internal and external. As a special corner often use sufficient width of the board and slats. The walls of the house trimmed with a block house can be primed for a more presentable look, then varnished. After the varnish layer has dried, the walls are sanded and varnished or painted again. Varnish coverage needs to be updated periodically.
In this way, you can decorate houses from bricks and various blocks, giving them the appearance of a wooden structure. All work on the preparation and installation of cladding performed independently. It does not need the skills of a carpenter or carpenter, enough desire and ability to handle simple tools.
In the building materials market one can find a block house made of metal and vinyl. Another name for this finishing material is siding. Outwardly, it is very similar to wooden products. The crate for fixing this material can be made from wooden bars as well as from galvanized metal guide profiles, which are used when working with plasterboard. For the design of joints along the length of the material and the corners, special panels are used, which are sold together with the panels of the house block.
A few useful tips
")
Thermal insulation scheme under block-house.
- When choosing a house block, you cannot save money. Quality material will last for decades without changing the appearance.
- Observance of special rules when working with the tool is not required, but it is recommended to work in gloves.
- Before performing the internal installation of cladding, thoroughly ventilate the room.
- 4 For the interior decoration, it is recommended to use a house block with a thickness of 20-25 mm, for the outside - 40-45 mm.
- The corners can be decorated with plastic corners of a suitable color shade.
- The laying of the indoor house block should be carried out in a warm room in dry weather. You can not lay a layer of insulation, if it is mounted on the outside of the wall.
- It is recommended to cover brick and block walls with a layer of plaster before lining.
- On flat walls, you can mount a sheathing of plastic elements. They are stronger than metal ones; they are easier to assemble than wooden blocks.
- The trimmed surface of the wall should be primed and varnished. After drying, sand with sandpaper to remove raised wooden villi. After that, paint or varnish again.
- When choosing a material, you should pay attention to the ends of the products. The denser the annual rings, the higher the quality of the material.
- It is recommended to choose clamps with tongue height not less than 6 mm.
- As a waterproofing material, you can use a special aluminum foil, which has an adhesive effect.
- The “Isobond B” film performs well the vapor barrier functions. It is two-layer, effectively protects the walls from condensation, the appearance of fungus and traces of corrosion.
- It is strictly forbidden to perform the insulation of extruded polystyrene foam. It is unsafe for health.
- It is recommended to repeat the treatment of wall cladding with antiseptics every 4-5 years. This can be done with the help of tinting compositions "Tikkurila", "Texturol", "Neomid".
The block house is an excellent finishing material of the new generation.
It is made from high-quality wood, has a long service life, great strength and reliability.Its installation can be carried out on wooden, brick, concrete walls. Work does not require a special tool. We need only high-quality material and not less high-quality fasteners. Everything else is quite possible to do it yourself.
Didn't find the answer in the article? More information on the topic:
Search
Related Articles
How to start repairs in the bathroom
The bathroom is one of the special rooms in your apartment, and its repair should be treated with special attention. After all, it is here in large quantities and often pours water, in this room the...
DIY landscape design (+ photos)
Landscape design is a series of activities aimed at improving the territory. Using natural ingredients, you make changes to the appearance of the site, thereby creating a unique cozy atmosphere. To...
Screen for the room do it yourself
To add an original and functional decor to a room, it is not always necessary to immediately buy expensive items. To date, there are many options and ideas that can be implemented from scrap materia...
How to lay a wooden floor: the rules, the choice of materials
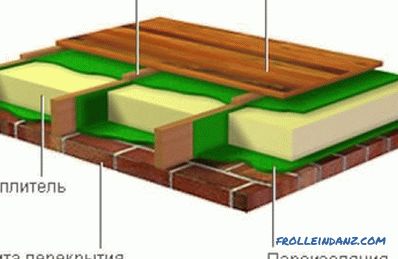
Every homeowner who built a house with his own hands faced a flooring problem. Many have yet to meet with this issue. How to lay a wooden floor in the house, what to look for when doing this work?...